Ana içeriğe geç
Dell Latitude E6510 Fan Replacement

Dell Latitude E6510 Fan Replacement

Tromaine Lee Cobbs

Tromaine Lee Cobbs ve 3 diğer katkıda bulunanlar

En son August 8, 2019 tarihinde güncellendi

3 dakika
Orta

The cooling fan may need to be replaced if the laptop is over heating. Sometimes the fan just may need to be clean, so be sure to clean the cooling fan before buying a new one.

Neye ihtiyacın var

  1. Dell Latitude E6510 Fan Replacement, Fan: adım 1, 3 resimden 1. Dell Latitude E6510 Fan Replacement, Fan: adım 1, 3 resimden 2. Dell Latitude E6510 Fan Replacement, Fan: adım 1, 3 resimden 3.
    • Remove the battery.

    • Remove the five strews that are holding the back cover down.

    • Firmly grasp the laptop and slide the cover to the front, then lift.

  2. Dell Latitude E6510 Fan Replacement: adım 2, 3 resimden 1. Dell Latitude E6510 Fan Replacement: adım 2, 3 resimden 2. Dell Latitude E6510 Fan Replacement: adım 2, 3 resimden 3.
    • Unscrew the 7 gray screws.

    • They will not disconnect from the gray plates.

    • Remove the 2 black screws that hold the fan in place.

  3. Dell Latitude E6510 Fan Replacement: adım 3, 1 resimden 1.
    • Wiggle the fan in the direction of the arrows until the end of the fan comes out.

  4. Dell Latitude E6510 Fan Replacement: adım 4, 1 resimden 1.
    • Pick up and pull the heat sink out in the direction of the arrow.

  5. Dell Latitude E6510 Fan Replacement: adım 5, 2 resimden 1. Dell Latitude E6510 Fan Replacement: adım 5, 2 resimden 2.
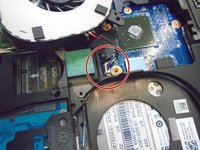
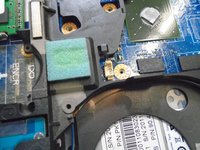
    • Firmly grasp the fan cord close to the plug, and pull straight up.

Sonuç

To reassemble your device, follow these instructions in reverse order.

2 farklı kişi bu kılavuzu tamamladı.

0Kılavuz Yorumları

Yorum Ekle

İstatistikleri Görüntüle:

Son 24 Saat: 0

Son 7 gün: 1

Son 30 gün: 5

Her zaman: 1,856