
Fitbit Alta Battery Replacement

Giriş
1. adıma gitThis guide will help you replace a Fitbit Alta battery. If you have let your Fitbit die for long period of time, have not been following proper charging practices, or have owned your Fitbit for multiple years, the battery may be at the end of its life. In this case, the battery may not turn on, hold a long charge, or stay on when unplugged.
This process involves exposing the internal components of the Fitbit, desoldering and disconnecting the old battery, and soldering in a new battery.
Caution: Fitbit can become dysfunctional if soldering is done incorrectly, and will not work if the wires are attached to the wrong ends or if the motherboard is exposed to excessive, prolonged heat.
The process will require a T2 Torx Screwdriver, tweezers, razor blade, soldering iron, and solder.
Neye ihtiyacın var


-
Bu adımda kullanılan alet:Tweezers$4.99
-
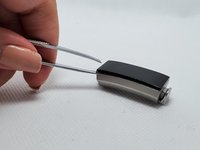
At one of the corners, push the tweezers in between the metal casing and screen cover. Use the tweezers to wedge the two pieces apart. Repeat on all four corners.
-
Once the screen is removed, the Fitbit should look like the third image.
-
-
-
Once the motherboard is lifted, you will use the tweezers to detach the old battery (located in the bottom left) from the casing. Note that the clear yellow section is a part of the battery.
-
Once the battery is removed, lift the motherboard and attached components completely out of the casing.
-
-
-
A soldering iron must be used to melt the solder connecting the battery to the motherboard.
-
Cut the wires of the new battery to an appropriate length and strip the ends of the wire casing with the razor to expose the wire.
-
Solder the new battery to the motherboard.
If after replacing the battery the Fitbit still doesn’t work (except when connected to the charging cable) check the supply fuse (markedF1) just below the red square in the above picture next to to the red battery lead pcb connection. The fuse may have blown when your old battery went short circuit.
I temporarily jumpered it out after replacing the battery and the Fitbit now works :-)
Unfortunately I have no information as to the current rating of this fuse?
If you know please add this info for me and others to benefit :-)
You don’t need to add more solder. Just break the old connections right at the solder joint and melt the solder slightly. Then slide the new wire into the melted solder and let it harden. Voila!!
I replaced the battery on my Alta, only to discover it would only work while plugged in, but not when unplugged. My Alta worked fine before the new battery, but would only last a day or two days. I read Dave Bullock’s comment above. I had nothing else to lose with my tiny paper weight, so i placed a tiny drop of solder across F1 (the same side as the battery terminals). Nothing came to life right away. I put it all back together, plugged it in, unplugged and and Bingo! It worked!…. Thank you DAVE! I agree shorting fuses is not the best practice… but I figure this is 4.25 volts device and I am now enjoying the device again. I would replace the fuse if I could … but this thing in TINY.
I really tried hard to not touch the battery wires to the board or case. I felt I succeeded, but with a blown fuse… I must have failed. Be careful to not let those wires touch anything.
-
-
-
Plug your Fitbit into its charger to turn it back on and charge up the new battery, if needed.
Batteria per FIT BIT ALTA: ——> https://www.ebay.it/itm/264400818629
FANTASTICO! ho acquistato la batteria su ebay e il Kit completo con il micro saldatore + multimetro Digitale il tutto a pochissimi euro! e son riuscita DA SOLA ad aggiustare il mio Fitbit! MERITO DI BENJAMIN E DEI SUOI COLLABORATORI :)))) complimenti per le precisissime spiegazioni.
ps: sono anche fiera di me! GRAZIE MILLE per avermi dato questa gioia e soddisfazione…sperando che la batteria duri un bel po eh eh!
-


Your Fitbit should now hold a charge.
Your Fitbit should now hold a charge.
İptal et: Bu kılavuzu tamamlamadım.
30 farklı kişi bu kılavuzu tamamladı.

Ekip

Embry-Riddle Aeronautical University, Team S4-G8, Ives Fall 2019 Embry-Riddle Aeronautical University, Team S4-G8, Ives Fall 2019 üyesi
ERAU-IVES-F19S4G8
3 Üyeler
5 adet Kılavuz yazıldı
16 Yorum
How about screen replacement? Is there a replacement part for that?
Hi, Tom.
I haven’t seen anything about replacement screens online. To the best of my knowledge, Fitbit doesn’t offer replacement parts for any of their devices.
My Fitbit Alta HR has no center screw. The battery connects from the end of the mother board and there are two very small screws on the other end. It is virtually impossible to solder the new battery in without shorting to the two hold down clamps. Virtually Junk…
Maybe try getting a few really small pieces of electrical tape to cover the clamps?
Keith,
Your Fitbit may be an Alta HR, rather than an Alta. I have the same situation you do. The PCB in the HR is different, and in the center has a very small flat-flex cable to the HR sensor below. If you are very careful, you can fold back a small piece of tape holding the flex flex in place (look closely, it is very hard to see), and then you can gently disconnect the HR sensor. The connector lifts straight up, perpendicular to the surface of the PCB. After you have disconnected, you can remove the two screws and slide out the screen, PCB, and battery assembly as a single unit. The HR sensor will remain behind in the case. I would recommend using a plastic tweezers for this process rather than metal, as if the PCB is powered you could damage it in the process.
I took some photos, but I don’t believe I can post them here.
jmmull,
Thank you for describing the differences between Alta vs Alta HR. The main guide was helpful with pictures. I was able to spot the differences with your detailed description. I successfully completed the battery swap for Alta HR. I found a heat gun very handy for removing the screen cover and prying the LCD screen. Note that the solder points for the battery are next to the hooks on the frame where you hook the PCB into for installation.
ganbare6 -
A bit more tedious than expected, smallest device I have ever worked on, but the toolkit I purchased from Amazon was perfect. Instructions were 95% accurate as it pertained to the inner workings, mine had two screws at the end of the motherboard holding it in, instead of a single one in the middle. But the written instructions were clear enough to help me adjust. Great Job!
Amazon says the battery is only compatible with the Alta not the HR. My HR battery says 46 mAh and the battery on Amazon is 36 mAh. Has anyone actually used the Alta 36 mAh in the HR?
Thanks!
hi guys i accidentally disconnected the little ribbon cable connected to the screen
i tried to re-connect it but i failed
can you please give me some tips on how to re-connect it correctly?
Regards
This may be late, but hopefully useful for others. The connector is the ZIF type where the black bar on the socket needs to be flipped up (use a 2mm flathead screwdriver or similar tool to flip it). There was also a small foam pad and black tape on the ribbon cable itself, I had to remove this from the cable because it was interfering with reinsertion. Be careful when removing the tape not to tear the ribbon. Once removed, the adhesive was not reusable for me, but seems to function fine without it. With the socket opened, you can get the cable lined up and just barely put in holding the device in one hand, and the screen in the other. To get it firmly seated, I flipped the screen over the circuit board like it would normally go which created the normal “bend” in the cable. I then used closed tweezers to gently push the bend toward the circuit board to effectively push the connector all the way in. I’ve used this method about 4 times already, and it works every time.
I replaced the battery on my Alta, only to discover it would only work while plugged in, but not when unplugged. My Alta worked fine before the new battery, but would only last a day or two days. I read Dave Bullock’s comment above. I had nothing else to lose with my tiny paper weight, so i placed a tiny drop of solder across F1 (the same side as the battery terminals). Nothing came to life right away. I put it all back together, plugged it in, unplugged and and Bingo! It worked!…. Thank you DAVE! I agree shorting fuses is not the best practice… but I figure this is 4.25 volts device and I am now enjoying the device again. I would replace the fuse if I could … but this thing is TINY.
I really tried hard to not touch the battery wires to the board or case. I felt I succeeded, but with a blown fuse… I must have failed. Be careful to not let those wires touch anything.
my fitbit alta is not working properly after unplug timing is not display in screen
what can i do pls help me… sukhpreetwithsevenseas@gmail.com Kindly revert me in this email id
For Alta HR owners:
Hi, i’ve successfully repaired my Alta HR with this tutorial, even if it is actually intended for a normal Fitbit Alta.
The procedure is the same excepted the order of the steps 3 to 6.
At step 3, before unscrewing the 2x torx 2 screws, (Alta HR has 2 screws instead of one) let them in place.
1/ Unsold the 2 contacts with the red and black wire.
Otherwise you gonna get blocked for pulling the battery out because of the sensor ribbon connected in the middle of the MB.
2/ Unscrew the torx screws
3/ Replace the battery (only 7€ for me in 2021)
4/ Screw the two screws back to the MB.
5/ Resold the contacts and the wires: black on -, red on + (basically step 6)
Follow step 7.
IMO it’s easier to do it this way for the Alta HR because of this new ribbon. But the whole procedure is basically the same.
Hi Tangogow,
I want to replace the battery in an Alta HR.
Bought two batteries:
Aliexpress: 45mah Ersatz batterie für Fitbit alta hr WL-FBT07 2-Draht
Amazon: Ersatz für Fitbit FB407 für Smartwatch Uhr Fitnessarmband (45mAh, 3,7V, Li-Polymer)
Seems both are the same and for Alta, not Alta HR.
Need information about type of battery and where to buy. Can you or someone else help to get the nessesary information or send me a link where to buy?
HoRu -
My versa 2 Fitbit stopped charging whenever I am trying to switch it on only battery icon appears in middle of screen and then disappear any suggestions
Io per togliere lo schermo ho usato la punta del taglierino facendo attenzione a non scalfirlo, seguendo con la lama tutt’intorno perché la cornice sotto è incollata.
Claudia Spatafora - Yanıt