Giriş
If the buttons on your GameSir Nova 2 Lite controller are sticking, unresponsive, or not registering inputs, this guide will show you how to replace them. Over time, dust buildup, moisture exposure, or normal wear can cause button failure. Before replacing the buttons, check out this troubleshooting guide to make sure the issue isn’t software or firmware-related.
Before you begin, power off the controller and disconnect it from any device or charger.
Neye ihtiyacın var
-
-
Use a Phillips #0 screwdriver to remove the four 8.5 mm screws from the bottom of the controller's casing.
 FixBot'a Sor
-
-
-
Insert an opening tool between the two halves to open the controller's casing.
-
Disconnect them by sliding the opening tool along the seam in the casing, applying continuous pressure.
-
Once you find a connector, apply increased pressure until you hear a snapping sound.
-
Repeat this process until all of the connectors are disconnected.
-
Separate the top and bottom of the controller case.
-
-
-
Set aside the bottom half of the shell.
-
Position the controller so that the motherboard is visible.
-
Use the point of a spudger to push on alternating sides of the battery connector to "walk" it out of its socket.
-
-
-
-
Use a spudger to loosen the tape securing the battery.
-
Remove the battery from the controller.
-
-
-
Push on alternating sides of the JST connector to release it from the socket on the circuit board.
-
If that doesn't work, use a pair of tweezers to firmly grip the sides of the connector and pull straight away from the socket. Hold the tweezers closer to the connector to get a better grip.
-
-
-
Pull the motor out of its socket.
-
Repeat the steps for the other rumble motor.
-
-
-
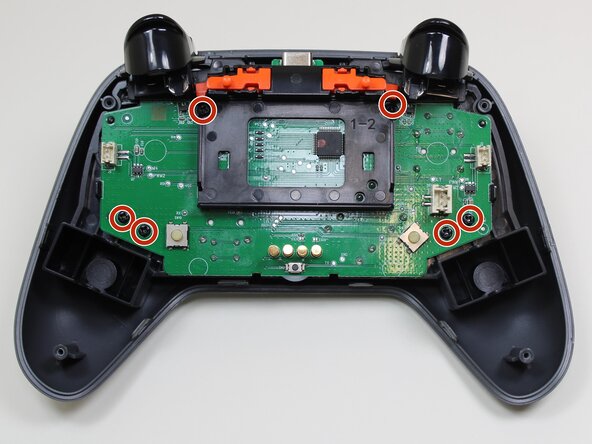
Use a Phillips #0 screwdriver to remove the six 5.7 mm screws securing the motherboard.
-
Separate the midframe that holds the motherboard from the outer shell.
-


To reassemble your device, follow these instructions in reverse order. Take your e-waste to an R2 or e-Stewards certified recycler.
İptal et: Bu kılavuzu tamamlamadım.
3 farklı kişi bu kılavuzu tamamladı.

Ekip

Austin Community College, Team 10-2, Watkins Fall 2025 Austin Community College, Team 10-2, Watkins Fall 2025 üyesi
AUSTINCC-WATKINS-F25S10G2
4 Üyeler
6 adet Kılavuz yazıldı
1Rehber Yorum
I .... where to find the ( new stick )for the controller Gamesir ?