Ana içeriğe geç
HP Compaq Presario V3000 RAM Replacement

HP Compaq Presario V3000 RAM Replacement

Bernard Lee

Bernard Lee ve 4 diğer katkıda bulunanlar

En son May 7, 2024 tarihinde güncellendi

5 - 10 dakika
Orta

This guide will show how to remove and replace RAM

Neye ihtiyacın var

Aletler

Daha fazlasını göster…

  1. HP Compaq Presario V3000 RAM Replacement, RAM: adım 1, 2 resimden 1. HP Compaq Presario V3000 RAM Replacement, RAM: adım 1, 2 resimden 2.
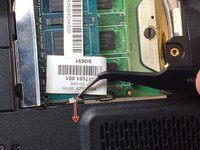
    • Locate the two screws holding the RAM cover in place

    • Use Phillips #0 screwdriver to remove the two 4.5mm Philips head screws

    • Place screws on magnetic mat to help avoid losing the screws

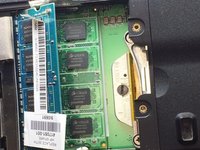
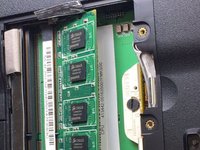
    • Lift the RAM cover towards the battery eject latch

  2. HP Compaq Presario V3000 RAM Replacement: adım 2, 3 resimden 1. HP Compaq Presario V3000 RAM Replacement: adım 2, 3 resimden 2. HP Compaq Presario V3000 RAM Replacement: adım 2, 3 resimden 3.
    • Lift foil covering RAM retention clips

    • Only pull the foil until the retention clips are visible. Do NOT continue pulling after.

    • Retention clips should be on the sides of the RAM chip

  3. HP Compaq Presario V3000 RAM Replacement: adım 3, 3 resimden 1. HP Compaq Presario V3000 RAM Replacement: adım 3, 3 resimden 2. HP Compaq Presario V3000 RAM Replacement: adım 3, 3 resimden 3.
    • Push retention clip on each side of RAM OUTWARDS

    • RAM will pop up

  4. HP Compaq Presario V3000 RAM Replacement: adım 4, 1 resimden 1.
    Bu adımda kullanılan alet:
    Tweezers
    $4.99
    • Using tweezers, carefully pull the RAM chip away from the RAM slot

  5. HP Compaq Presario V3000 RAM Replacement: adım 5, 3 resimden 1. HP Compaq Presario V3000 RAM Replacement: adım 5, 3 resimden 2. HP Compaq Presario V3000 RAM Replacement: adım 5, 3 resimden 3.
    • Push retention clip on each side of the second RAM chip OUTWARDS

    • RAM chip will pop up

  6. HP Compaq Presario V3000 RAM Replacement: adım 6, 1 resimden 1.
    • Repeat Step 5 and use tweezers to carefully pull RAM away from RAM slot

Sonuç

To reassemble your device, follow these instructions in reverse order.

2 farklı kişi bu kılavuzu tamamladı.

Bernard Lee

Üyelik tarihi: 03/01/17

143 İtibar

1 Kılavuz yazıldı

Ekip

IUPUI, Team S1-G1, Harley Spring 2017 IUPUI, Team S1-G1, Harley Spring 2017 üyesi

IUPUI-HARLEY-S17S1G1

4 Üyeler

3 adet Kılavuz yazıldı

0 Yorum

Yorum Ekle

İstatistikleri Görüntüle:

Son 24 Saat: 0

Son 7 gün: 3

Son 30 gün: 16

Her zaman: 3,516