Giriş
After repeated use, some elastics may lose their elasticity and need to be replaced. This could be the case on your ski trousers. With this guideline, you will be able to see how to replace those defective elastic braces.
➡️Before you get started, please check the safety disclaimer at the bottom of the page.
Neye ihtiyacın var
-
-
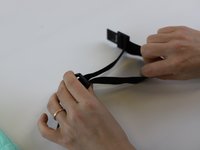
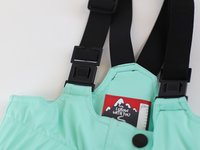
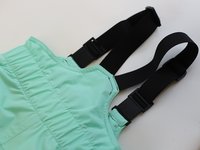
Identify the defect and the elastic which need to be replace.
-
In our example, the elastic is torn.
-
-
-
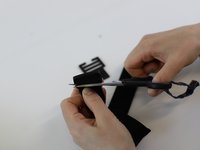
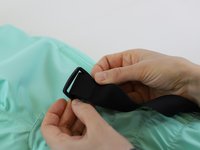
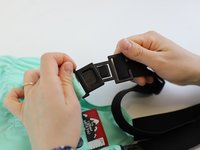
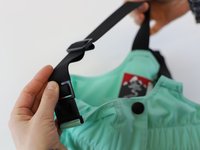
First unclip the buckle.
-
Next, use a "seam ripper" tool to cut through the seam on the other end
-
Take care: do not damage the fabric with the seam ripper! After cutting all the threads, pull them out from the garment to leave a clean area.
-
-
-
In this repair we will replace the elastic, but re-use the buckles.
-
Carefully remove the buckles by cutting the elastic, and set aside the buckles for later.
-
There are two parts to remove: the buckle clip and adjusting loop.
-
-
-
-
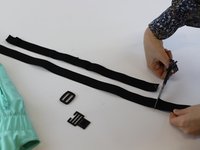
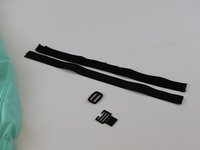
Select a new elastic band, similar to the previous one in quality and size.
-
Get creative: We've demonstrated with the a matching colour for the new strap, but why not pick a bold new colour or pattern?
-
Cut same length as the defective elastic band you just removed from your trousers.
-
-
-
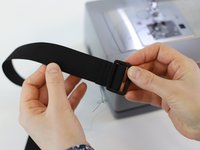
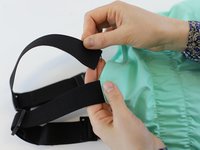
Thread the new elastic through the buckle loop.
-
Position the buckle loop at the end of the elastic, with just enough excess strap to bend over and sew in place.
-
Use a straight stitch on the sewing machine to sew the folded part of the elastic back onto itself, keeping the buckle loop fastened in location. Repeat this 2-3 times to give several rows of stitching for extra strength. Use a locking stitch at the beginning and end.
-
Tip: if your sewing machine has enough power, fold the end of the elastic twice, before stitching. This will result in a neater end, with less chance of fraying.
-
-
-
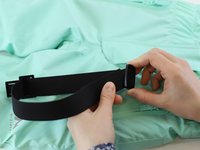
Slide the adjusting loop onto the new elastic.
-
Take care to slide it on in the correct orientation! (use the other brace, which was not repaired, as reference)
-
-
-
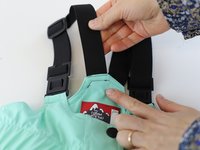
Click the buckle-clip on the matching part.
-
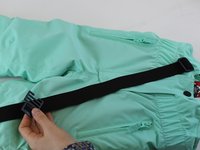
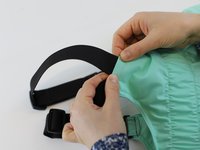
Take the loose end of the new elastic, and offer it up to the hole in the trousers.
-
Push the elastic into the hole in the trousers, and make sure it is deep enough to give a secure repair after stitching. (for reference, feel through the trouser to the strap which was not repaired)
-
-
-
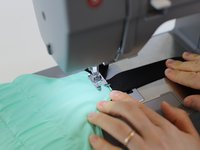
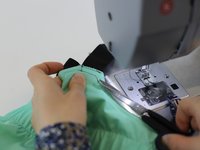
Use the sewing machine to securely re-attach the elastic to the trouser.
-
Tip: Check how the stitching looks on the other (non-repaired) elastic join, and follow this for reference.
-
We have demonstrated with a double-line stitching, but box-stitch or other durable construction stitch types will also work well.
-
-
-
🛠️🏆👏 Congratulations! The repair is complete, and you're ready to go!
-


In need of another repair? Don't worry! Check out our other guides to find quick solutions for your favourite clothing, footwear and equipment!
----------------------------------------
🚨🛠️🩹 IMPORTANT SAFETY NOTICE:
The repair guides provided on this site are intended to help you repair products on your own. While we have put a lot of care into them, all repair work carries some risk:
- Safety Precautions: When repairing your product, take all necessary precautions to ensure your safety. Use appropriate tools and follow the instructions carefully.
- Product Condition: Once your product has been repaired, it may not meet original compliance guidelines anymore and could potentially have issues.
- Liability: We are not responsible for any damage or injury that may occur during the repair process or as a result of using a repaired product. You, as the repairer, assume all risks and responsibilities associated with the repair.
By using these repair guides, you fully acknowledge and accept the potential risks and responsibilities involved.

Ekip
