Giriş
This guide has been replaced by an iFixit created guide found here.
This guide will instruct step-by-step how to disassemble the P8 Lite and replace the battery. A breakdown kit and a replacement battery will be required. Review the device Teardown Guide to get started.
Neye ihtiyacın var
Videoya Genel Bakış
-
Bu adımda kullanılan alet:Spudger$2.99
-
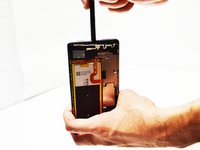
Use the Spudger tool to get access to the loudspeaker. Locate where the headphone jack is, then move about one-inch to the right and begin to gently pry the back-cover off the phone with the flat end of the Spudger tool. Make sure to pry apart the entire perimeter of the back-cover to prevent bending/cracking of the plastic.
-
Tools used: Spudger tool (used as a wedge to pry off the back-cover and loudspeaker.)
-
-
-
Bu adımda kullanılan alet:Spudger$2.99
-
Gently, use the flat end of the Spudger tool, or a metal opening tool to lift and remove the loudspeaker from the phone. The loudspeaker is the entire portion of the phone where the screws were extracted.
-
-
-
Locate adhesive strip underneath the battery and grip with your thumb and forefinger. Slowly pull on the adhesive strip until it's off to release adhesive securing battery.
-
-
Bu adımda kullanılan alet:Spudger$2.99
-
Insert the Spudger tool underneath the battery multiple times to separate the adhesive securing the battery. Be careful not to bend the battery and lift it from the phone frame.
-


To reassemble your device, follow these steps in reverse order.
To reassemble your device, follow these steps in reverse order.
İptal et: Bu kılavuzu tamamlamadım.
6 farklı kişi bu kılavuzu tamamladı.
Ekip

Metro State, Team 1-2, Carpenter Spring 2016 Metro State, Team 1-2, Carpenter Spring 2016 üyesi
MSU-CARPENTER-S16S1G2
3 Üyeler
8 adet Kılavuz yazıldı