
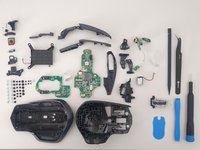
Logitech MX Master 2s Mouse Disassembly
Neye ihtiyacın var
Tamir Setleri
Bu kitler, bu kılavuzu tamamlamak için gereken tüm parçaları ve araçları içerir.


Parçalar


Aletler


Daha fazlasını göster…
-
-
We verify that the mouse is off, we turn it over to access 6 screws at the bottom.
-
Remove the Two screws on the front T5.
-
and 4 Phillip type under the stickers, 2 on each side.
-
-
-
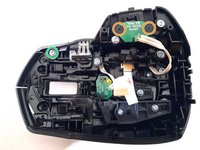
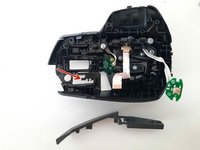
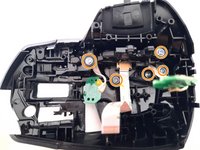
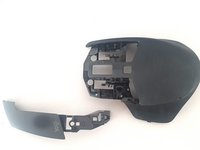
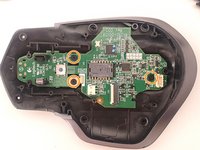
Carefully separate the parts
-
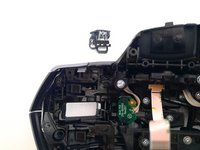
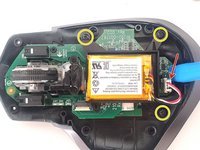
Lift the plastic latch to release the ribbon cable.
-
Disconnect the ribbon cable from its socket.
the ribbon connector clamp flips up 90 degrees from pcb
This comment was super helpful, thank you Rob! Just pry the little white piece up very gently to free up the ribbon.
you don't need a tool, my thumbnail easily separated the two big parts that form the external shell without causing any damage
-
-
-
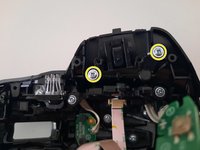
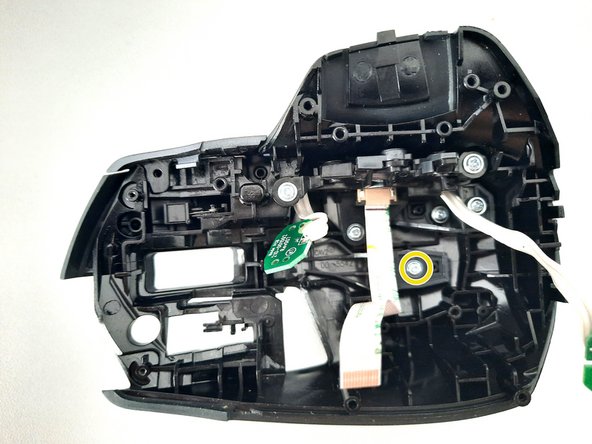
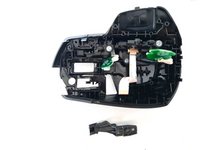
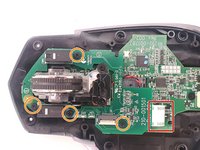
Remove the black screws from the button plate.
-
Additionally unscrew, the screw that holds the upper case and the side cover.
-
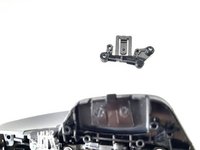
Remove the button mechanism.
I'm also on Mac OS (Ventura on M1 Studio) and tried both with and without Logi software. I had the same common fault that the cursor stopped tracking at all. Had the mouse maybe 5 years and use it solidly 40 hours a week at work. Was gutted when it appeared to have died. Found this tutorial and I'm back in business, mouse works now. I only followed up to this early stage of the exercise, and removed the thumb button widget altogether, never used that functionally anyway. The Logi ergonomics of the thumb rest are pretty much why I invested in this mouse, but never got into using it for thumb clicks.
-
-
-
Remove the screw that holds the piece, carefully remove. also if you wish you can separate it into two parts very easy, for cleaning.
-
-
-
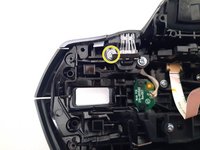
Unscrew the two screws holding the button.
-
When removing the screws gently pull the button forward.
-
-
-
Remove the black screws from the button plate.
-
Unscrew the screw holding the button.
-
Remove the plastic button carefully.
-
-
-
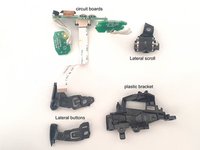
Remove the screws that hold the entire scroll mechanism and two side buttons. We also removed most of the screws that hold the right click button.
-
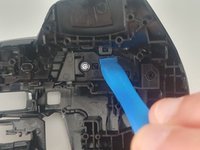
Gently press the scroll in from the outside of the mouse, pull up the inside of the piece, it can be helped with a plastic lever, but it is not necessary, all the action make it very smooth, so as not to damage the cables and the mechanism.
-
-
-
Remove the screws that hold the buttons and scroll.
-
Using a lever or plastic wedge, finish disassembling the scroll.
-
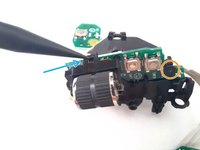
Then remove the screw that holds the board with the circuits.
-
-
-
Unscrew the screw holding the button.
-
When removing the screw gently pull the button forward.
-
-
-
Unscrew the three screws from the battery holder and remove the connection to the motherboard.
-
Remove the screws from one of the two electronic boards.
-
-
-
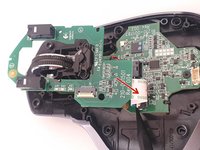
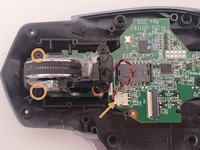
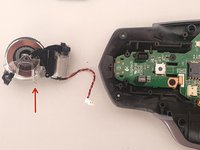
Remove the two screws and disconnect the cable.
Donde puedo conseguir el rodillo de este raton, lo he buscado por eBay y por Aliexpress y no lo encuentro
-
-
-
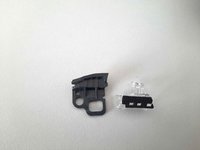
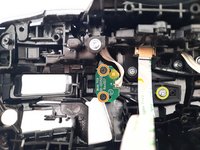
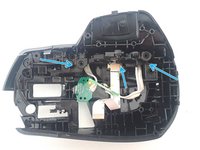
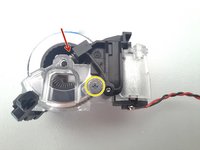
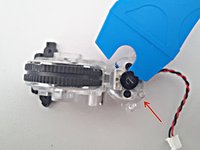
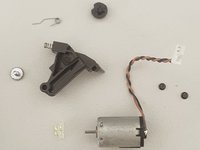
Remove the two screws that secure the motor rotor cover, and then gently remove the cover.
-
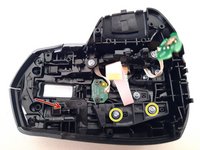
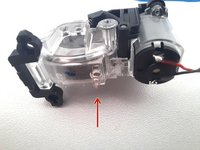
Remove the screw that holds the piece, plastic. Note that to remove it you must carefully remove the small spring that connects it to the transparent support where the scroll wheel rests.
-
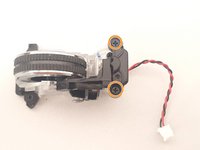
Disassemble the rotor or motor head by prying very gently with an iFixit Opening Tool or other instrument. Note the position where it was before dismounting, as it has only one position for mounting.
The last picture showing that spring is too blurry, and the spring popped off before I could see where it was supposed to be. Now I can't figure how to add it back since it doesn't seem like it does anything
Hi Mike! Look at the 1st picture in the step 14. With a red arrow, that is the first spring (or strap, I don't know what's is the name for that), It's a support for the "rotor motor cover" (step 13, 3rd picture).
A 2nd spring (step 14, 3rd picture) is a support (or "shock absorber" maybe) for the scroll wheel, It's is located inside the black plastic piece.
-
-
Bu adımda kullanılan alet:Tweezers$4.99
-
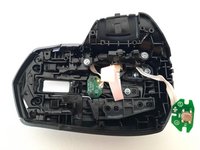
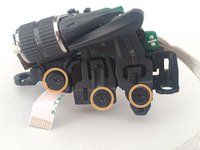
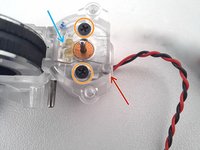
Remove the two screws that hold the motor, it will be completely free.
-
-
-
Remove the three screws that hold the motherboard.
-
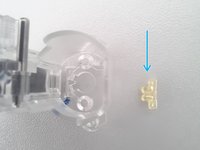
Remove the power button, and look at the position as it was.
-


To reassemble your device, follow these instructions in reverse order.
To reassemble your device, follow these instructions in reverse order.
İptal et: Bu kılavuzu tamamlamadım.
46 farklı kişi bu kılavuzu tamamladı.
37Kılavuz Yorumları
I’m not sure I see any reason why anyone would to this and risk it being ruined. In other words, what are the potential benefits? Cleaning?
Yup cleaning that scroll wheel, and maybe even the switches if your really dirty. 15 min made my mouse new again
Hello!! It is a spectacular product, with its mistakes (nothing is perfect ;)). The fundamental objective of this guide is simply to answer the question How does it work, what is inside? It can serve as a guide to clean it (either both scrolls or the button contacts), change the battery, etc. Everything that can contribute to extend its useful life much more.
Read the name of the site
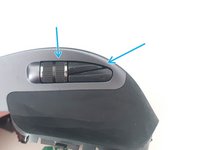
There is a very clear example of why one would need to do this. Certain 2s's, including my own, have a fundamental flaw. At some point, the pressing of the thumb-button, the one located below where the thumb is positioned, gradually results in the button getting stuck. For some reason, this results in the mouse movement not registering.
To resolve this issue, you can loosen a screw located button, but this can only be done when the mouse is disassembled, as it is contained within the mouse itself.
Yize H. -
My mouse was out of warranty, and had a manufacturing defect (bad soldering) which could be easily fixed. It gave the mouse a new chance.
Used this guide to clean my scroll wheel, took me 15 min, super easy. Didn’t need to remove anything, just opened it up and disconnected the 1 ribbon cable from the top half.
I used some clear tap folded on itself and ran it through the scroll wheel a few times. Only a bit of dust came out but the difference is crazy, its totally free spinning now.
Stop convincing yourself your scroll wheel is fine, open it up, clean it out and its even better.
Thanks iFixit
It’s actually a REALLY good mouse
Can be used without the lithium-ion battery, just like a normal wired mouse
Great guide Victor. Thanks for mentioning the fact that you can use the mouse without battery - I was wondering about this since I was worried about long term use.
Thanks you!!!
Perfect! Mine had the base button not working, or perhaps not clicking anymore. I already have a new one so i'll try this for entertaining purpous and see whats wrong with it!
Hello everyone! Some tricks to repair the led? My mouse is all operative but the movement led is apparently dead..
owners kitten caught its first mouse - turned out to be an excpensive one used this to dissemble and glue the RMB to the prongs where it came off it is now setting for 24hrs with chemical metal but the instructions were top notch !
Excellent guide but I would have appreciated driver sizes since they are not all the same. And kudos to Logitech; this version seems so much more serviceable than the original MX Master.
Hi @mangosjohn, the drivers used in this guide are listed at the top: Phillips #0 Screwdriver, Phillips #00 Screwdriver, and T5 Torx Screwdriver.
Thank you @amber. I had drivers for each step in mind since similar looking screws needed a different bit, but I admittedly did not see the list at the top either.
Both this mouse from eBay.
Anyone have any idea why the left button behaves as the right button?
I can't seem to find what is the issue with it.
Hi.
Did you verify this problem by trying the following?
1. Installing and config the button with Logitech Logi Option+ Downloads - MX Master Wireless Mouse – Logitech Support + Download
2. Checking the native mouse settings in the operating system (Windows, Mac or Linux).
3. Test the mouse (see the menu, you can test each button independently) Mouse Test - Check Mouse Button, DPI, Sensor, and Double Click (clickspeedtest.io)
Thanks so much for this guide! I spilled bubble tea on my mouse and decided I'd proactively take it apart and give it a wash (soap and water for the non electronic parts, isopropyl alcohol for the electronic parts), as even if the electronics didn't get ruined from the spill, the sugar made it very yuck to use. This is my first time taking apart an electronic device, and this guide made it a relatively simple process. Surprisingly satisfying too! I managed to lose a screw and ended up with two extra screws, but I suppose that can't be helped given that I spilled a bunch of the screws onto the floor at least two times. Hopefully this mouse will keep on working for many years yet. Thanks again, it was super helpful.
You're welcome! I'm glad to hear that the guide was helpful to you in taking apart and cleaning your mouse. It can be a bit daunting to take apart an electronic device for the first time, but it sounds like you did a great job. It's definitely satisfying to fix something yourself and make it like new again. As for the lost screw and extra screws, those things happen even to the most experienced tinkerers! Hopefully, your mouse will continue to work well for you for years to come. You're welcome! I'm glad to hear that the guide was helpful to you in taking apart and cleaning your mouse. It can be a bit daunting to take apart an electronic device for the first time, but it sounds like you did a great job. It's definitely satisfying to fix something yourself and make it like new again. As for the lost screw and extra screws, those things happen even to the most experienced tinkerers! Hopefully, your mouse will continue to work well for you for years to come.
Okay, I want to know what the part number is for the secondary scroll and back and forward buttons for the MX Master S2. Haven't been able to locate that part just yet. I need to replace it because it is doing the double click thing on both buttons.
Thanks for sharing this. Could you tell me where to place the spring in the upper left corner on picture 3 from step 14?
Hi, thanks! See Picture 1 from step 14: The red arrow shows you where the spring goes, notice that the tips point to the left in the image.
All best!
Excellent guide, comme Yize H. - 5 juil. 2023 le laser de mouvement ne fonctionnait plus car le bouton de gestes sous le pouce (thumb-button) était collé/bloqué , après ouverture et derrage , ma souris qui a 3 ans fonctionne à nouveau.
Confirming that loosening the thumb button screws also helped it stop randomly triggering and opening the Alt+Tab menu, or making the pointer stop moving while all the buttons still work.
One thing worth mentioning is that the bottom stickers have 2 layers and it's possible to peel off only the top one, which leaves the adhesive still on the mouse and does not provide access to the screws. Make sure you peel off the entire sticker from the bottom on the first try, otherwise the stickers might not adhere perfectly together again.
Incredible unreliable product! Thank you so much for the description!
@johnsmith48822 I needed this because after only having had this mouse for a day, my kid bent one of the buttons so that if felt like cheap crap. Had to take it open and bend it back. Very helpful guide.
Hello, can someone help me =(((
I have trouble with Step 13 "Disassembling the scroll mechanism" when I don't know how to reinstall the spring of the plastic part, when I disassembled I didn't pay attention to it but it was attached, please help me.
Hello, which spring are you referring to? In the 2nd photo of step 13, there is a red arrow pointing to it. It's quite simple; each plastic part has a support for the spring. I recommend placing it first in the dark part and then adjusting it in the transparent part. You can see in the last image of point 14 that the spring is quite tight in the dark plastic. If you are referring to the spring that assists the motor rotor, take a look at the 1st image in point 14. It appears to be fitting well in its place. Best of luck!
Thanks a lot it worked for me, could able to fix my mouse by cleaning it.
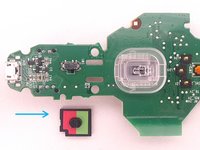
My scroll wheel was behaving erratically, it would randomly register up and down scrolls at the same time, no matter which direction I was scrolling to. This guide helped with removing the first screws underneath the pads. After that it was pretty easy without the guide too. First I couldn't find anything inside that could cause the erratic behaviour, then I looked underneath the motherboard, and the hall sensor had horrible solder joints (nothing like the ones shown on the photo in this guide, they were big blobs of cold soldering and burnt PCB - photo below). I have replaced the joints adding flux, desoldering with the help of a wick, then re-solder and it fixed the mouse wheel and now it's like new. This mouse was out of warranty and was set to be thrown away so I didn't care if I messed it up. This was my first attempt at fixing a mouse. I have just recently learned how to solder, I am a beginner, it was perfect for practicing :)
Logitech MX Master 2s Mouse Factory solder joints causing the scrolling error
Just wanted to thanks the author of this post as it allowed me to take the mouse apart, cleaning it, and give it a new life. Furthermore, the tip from Mr Yize to loosen the screw of the side button really helped as my mouse also got stuck as I was putting it back together.
if the problem is that the scroll wheel spins freely, the button next to it controls that.
Rob Miller - Yanıt
The stickers have two layers. To avoid de-laminating them, stick a sharp, flat object underneath the edge of the sticker and try to carefully pry up all of the material at once.
Maddison Hellstrom - Yanıt
Yes, this is a great comment. I accidentally separated the two layers and I had to glue them back together on one side. You want to peel up both layers at once and not separate them, ideally.
David Richardson -