Bu sürüm, hatalı düzenlemeler içerebilir. En son doğrulanmış bellek kopyası dönün.
Neye ihtiyacın var
-
Bu adım çevrilmemiş. Çevrilmesine yardım edin
-
If your MacBook is running Big Sur v11.1 or later, disabling Auto Boot may not work. You can proceed normally, but make sure to disconnect the battery as soon as you're inside.
-
Use a P5 driver to remove the following screws:
-
Two 7.9 mm screws
-
Two 7.3 mm screws
-
Six 2.6 mm screws
-
-
Bu adım çevrilmemiş. Çevrilmesine yardım edin
-
Wedge your fingers between the display and the lower case and pull upward to pop off the lower case.
-
Remove the lower case.
-
Set it in place and press firmly to engage the two hidden clips underneath. You should feel and hear them snap into place.
-
-
Bu adım çevrilmemiş. Çevrilmesine yardım edin
-
Use the flat end of a spudger to pry up and unlatch the metal locking arm on the battery connector.
-
Lift straight up on the metal locking arm to pull the battery connector out of its socket on the logic board.
-
If necessary, push the rear, wire side of the connector into place first, then rock the front of the connector into place.
-
-
Bu adım çevrilmemiş. Çevrilmesine yardım edin
-
Use a T3 Torx driver to remove the two 1.4 mm screws securing the trackpad cable cover.
-
-
-
Bu adım çevrilmemiş. Çevrilmesine yardım edin
-
Use the flat end of a spudger to pry the trackpad cable connector up and out of its socket.
-
-
Bu adım çevrilmemiş. Çevrilmesine yardım edin
-
Use a pair of tweezers to peel back the tape covering the trackpad cable connector.
-
-
Bu adım çevrilmemiş. Çevrilmesine yardım edin
-
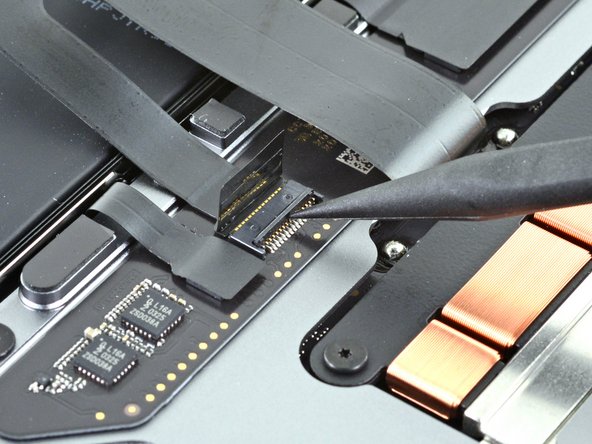
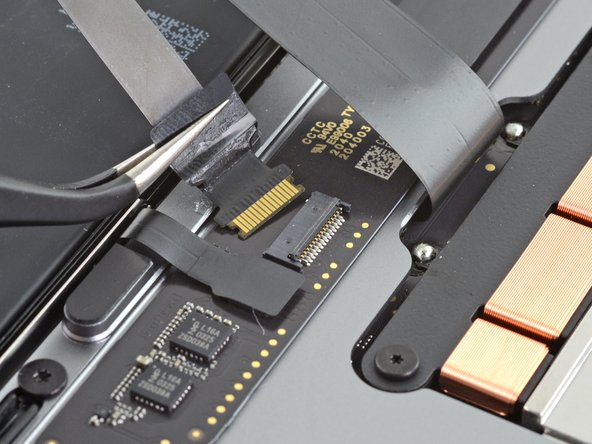
Use the pointed end of a spudger to lift up the small locking flap on the trackpad cable's ZIF connector.
-
-
Bu adım çevrilmemiş. Çevrilmesine yardım edin
-
Use a T5 Torx driver to remove the nine screws securing the trackpad:
-
Eight fully-coated 3.1 mm screws
-
One partially-coated 3.1 mm screw
-
-
Bu adım çevrilmemiş. Çevrilmesine yardım edin
-
While keeping the laptop screen-side down, carefully open the laptop. The trackpad will stay sitting on the display.
-
-
Bu adım çevrilmemiş. Çevrilmesine yardım edin
-
As you remove the trackpad assembly, be careful not to lose the five small metal washers resting on the screw posts. (They will fly off and get lost with very little provocation.)
-
Remove the trackpad.
-
-
Bu adım çevrilmemiş. Çevrilmesine yardım edin
-
Use the flat end of a spudger to lift the small locking flap on the trackpad's ZIF connector.
-
Slide the trackpad cable straight out of the ZIF connector.
-


İptal et: Bu kılavuzu tamamlamadım.
9 farklı kişi bu kılavuzu tamamladı.


12 Yorum
Hi! So I successfully replaced my trackpad (the center screw got stripped so I had to use the superglue technique and threw it away), and the trackpad works perfectly well but without haptics. My replacement didn’t come with a new cable so used the old one after cleaning of the end (it had some blackening on the portion connected to the trackpad). Is my trackpad a bad unit or should I try replacing the cable first?
Hi! Considering the blackening on the old cable, I’d recommend thoroughly cleaning its contacts with high concentration (90%+) isopropyl alcohol and a Q-tip. Let it dry before reinstalling it. If that cleaning doesn’t help, replace the old cable before considering your replacement trackpad a bad unit. Good luck on your repair!
Hi Carsten! I tried cleaning it but didn’t work. Picked up a new cable from here, and now works flawlessly. Highly recommend anyone reading this to just buy a replacement cable too when you do the repair to rule out a faulty part. Thanks!
Hi, I replaced trackpad following the guide and trackpad seems to work but very slow and lagging. and when I log in, mac is showing message waiting for bluetooth trackpad to be discovered. Could this be cable issue?