Bu sürüm, hatalı düzenlemeler içerebilir. En son doğrulanmış bellek kopyası dönün.
Neye ihtiyacın var
-
Bu adım çevrilmemiş. Çevrilmesine yardım edin
-
Remove the following ten screws securing the lower case to the upper case:
-
Two 2.3 mm P5 Pentalobe screws
-
Eight 3.0 mm P5 Pentalobe screws
-
-
Bu adım çevrilmemiş. Çevrilmesine yardım edin
-
Wedge your fingers between the upper case and the lower case.
-
Gently pull the lower case away from the upper case to remove it.
-
-
Bu adım çevrilmemiş. Çevrilmesine yardım edin
-
Use the flat end of a spudger to lift the battery connector straight up out of its socket on the logic board.
-
-
Bu adım çevrilmemiş. Çevrilmesine yardım edin
-
Remove the two 2.1 mm T5 Torx screws securing the logic board end of the I/O board cable bracket.
-
Remove the I/O board cable bracket.
-
-
Bu adım çevrilmemiş. Çevrilmesine yardım edin
-
Use the flat end of a spudger to pop the I/O board connector straight up off its socket on the logic board.
-
-
Bu adım çevrilmemiş. Çevrilmesine yardım edin
-
Lift the logic board end of the I/O board cable straight up to bend it out of the way.
-
-
Bu adım çevrilmemiş. Çevrilmesine yardım edin
-
Carefully tuck the tip of a spudger under the right speaker cable near the connector and lift it up out of its socket on the logic board.
-
-
Bu adım çevrilmemiş. Çevrilmesine yardım edin
-
Carefully peel the right speaker cable off the upper case.
-
-
Bu adım çevrilmemiş. Çevrilmesine yardım edin
-
Remove the following screws securing the right speaker to the upper case:
-
One 5.7 mm T5 Torx screw
-
One 6.5 mm T5 Torx screw
-
One 3.8 mm T5 Torx screw
-
-
Bu adım çevrilmemiş. Çevrilmesine yardım edin
-
Lift the right speaker from the cable end and pull it free from the case.
-
-
Bu adım çevrilmemiş. Çevrilmesine yardım edin
-
Insert the tip of a spudger under the left speaker cable near the connector and lift it up out of its socket on the logic board.
-
-
Bu adım çevrilmemiş. Çevrilmesine yardım edin
-
Remove the following screws securing the left speaker to the upper case:
-
One 5.7 mm T5 Torx screw
-
One 6.5 mm T5 Torx screw
-
One 3.8 mm T5 Torx screw
-
-
Bu adım çevrilmemiş. Çevrilmesine yardım edin
-
Lift the corner of the left speaker up and slide it out around the battery to remove it from the upper case.
-
-
Bu adım çevrilmemiş. Çevrilmesine yardım edin
-
Use the flat end of a spudger to pop the trackpad connector straight up off its socket on the logic board.
-
-
Bu adım çevrilmemiş. Çevrilmesine yardım edin
-
Lift the trackpad cable up off the battery to separate it from the adhesive securing it.
-
-
Bu adım çevrilmemiş. Çevrilmesine yardım edin
-
Use the end of a spudger to flip the retaining tab on the ZIF connector.
-
-
Bu adım çevrilmemiş. Çevrilmesine yardım edin
-
Pull the trackpad cable straight out of its ZIF socket on the trackpad control board.
-
-
Bu adım çevrilmemiş. Çevrilmesine yardım edin
-
Remove the single 3.7 mm T5 Torx screw securing the battery board to the upper case.
-
-
Bu adım çevrilmemiş. Çevrilmesine yardım edin
-
Fill a pot or pan with enough water to fully submerge an iOpener.
-
Heat the water to a boil. Turn off the heat.
-
Place an iOpener into the hot water for 2-3 minutes. Make sure the iOpener is fully submerged in the water.
-
Use tongs to extract the heated iOpener from the hot water.
-
Thoroughly dry the iOpener with a towel.
-
Your iOpener is ready for use! If you need to reheat the iOpener, heat the water to a boil, turn off the heat, and place the iOpener in the water for 2-3 minutes.
-
-
Bu adım çevrilmemiş. Çevrilmesine yardım edin
-
To protect your display, place a sheet of aluminum foil between the display and keyboard and leave it there while you work.
-
-
-
Bu adım çevrilmemiş. Çevrilmesine yardım edin
-
Alternatively, if you are using the hot iOpener method, skip the following three steps.
-
Wear eye protection when handling and applying the adhesive remover. (Eye protection is included in your kit.)
-
Protective gloves are also included in your kit. If you are concerned about skin irritation, put your gloves on now.
-
-
Bu adım çevrilmemiş. Çevrilmesine yardım edin
-
Pull off the black rubber stopper from your bottle of adhesive remover.
-
Use scissors to cut off the sealed tip of the applicator.
-
-
Bu adım çevrilmemiş. Çevrilmesine yardım edin
-
Apply a few drops of adhesive remover evenly under the edge of the rightmost battery cell.
-
Wait 2-3 minutes for the liquid adhesive remover to penetrate underneath the battery cell before you proceed to the next step.
-
-
Bu adım çevrilmemiş. Çevrilmesine yardım edin
-
Use the hot iOpener to cover half of the right-most battery cells.
-
After about a minute, reheat the iOpener and move it to cover the other half of the right-most battery cells.
-
-
Bu adım çevrilmemiş. Çevrilmesine yardım edin
-
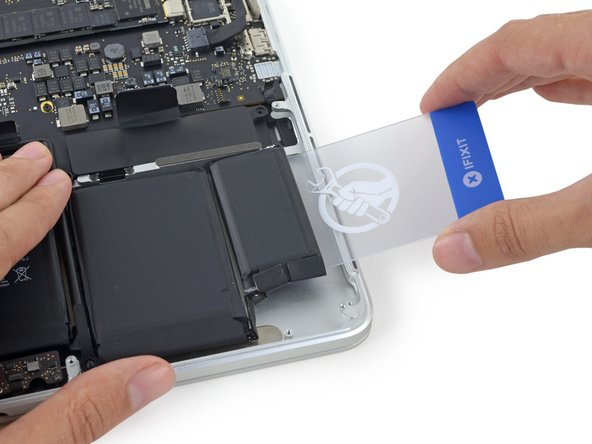
Push a plastic card between the right-most battery cell and the upper case, cutting the adhesive between the two.
-
When using the hot iOpener method, if you encounter significant resistance to prying, stop and use the iOpener to reheat the section you're working on.
-
-
Bu adım çevrilmemiş. Çevrilmesine yardım edin
-
Repeat this procedure with the adjacent battery cell:
-
Apply a small amount of liquid adhesive remover under the battery cell, and wait 2-3 minutes for it to penetrate and soften the adhesive.
-
Alternatively, re-heat this section with your iOpener if needed.
-
Push a plastic card about an inch between the battery cell and the upper case, and slowly pry the cell up to separate all of the adhesive.
-
-
Bu adım çevrilmemiş. Çevrilmesine yardım edin
-
Temporarily leave your plastic card underneath the two rightmost battery cells to prevent them from re-adhering to the upper case.
-
If using an iOpener, reheat it and reapply it, this time to the left-most battery cells.
-
-
Bu adım çevrilmemiş. Çevrilmesine yardım edin
-
Repeat the above procedure to separate the two leftmost battery cells from the upper case.
-
Remember to apply a small amount of adhesive remover to each battery cell, and wait 2-3 minutes for it to penetrate and soften the adhesive.
-
Use a second plastic card to separate the two leftmost battery cells from the upper case.
-
-
Bu adım çevrilmemiş. Çevrilmesine yardım edin
-
Insert the plastic card between the second left-most battery cell and the upper case to cut the adhesive joining the two, and pry the cell up from the case.
-
-
Bu adım çevrilmemiş. Çevrilmesine yardım edin
-
Leave the second card in the corner between the two left cells.
-
If using an iOpener, reheat it and apply it to the central battery cells.
-
As before, leave the iOpener in each position for about a minute, reheating in between, to heat each half of the center cells.
-
In the following steps, you can either use a third card, or the card from the right corner. The right corner adhesive should be dry/cool enough that the cells can easily be pulled up again when needed.
-
-
Bu adım çevrilmemiş. Çevrilmesine yardım edin
-
If using liquid adhesive remover, apply a few more drops under each of the final two, middle cells.
-
Allow 2-3 minutes for the adhesive remover to penetrate before you continue.
-
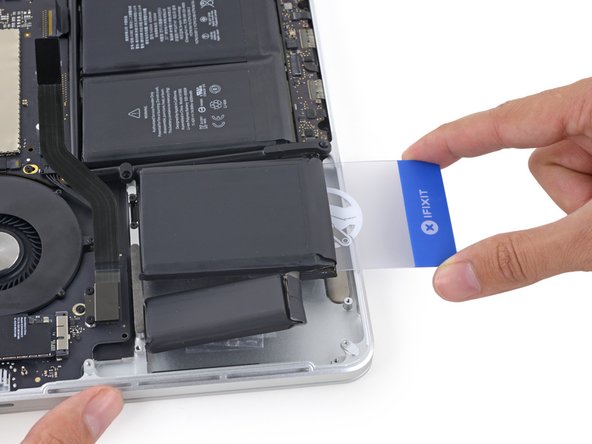
Gently folding the right-most battery cells out of the way, insert a plastic card under the right center cell.
-
Push the card in about half of its length to cut the adhesive holding the battery cell to the case.
-
Leave the card in place to keep the adhesive from re-sealing.
-
-
Bu adım çevrilmemiş. Çevrilmesine yardım edin
-
Repeat the same procedure for the last remaining battery cell.
-
Holding the outer cells out of the way, insert the plastic card about halfway under the left center battery cell, avoiding the trackpad board.
-
-
Bu adım çevrilmemiş. Çevrilmesine yardım edin
-
Return to the card beneath the right-center cell, and twist it to separate the entire battery from the upper case.
-
If it does not come out easily, you may need to reheat the iOpener and apply it to the stuck areas, and then continue gently cutting the adhesive with the plastic cards.
-
-
Bu adım çevrilmemiş. Çevrilmesine yardım edin
-
Remove the battery.
-
With a little luck, you can slowly pull out each strip of adhesive with your fingers.
-
Otherwise, soak each section of adhesive with a bit of adhesive remover for 2-3 minutes, and then scrape it out with an opening pick or one of the other tools in your kit. This can take quite a bit of work, so be patient.
-
Mop up any remaining adhesive remover and give your MacBook Pro a few minutes to air dry.
-
Calibrate your newly installed battery: charge it to 100%, and keep charging it for at least 2 more hours. Unplug and use it normally to drain the battery. When you see the low battery warning, save your work, and keep your laptop on until it goes to sleep due to low battery. Wait at least 5 hours, then charge your laptop uninterrupted to 100%.
-
If you notice any unusual behavior or problems after installing your new battery, you may need to reset your MacBook Pro's SMC.
-
-
Bu adım çevrilmemiş. Çevrilmesine yardım edin
-
Remove the ten 2.8 mm T3 screws securing the trackpad cover plate to the upper case.
-
-
Bu adım çevrilmemiş. Çevrilmesine yardım edin
-
Remove the twelve 2.4 mm T5 screws securing the trackpad to the upper case.
-
-
Bu adım çevrilmemiş. Çevrilmesine yardım edin
-
Grab the black plastic tab to flip the display cable connector open and pull it straight out of its socket on the logic board.
-
Pull in the direction of the cable, parallel to the logic board. Do not pull up.
-
-
Bu adım çevrilmemiş. Çevrilmesine yardım edin
-
Pull the DC-In board connector straight out of its socket on the logic board.
-
-
Bu adım çevrilmemiş. Çevrilmesine yardım edin
-
Remove the two 3.5 mm T5 Torx screws securing the MagSafe DC-In board to the upper case.
-
-
Bu adım çevrilmemiş. Çevrilmesine yardım edin
-
Use the MagSafe DC-In board cable to pull the board out and up from the upper case to remove it.
-
-
Bu adım çevrilmemiş. Çevrilmesine yardım edin
-
Carefully remove the rubber fan bumper from the edge of the heat sink.
-
-
Bu adım çevrilmemiş. Çevrilmesine yardım edin
-
Use the flat end of a spudger to peel the four foam stickers off of the heat sink screws.
-
-
Bu adım çevrilmemiş. Çevrilmesine yardım edin
-
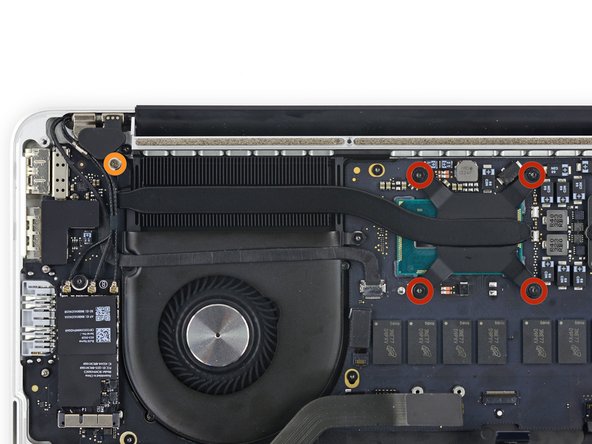
Remove the following screws securing the heat sink:
-
Four 2.6 mm T5 screws
-
One 2.4 mm Phillips #000 screw
-
-
Bu adım çevrilmemiş. Çevrilmesine yardım edin
-
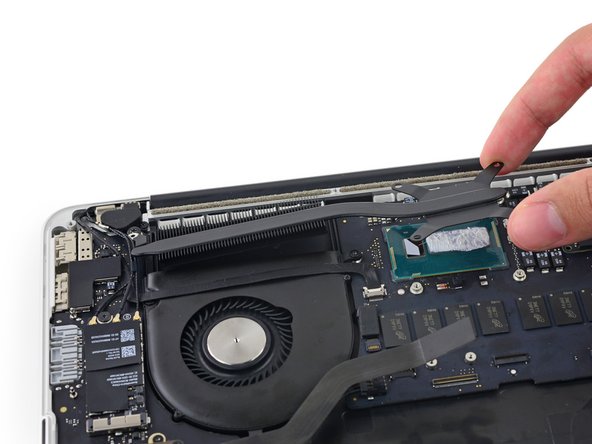
Use the tip of a spudger to push on either side of the the iSight camera cable connector and walk it out of its socket on the logic board.
-
-
Bu adım çevrilmemiş. Çevrilmesine yardım edin
-
Peel the iSight camera cable up off the fan housing to fold it out of the way.
-
-
Bu adım çevrilmemiş. Çevrilmesine yardım edin
-
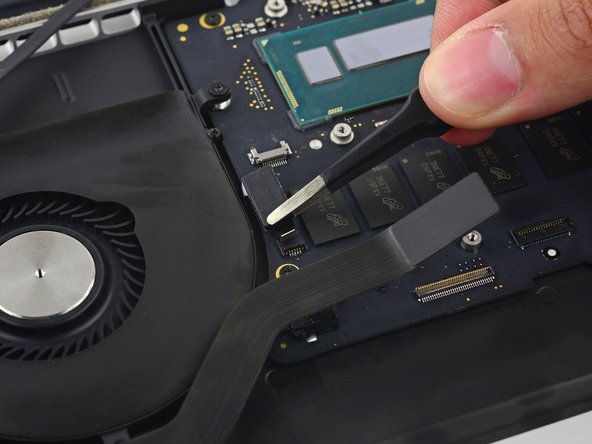
Use the tip of a spudger to flip the tab on the fan's ZIF connector.
-
Carefully pull the fan cable from its connector.
-
-
Bu adım çevrilmemiş. Çevrilmesine yardım edin
-
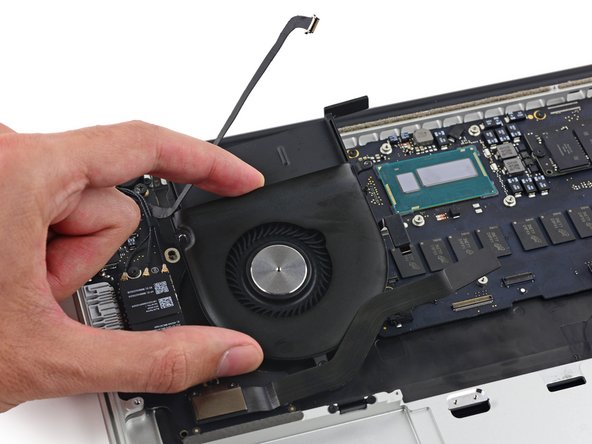
Remove the following screws securing the fan to the upper case:
-
One 5.0 mm T5 Torx screw
-
Two 3.6 mm T5 Torx screws
-
-
Bu adım çevrilmemiş. Çevrilmesine yardım edin
-
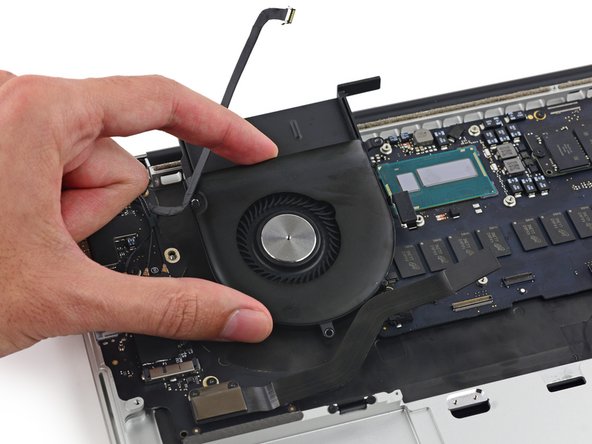
Lift the end of the fan from the heat sink cavity and pull it up and out toward the hinge of the laptop to remove it.
-
-
Bu adım çevrilmemiş. Çevrilmesine yardım edin
-
Insert the tip of a spudger under each of the antenna cables near their connectors and pry up to disconnect them from the AirPort board.
-
Connect the long-sleeved cable to the center socket.
-
The short-sleeved cable connects next to the screw.
-
The remaining cable has no sleeve, and connects in the last empty socket, next to the fan.
-
-
Bu adım çevrilmemiş. Çevrilmesine yardım edin
-
With the tip of a spudger, push on either side of the I/O board connector to walk it out of its socket on the logic board.
-
-
Bu adım çevrilmemiş. Çevrilmesine yardım edin
-
Remove the following screws securing the I/O board to the upper case:
-
One 3.5 mm T8 Torx standoff screw
-
One 3.5 mm T5 Torx screw
-
-
Bu adım çevrilmemiş. Çevrilmesine yardım edin
-
Lift the I/O board cable end of the I/O board and pull toward the logic board to free the ports from the upper case.
-
Remove the I/O board.
-
-
Bu adım çevrilmemiş. Çevrilmesine yardım edin
-
Use the flat end of a spudger to disconnect the keyboard backlight cable and move it out of the way.
-
-
Bu adım çevrilmemiş. Çevrilmesine yardım edin
-
Use the tip of a spudger to flip the retaining tab on the microphone cable ZIF connector.
-
-
Bu adım çevrilmemiş. Çevrilmesine yardım edin
-
Pull the microphone cable straight out of its socket on the logic board.
-
-
Bu adım çevrilmemiş. Çevrilmesine yardım edin
-
Use the tip of a spudger to flip the retaining tab on the ZIF connector.
-
-
Bu adım çevrilmemiş. Çevrilmesine yardım edin
-
Pull the keyboard cable straight out of its ZIF socket on the logic board.
-
-
Bu adım çevrilmemiş. Çevrilmesine yardım edin
-
Remove the five 3.5 mm T5 Torx screws securing the logic board to the upper case.
-
-
Bu adım çevrilmemiş. Çevrilmesine yardım edin
-
Lift the processor end of the logic board up slightly and pull it toward the fan recess to free the ports from the edge of the upper case and remove the logic board.
-
-
Bu adım çevrilmemiş. Çevrilmesine yardım edin
-
Use a pair of tweezers to lift the rubber hinge covers up off the right and left display hinges.
-
-
Bu adım çevrilmemiş. Çevrilmesine yardım edin
-
Remove the 3.2 mm T5 Torx screws (one on each side) securing the aluminum hinge brackets to the upper case.
-
-
Bu adım çevrilmemiş. Çevrilmesine yardım edin
-
Use a pair of tweezers to lift aluminum hinge brackets off the right and left display hinges.
-
-
Bu adım çevrilmemiş. Çevrilmesine yardım edin
-
Remove the four inner 5.3 mm T8 Torx screws (two on each side) securing the display to the upper case.
-
-
Bu adım çevrilmemiş. Çevrilmesine yardım edin
-
While holding the display and upper case together with your left hand, remove the remaining T8 Torx screw from the lower display bracket.
-
Remove the last remaining T8 Torx screw securing the display to the upper case.
-
-
Bu adım çevrilmemiş. Çevrilmesine yardım edin
-
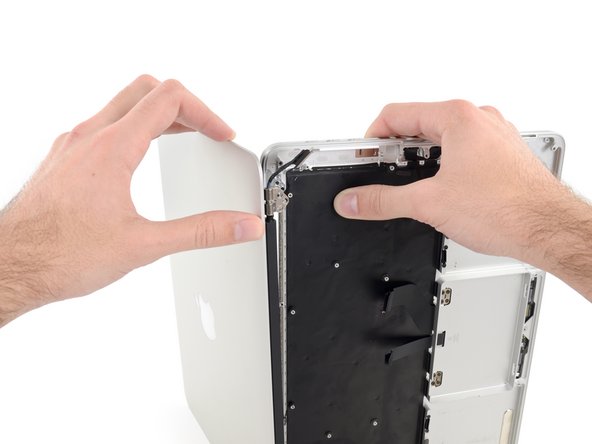
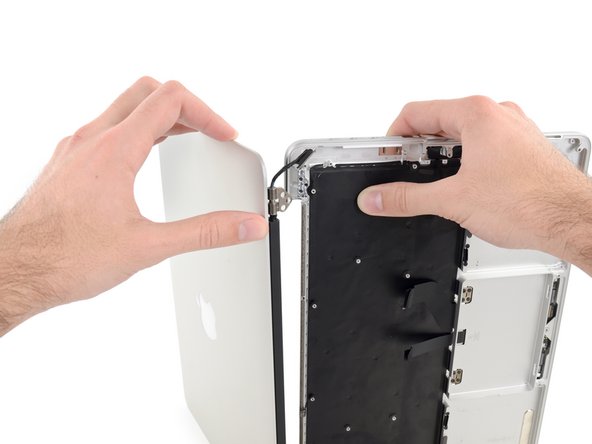
Grip both halves of the device, one in each hand.
-
Gently push forward on the bottom half of the device to detach it from the display assembly.
-
Carefully set each component aside, making sure to set down the lower half keyboard-side down.
-
-
Bu adım çevrilmemiş. Çevrilmesine yardım edin
-
Place the MacBook on a heated iOpener for about a minute to soften the adhesive securing the dual microphone cable.
-
-
Bu adım çevrilmemiş. Çevrilmesine yardım edin
-
Insert the tip of a spudger under the rubber microphone cable cover to free it form the upper case.
-
Remove the rubber microphone cable cover.
-
-
Bu adım çevrilmemiş. Çevrilmesine yardım edin
-
Insert the tip of a spudger under the connector end of the microphone ribbon cable and lift to peel that section up from the upper case.
-
-
Bu adım çevrilmemiş. Çevrilmesine yardım edin
-
Insert the tip of a spudger under the right-hand portion of the microphone ribbon cable and slide it toward the screw post to free it from the upper case.
-


İptal et: Bu kılavuzu tamamlamadım.
57 farklı kişi bu kılavuzu tamamladı.

8 Yorum
Hey I need to replace my track pad for sure, but would anyone know if the circuit board on the backside of the track pad controls the keyboard? or where the hardware is that controls the keyboard? My mouse and keyboard arent working due to water damage and apple wants 750 for a part thats less then 100 dollars. Any insight would be much appreciated!
@andrew how do you re-assemble the iOpener-removed battery? Just lay it in-place and re-heat it all with the iOpener? Can the adhesive be re-used?
I ended up reassembling with the remaining glue on the battery and trackpad cover panel. I used a hairdryer to attempt to reactivate the glue since my iRemover sprung a leak. The outside-most cells are loose - oh well :). Maybe I'll open it up and tape them down.
Well done Andrew!!! I followed this guide and surprisingly everything is good. The tech at the Apple store tried to convince my daughter that she fried the logic board + keyboard by getting water into it. (It was a month past the warranty so we didn't argue.) But she swears she never got any liquid near it. I didn't see any obvious signs of moisture when I opened it up. Based on other comments on other sites, it seems more like Apple has shipped some defective keyboards for at least some MacBook models.
that’s exactly what is happening with me now!!! apple is trying to convince me that there is a liquid damage exactly on the I/o board in my mackbook pro early 2015. At first the battery isn’t charging and they said that they will change the top case including keyboard and battery, five days later which is today the call me saying they discovered a liquid damage on the I/o board and the price will be changed from 200 hundred pounds to 325 pounds. I definitely refused and suspected them. now I took my MacBook back again and looking for another solution. it works fine with the power cable. so any idea would be highly appreciated.
many thanks
sofian
Sofian -