
MacBook Pro 13" Unibody Mid 2010 LCD Replacement

Giriş
1. adıma gitUse this guide to replace the LCD rather than the entire display assembly.
Neye ihtiyacın var
Parçalar


Aletler


Daha fazlasını göster…
-
-
Remove the following 10 screws securing the lower case to the MacBook Pro 13" Unibody:
-
Seven 3 mm Phillips screws.
-
Three 13.5 mm Phillips screws.
-
-
-
Slightly lift the lower case and push it toward the rear of the computer to free the mounting tabs.
In the introduction you should link fixers to this excellent doc: https://www.ifixit.com/Misc/HD_Software_...
It is really critical, super easy, and free(!) to clone your existing drive onto the new one you will install. I ran into one error, but SuperDuper! support replied immediately on how to fix it...Thanks ifixit and SuperDuper! (I ponied up the $28 for the software anyway, I was so impressed!)
Long story short: I drank the AppleKoolAid back in 1984 and have always left the guts of my machines up to Apple - until recently when I needed to swap the SATAs from my original MacDaddy (2009 13" MBPro that I killed in 2018 - coffee + blackout = OOOOPS) into a pristine 2009 MBPro from a Goodwill in North Carolina through eBay. I need the files from iCal and MacMail that can't be opened in my newer machines.
Well . . . I ain't never done nuttin' like that, before!
Enter Luke Miani on YouTube. He raves about you guys! So, I watched everything I could, read your site, bought the right tools and at the ripe old age of 72, I sat down, this morning and did the work. Now my original MacDaddy lives in MacDaddy2.0.
Am I allowed to cry?
Seriously, I can't thank you enough for your bitchen site and killer tools. I wish I'd'a been turned on to this shizzle 30+ years ago.
IFIXIT - IDIGIT!
HAHAHAHAHAHAHAHAHAHA.
That was a brilliant read.
Yes, I came across ifixit a few years ago. Totally helped me out on several occasions.
Glad your Mac repair journey worked out.
:)
Cary B -
-
-
-
Use the flat end of a spudger to lift the battery connector up out of its socket on the logic board.
How do you get that battery connector back on? Do you just press it in back in place after you're done?
yes. I usually plug it in before I screw it down so I can lift the battery a bit and have enough slack to be able to go straight down on the connector, otherwise it comes in on a bit of an angle, which can't be good (though not necessarily bad).
This step almost finished me, and I did extensive damage to the battery plug. Fortunately, I later replaced the battery, and the replacement came with a new plug! :) Newbies need to know - 1. The battery plug is like a thin lip on a thicker lip, so you need to pry BETWEEN 2 thin lips to get it off, else you are trying to yank out the socket. 2. Mine was initially VERY tight, and trying to get it out broke the plastic on all sides of plug, even though I was as careful as possible. Luckily, this didn't hurt functionality and I later replaced the battery. AFTER disconnecting once, it was never so tight again,
-
-
-
Use the flat end of a spudger to pry up the subwoofer/right speaker cable connector out of its socket on the logic board.
-
-
-
De-route the camera data cable from the channel in the optical drive.
-
-
-
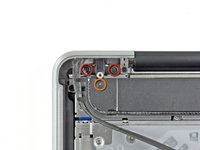
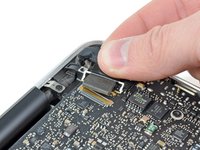
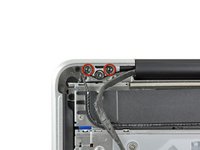
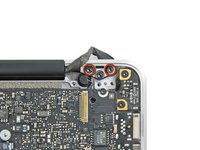
Remove the two outer 6.5 mm T8 Torx screws securing each of the two display brackets to the upper case (4 screws total).
-
-
-
-
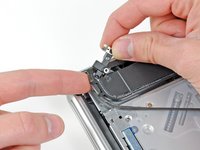
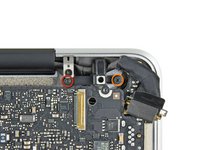
Remove the last remaining T8 Torx screw securing the display to the upper case.
When reassembling, Careful not to drop your screw, or it may get stuck to the (magnetic) power adapter port. Oops!
Save yourself some time and don't drop it!
-
-
-
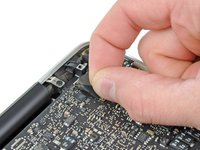
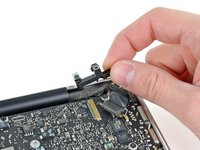
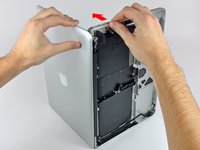
Grab the upper case with your right hand and rotate it slightly toward the top of the display so the upper display bracket clears the edge of the upper case.
-
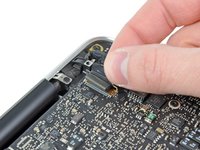
Rotate the display slightly away from the upper case.
-
-
-
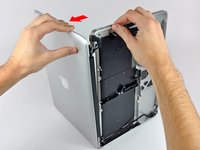
Lift the display up and away from the upper case, minding any brackets or cables that may get caught.
-
-
-
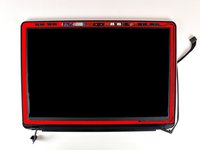
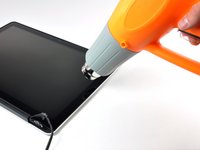
With the heat gun set to low, start by heating the outer black border near the upper right corner of the glass panel.
With a lot of heating, for me, it was very hard to get the glass to separate from the case. I had better luck starting from the bottom right as I could grip better onto the case. Three mistakes I made:
1. Once I got the glass separated, I probably didn't heat sufficiently as I was going around and the glass broke. That made the rest of the procedure miserable. Lesson: pull very gently.
2. I must have touched one of the tiny bits of glass that fell on the LCD and it scratched the actual screen. :-(. Lesson: vacuum the pieces as you go and be very careful when touching the LCD.
3. I somehow overheated the LCD screen at the top left and right corners and now the display is all wonky and faded at the corners. Not sure what the lesson is here.
First, if using a hair dryer, what setting should that be operated at? It would be much cooler than the heat gun, right?
Second, the iFixit basic set comes with a small, clear suction cup. Would that be sufficient for this project, or does it require the stronger pull of the other cups?
Finally, must I reapply adhesive to the case when replacing the glass? Does the original remain tacky and re-bond on assembly?
It's been a while since you asked, but since no one answered and someone else may have the same questions:
Hair dryers vary a lot, depending on wattage. I would start on low or med, and work my way up to high if necessary. I'd keep the fan on the lowest setting.
The little suction cup is for removing screens like the iMac, which just uses magnets, and possibly an iPad or iPhone. I would not want to use that for this project, get something about 2" wide with a decent handle.
The screen should have the double sided glue tape already applied, just remove the backing. I wouldn't get glass that doesn't have the tape on it, big waste of time with little savings in cost.
Jeff Kamis
All I can say for this is don't be tempted to hold the heat gun too close. I ended up burning my LCD the first time I did it and having to replace that when all I was looking to do was replace the cable. I got the glass off holding it about 4/5 inches from the screen and being patient (it took about 5/10 minutes in the end).
The tape is very sticky and the glass is very fragile but at the same time fairly flexible.....I ended up breaking the glass ans it turned out to be a mess picking up the shards....but in the end a new glass is not too costly. the implication is that heating melts the glue but it is really just double stick tape.....there are some "youtube" videos that are worth a look but I would suggest using guitar picks and not a putty knife which creates a point load that breaks the glass....wear safety glasses!!
Be ready to replace the glass (good thing mine was already broken, I ordered one). Wear surgery gloves and protective glasses. Trust your nose, if it smell melted plastic, it’s a good clue to stop the heat.
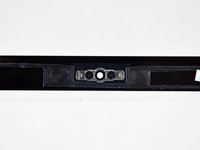
If you have a glass cover that is severely cracked then the heating gun and suction cup procedure really doesn’t work. Suction cups won’t hold and the already broken glass doesn’t lift. Here’s what I did that made the job easier. Using 2 inch wide transparent packing tape I laid it along the perimeter of the display but not covering the rubber edge. Then I used a 1/4 inch wood carving tool and very carefully removed the glass and 2 sided tape around the metal border. Use as your guide picture 2 in this step that shows where the camera and cable is located. Where the camera is located in the top center the 2 sided tape isn’t located so you can easily lift the glass. The camera cable runs up the right side in a trough in the metal border so when lifting the tape and glass in this area just keep the sharp end flat and it is wide enough it won’t dip into the trough and damage the cable. The tape was very helpful because it kept the glass from splintering and going everywhere.
-
-
-
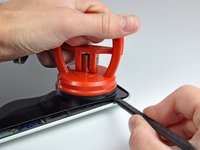
Gently lift the corner of the display glass enough to insert a spudger between it and the display assembly.
-
Use the flat end of a spudger to gently pry up the adhesive securing the front glass to the display.
-
Pry up the glass panel a few inches away from the upper right corner along the top and right edges of the display.
-
-
-
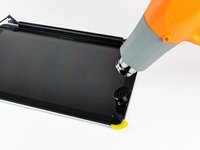
Use a heat gun to soften the adhesive under the black strip along the right side of the front glass panel.
-
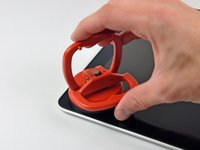
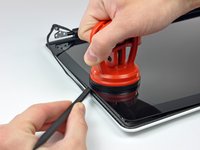
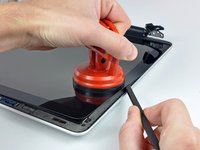
Attach a suction cup along the right side of the front glass panel.
-
Pull up on the glass panel while you use the flat end of a spudger to separate it from the rest of the display assembly.
-
Continue working along the right edge of the front display glass until it is separated from the display.
I ended up breaking my glass panel due to using the spudger. I think if you use something more like a small putty knife you will do better. The spudger puts a lot of pressure in a small spot while the putty knife would put a little pressure over a larger area. Also, if you do break the glass, be sure to get ALL of the broken bits off before putting the new one on. Also, watch out for those broken bits as they tend to penetrate skin quite easily, and stay there for days!
-
-
-
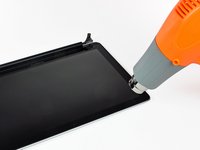
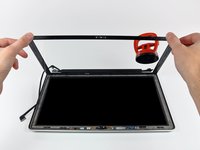
Use your heat gun to soften the adhesive under the black strip along the top edge of the glass display panel.
-
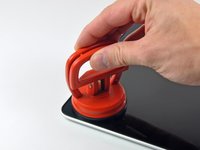
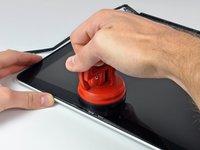
Attach a suction cup near the top edge of the glass display panel and use it to pull the glass panel up off the display.
-
Work along the top edge of the glass panel, carefully using the flat end of a spudger to separate the adhesive if necessary.
-
-
-
Use a heat gun to soften the adhesive under the black strip near the upper left corner of the glass display panel.
-
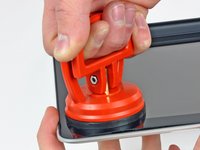
Attach a suction cup near the upper left corner of the glass display panel.
-
Pull up on the suction cup and use the flat end of a spudger to carefully pry the glass display panel out of the display assembly.
-
-
-
Use a heat gun or hair dryer to soften the adhesive under the black strip along the left side of the front glass panel.
-
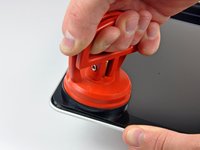
Attach a suction cup along the left side of the front glass panel.
-
Pull up on the glass panel while you use the flat end of a spudger to separate it from the rest of the display assembly.
-
Continue working along the left edge of the front display glass until it is separated from the display.
-
-
-
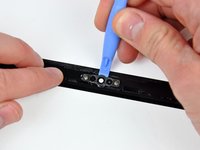
Insert the edge of a plastic opening tool between the display glass and the camera bracket, and run it around the camera bracket to separate it from the display glass.
-
-
-
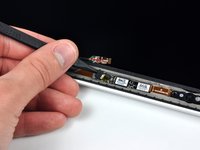
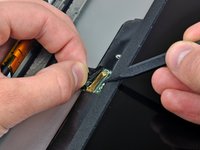
To reconnect the cable, first use the tip of a spudger to remove the piece of foam tape over the camera cable ZIF socket.
-
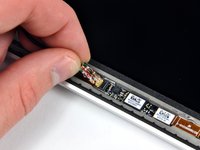
Use the tip of a spudger to flip up the ZIF cable retainer on the camera cable socket.
-
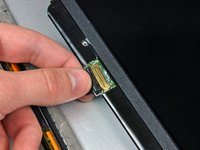
Insert the camera cable into its socket on the camera board and use the tip of a spudger to snap down the ZIF cable retainer, locking the cable in place.
-
-
-
Slide the clutch cover toward the right edge of the display.
-
-
-
Starting at its far right end, rock the clutch cover along its long axis while pulling it away from the clutch hinge.
-
Working from right to left, carefully continue to release and lift the clutch along the lower edge of the display assembly.
-
Lift the clutch cover up off the front bezel and set it aside.
Highly recommended to remove clutch cover BEFORE heating up glass, because cover is made of very thin plastic and it'll be deformed!
Basically, I'm removing everything from screen - clutch cover, wifi card, antenna, all plastic bits, and only then proceed with heating and glass removal.
-
-
-
De-route the display data cable from its retaining bracket near the lower left edge of the display.
-


To reassemble your device, follow these instructions in reverse order.
To reassemble your device, follow these instructions in reverse order.
İptal et: Bu kılavuzu tamamlamadım.
79 farklı kişi bu kılavuzu tamamladı.

5Kılavuz Yorumları
All I can say is THANKS! I was able to replace my daughters display, the bottom aluminum panel and to remove the dents from the top aluminum panel. Without your guide, I doubt I ever could have done this. You saved me hundreds! Your spudger tool was worth its weight in gold....till I used it to break the glass front panel...sigh. Still, I'll use that hundreds of times from now on.
==Step 17==
It is extremely critical that when attaching the suction cup to FIRST LIFT THE LEVER ABOUT HALF WAY before attaching to the glass in order to only apply about half the suction the tool is capable of applying!! Lift the lever half way. Set into position on glass. Lift the rest of the way to apply about half of the suction cup's potential suction. Failure to do this WILL result in circular break around the suction cup!
This was extremely helpful. I am a junior in high school who was issued a Mac for class. I am one of those anti-Apple people, so I get easily frustrated with them and tend to beat them up a bit. Consequently, I broke it. Being low on funds, I couldn't afford the repair costs, let alone had the nerve to own up to my actions and tell the teacher about it. SO....after staying up an extra couple hours researching the problem, I discovered this and decided to give it a try. Despite already being somewhat tech savvy, I found this resource very helpful, even more so after re-reading it and watching a couple how-to videos. The problem was fixed in no time.
Lets just say, thanks to this site, the school never found out that I broke the laptop. :)
GREAT GUIDE! Thanks!
I had a laser targeted infrared thermometer for another project ($25 at local hardware store) and found the screen cover adhesive softened nicely at top and sides at 140-145F. I used a hairdryer on high setting.
I found with the top edge and both side edges lifted free of the adhesive in earlier stages, the bottom edge lifted easily at 100-105F. (I had package taped the screen as it had cracks, being sure the tape laid flat so sunction would form in the early steps.
NOTE THE MAXIMUM SPECiIFIED NONOPERATING TEMPERATURE IS LISTED BY APPLE AT 113F for the 2010 MBP 13”. Separating the bottom and top cases allows the keyboard and all the other goodies in the lower case to rest comfortably away from the heat.
One or two very thin flexible pry tools like iSesame (inexpensive online) worked well once the upper corner was lifted with a suction cup
This guide is the same of MacBook Pro 13 unibody 2012?
Compare the short screws carefully before reinstalling them. The shouldered screws go in the holes on the front edge.
David Kilbridge - Yanıt
Before I started removing any screws I took a piece of paper and drew the bottom of the laptop and put a piece of double-sided tape in the spot where each screw goes. That way when I took out the screws, I could put them on the tape so I knew exactly which screw went in which spot. I did the same thing for dismantling the inside on another sheet of paper, then a third sheet for the screen after getting the front glass off.
mastover - Yanıt
I use a similar technique: I print out the iFixit manual for the job, and Scotch-tape down the screws/brackets/cables I remove at each step next to the component descriptions. That way, when I'm reassembling, the bits are taped right next to the photo of where they came from.
adlerpe -
That's exactly what I do for all my repairs! It's the best way to keep track of all of the parts ' original location and to make sure that you don't miss any parts during reassembly.
joyitsjennie -
Great idea and one I use often
Thomas Overstreet -
Excellent idea! Thanks for sharing it here.
Laura Sharkey -
I used a 00 that fit but the screws were very tight so I used a tiny paintbrush with some wd40 on it and put it around the edges of the screws. Worked like a charm
valentinedhdh - Yanıt
I use a magnetic mat and place the screws in order on that :)
Cary B - Yanıt
How to tell all screws apart?
Spudgeboy - Yanıt