Giriş
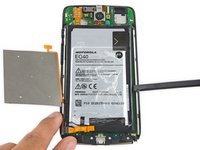
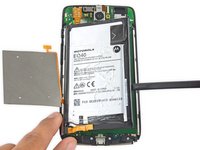
Use this guide to replace the battery on your Motorola Droid Turbo.
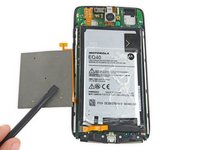
If your battery is swollen, take appropriate precautions.
Neye ihtiyacın var
-
-
Prepare an iOpener and lay it over the rear case to soften the adhesive on securing the rear case to the phone.
-
-


To reassemble your device, follow these instructions in reverse order.
İptal et: Bu kılavuzu tamamlamadım.
60 farklı kişi bu kılavuzu tamamladı.
Ekip

USF Tampa, Team 15-5, Remmell Spring 2016 USF Tampa, Team 15-5, Remmell Spring 2016 üyesi
USFT-REMMELL-S16S15G5
3 Üyeler
6 adet Kılavuz yazıldı
34Kılavuz Yorumları
The screws that attach the black plastic in step 3 are NOT #2 phillips. This is reasonably obvious from the photo but the misleading caption should be changed. They are T5 Torx bit screws. Also, the plastic camera sub assembly in step 4 has 3 small t shaped tabs that shear if you pry it away from the phone. I could not see a way to remove the sub assembly without damaging the tabs so the 4 T5 screws will have to keep it in place from now on.
Hey Jeffrey! Thanks for the heads up. Feel free to edit the guide steps as you see fit by selecting Edit in the top right corner of the guide step in question. We changed the permissions so you should be able to edit the text. Thanks again for contributing!
Do you need to apply fresh adhesive when re-assembling?
Do you need to apply adhesive when re assembling?
the adhesive is 3 narrow pieces of double sided tape. You can carefully peel it off the old battery and reuse it. I don't see where it's absolutely necessary though. The battery isn't going to move around after the phone is put back together.