Giriş
Use this guide to replace the battery in your Nexus 5X.
Before disassembling your phone, discharge the battery below 25%. If your battery is swollen, do not heat your phone. Swollen batteries can be very dangerous, so wear eye protection and exercise due caution, or take it to a professional if you're not sure how to proceed.
You’ll need replacement adhesive to reattach components when reassembling the device.
Neye ihtiyacın var
-
-
Insert a SIM card ejection tool into the hole on the SIM card tray, located on the left edge of the phone.
-
Press in to eject the SIM card tray.
-
Remove the SIM card tray.
 FixBot'a Sor
-
-
-
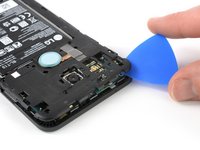
Place an opening pick in the opening of the SIM card tray slot and twist it sideways to release the first plastic clip that holds the rear panel in its place.
-
Slide the opening pick around the top edge of the phone to release the plastic clips that secure the rear panel.
-
-
-
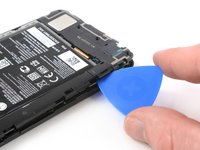
Continue to slide the opening pick around all sides of the phone to release all clips that secure the rear panel.
-
-
-
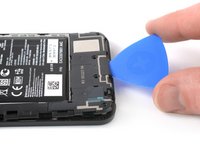
Tilt the opening pick to lift the rear panel a little bit.
-
There are two more plastic clips next to the fingerprint sensor. Release them by gently pulling the rear panel.
-
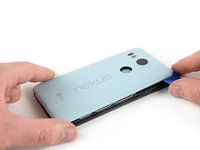
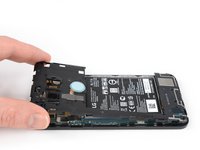
Remove the rear panel.
-
-
-
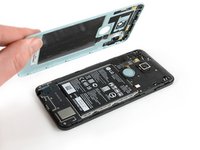
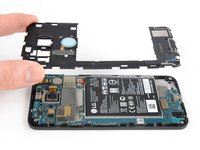
Remove the ten 3.6 mm Phillips screws that secure the midframe.
-
-
-
-
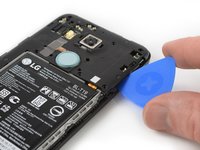
Insert an opening pick into the SIM card tray slot and twist the opening pick sideways to release the plastic clips.
-
-
-
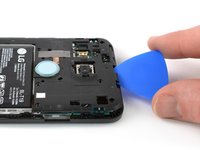
Continue sliding the opening pick around the upper part of the midframe to release the plastic clips.
-
-
-
Use the plastic pick to pry open the plastic clips on the long edge of the midframe and on the bottom edge.
-
-
-
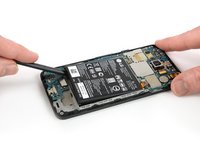
Use the edge of a spudger to pry up and disconnect the battery flex cable located at the bottom right of the motherboard.
-
-
-
Use an iOpener to loosen the adhesive beneath the battery. Apply the iOpener on the back of the phone for at least two minutes.
-
-
-
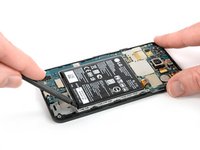
Insert the flat end of a spudger under the bottom left corner of the battery and gently pry upwards.
-
If you are having trouble prying up the battery, the adhesive may not be loose enough. You can apply some isopropyl alcohol under each corner of the battery and allow it to penetrate for several minutes to help weaken the adhesive.
-
-
-
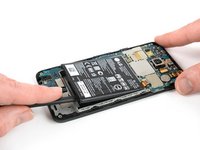
Insert the flat end of a spudger under the bottom right corner of the battery and gently pry upwards to loosen the remaining adhesive.
-


To reassemble your device, follow these instructions in reverse order.
If possible, turn on your phone and test your repair before installing new adhesive and resealing the phone.
For optimal performance, calibrate your newly installed battery: Charge it to 100%, and keep charging it for at least two more hours. Then, use it until it shuts off due to low battery. Finally, charge it uninterrupted to 100%
Take your e-waste to an R2 or e-Stewards certified recycler.
Repair didn’t go as planned? Check out our Nexus 5X Answers community for troubleshooting help.
İptal et: Bu kılavuzu tamamlamadım.
122 farklı kişi bu kılavuzu tamamladı.

31Kılavuz Yorumları
I replaced the battery, but I'm still not getting an led or anything on the screen to show it's charging. What else could be the issue?
All went smooth here. Pulled the mainboard out and was able to gently pry the battery free without heat. Rapid charging is working fine. I got an LG battery off Amazon. Didn't cost much more than knock-offs.
worked great for me, in the end used brute force to get the battery off with a terrifying crack.