Giriş
Use this guide to remove and replace the midframe from your Nexus 5X.
Neye ihtiyacın var
-
-
Insert a SIM card ejection tool into the hole on the SIM card tray, located on the left edge of the phone.
-
Press in to eject the SIM card tray.
-
Remove the SIM card tray.
-
-
-
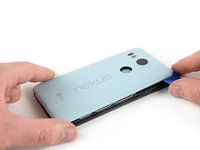
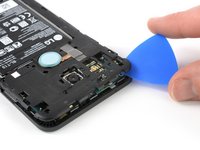
Place an opening pick in the opening of the SIM card tray slot and twist it sideways to release the first plastic clip that holds the rear panel in its place.
-
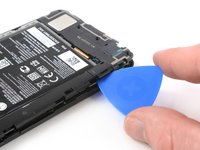
Slide the opening pick around the top edge of the phone to release the plastic clips that secure the rear panel.
Here’s a photo of the location of the 18 tabs that hold the back cover in place
Twisting sideways didn’t do it for me, but sliding along the edge did. However, at first I didn’t realize that the pick was between the motherboard and midframe, rather than between midframe and back cover like it was supposed to. This led to breaking off a spring-loaded connector on the motherboard, connecting to an antenna (I guess) in the back cover. So far I haven’t noticed any reception issues, but I can’t say for sure.
In essence: be careful to get the pick towards the back cover, and not “straight in” under the midframe.
-
-
-
-
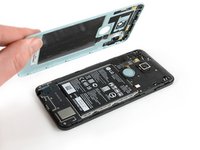
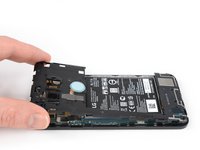
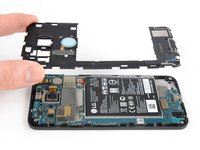
Remove the ten 3.6 mm Phillips screws that secure the midframe.
-
-
-
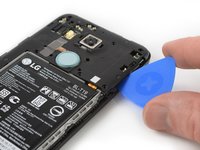
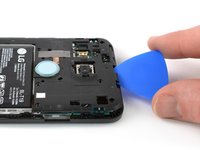
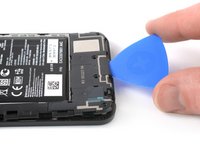
Insert an opening pick into the SIM card tray slot and twist the opening pick sideways to release the plastic clips.
The photo seems to show that the person is opening from the top, which is the opposite of your advice. So, just want to be clear.
yes, open from bottom first... the pic above shows the finished product after reaching top of phone. I found it best to actually start close to the right of the usbC connector. Pushing inbetween the 2 tabs and up will release the shell.. then work clockwise.
Chris, your advice to start to the right of the usbC connector was excellent, thank you!
I found that my middle panel was already broken at the narrowest part just to the left of the 2-D scan code on the battery, perhaps from some ham-fisted previous repair. This seems of little consequence, there do not seem to be any electrical connections running through this part.
After a long amount of prying, I discoved that, if used gently, a jimmy can really help get the plastic off
I could not remove the cover with the opening tool but had success with the opening picks (the triangle parts). Just slide them under the cover and gently bend and twist the pick to release the cover from the locks. By the way: it’s perfectly normal for the bottom cover part to come loose from the top cover part. It’s designed that way (they interlock).
Here’s a photo of the location of the 20 tabs that hold the middle assembly in place, and the pry angle needed.
This is the scariest part but it is the same process of taking a bike tire off the rim: lift up one part of the cover then put a wedge under the lifted section to hold it up then continue around the frame lifting it up and holding it up with the blue picks. You’ll find that after you life the bottom you can wriggle free the rest by hand.
The 10 screws came out quickly using the IFIXIT.com magnetic screwdriver.
-


To reassemble your device, follow these instructions in reverse order. If your middle panel is damaged or broken, install the new panel instead.
Take your e-waste to an R2 or e-Stewards certified recycler.
Repair didn’t go as planned? Check out our Nexus 5X Answers community for troubleshooting help.
İptal et: Bu kılavuzu tamamlamadım.
7 farklı kişi bu kılavuzu tamamladı.


2Kılavuz Yorumları
Has anyone else run into the different screws holding the midframe? I opened my son's phone today to swap out the battery and found the screws to be tri-wing. Imagine my confusion. I've been into to my wife's Nexus 5x before, and it has phillips-head screws. Weird.