Giriş
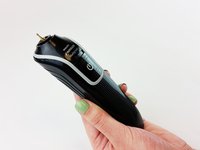
This guide will demonstrate how to change the battery of a Philips Norelco MultiGroom 3100. Tear down/reassembly requires a plastic spudger and soldering equipment.
Neye ihtiyacın var
-
-
-
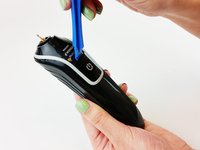
Insert the spudger into the bottom of the gray bezel and begin to gently pry it off.
Works better if you use the thin opening picks all around the edge at once.
-
-
-
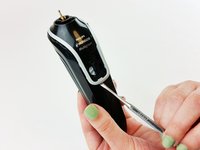
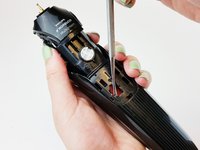
Insert the spudger in the indicated hole and apply a tilting force to loosen the outer casing.
-
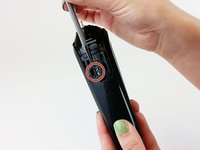
Pull upward on the top of the inner housing to remove it from the outer casing.
This has to be a hard spudger that does not bend. The one on the picture is not included in the ifixit Pro Tech Toolkit, so I used a small screwdriver.
Applying force on the top of the outer case as in the second image didn’t work very well for me. But the outer case has a hole where the charger terminals exit the bottom of the shaver. I was able to remove the inner housing by holding the outer case and pushing in on the recessed plastic surface around the terminals with a small screwdriver. On reassembly, the housing snaps right back in.
I snapped a plastic spudger trying this Step 6. I found an easier way, was to simply flip the shaver to the other side, use your thumbs to push upwards the inner unit from the outer unit. There is no bracket or clip that is actually holding it together that you must manipulate with a tool. Thanks for the writeup.
-
-
-
Make sure battery is safely secured and re-solder the battery contact tab onto new battery.
-
Check that contact tab is re-soldered onto the original solder.
-
Once solder is dried and cool, toggle the power switch (not the power button) to check that the device is functional.
In step 6 to 7 there are two different models changes from multigroom to series 3100. I am stock at step 6 because I have the 3100 and the picture is for multigroom at step 6. plase help
Dude by the way , where is the bms or pcb for this li-ion cell!
without a bms, it can explode!!
and the original cell used by philips in this shaver is nimh not li-ion!!
-


İptal et: Bu kılavuzu tamamlamadım.
15 farklı kişi bu kılavuzu tamamladı.
Ekip

IUPUI, Team S1-G5, Freund Fall 2017 IUPUI, Team S1-G5, Freund Fall 2017 üyesi
IUPUI-FREUND-F17S1G5
4 Üyeler
2 adet Kılavuz yazıldı
10Kılavuz Yorumları
Capitalize Battery in the Title
Go ahead and upload the picture of the device.
Be sure to submit to iFixit for their comments when done.
Also include prerequisite guides
For the Multigroom QG3380 (which I bought at Costco in Canada), there are some differences. Don’t remove the power button – not needed. Pry off the silver frame – very hard not to break some clips. It uses two 750 mAh AAA NiMH batteries (Suppo HSY-AAA0). I’ve ordered 900 mAh batteries with clips to replace these.
Where did you order the replacement batteries ?
I had mine from Japan, QG3380 too many clips broke off and indeed don’t remove the power button on that one.
Sear Sir,
Regarding the step #6 above, I failed to do it ( “Insert the spudger in the indicated hole and apply a tilting force to loosen the outer casing” ) as I am afraid it may break.
Do you have any other solution. Thank you.
Mohammed.
That was awesome. I literally just soldered on a rechargeable NiMH AA battery and its good.
Very clear and accurate instructions, I would only add a close up of how to orient the battery poles. I took my photos ...
I'd like to know what kind of battery is it .
Apparently the original battery in my Philips Norelco Multigroom 3100 (QG3330/49) is NiMH SUPPO HLY AA1200 1.2V (1200mAh), while the listed replacement battery is Lithium-ion CS-PHQ190SL 3.7v (750mAh). I'm pretty sure it is a bad idea to use it.
Nina Lovekrist, Katie Scalion and Martin CREATED THE POWER BUTTON GUIDE. The recent modifications asa far as Team Members by Adam are FALSE. WE WERE TEAM 1- LEAHY 2015 USF
*SO GIVE CREDIT WHERE CREDIT IS DUE & STOP ERASING NAMES.
Nina Lovekrist - Yanıt