Ana içeriğe geç
Philips Satinelle Gear Replacement

Philips Satinelle Gear Replacement

Nathan Christian

Nathan Christian ve 4 diğer katkıda bulunanlar

En son July 14, 2024 tarihinde güncellendi

Tahmin yok
Orta
Daha iyi giriş

Use this guide if you need to replace the gear that turns the tweezers of your Philips Satinelle.

Neye ihtiyacın var

Aletler

Daha fazlasını göster…

  1. Philips Satinelle Gear Replacement, Philips Satinelle Disassembly: adım 1, 2 resimden 1. Philips Satinelle Gear Replacement, Philips Satinelle Disassembly: adım 1, 2 resimden 2.
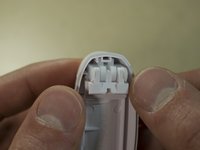
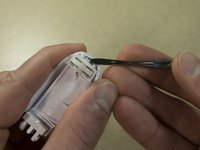
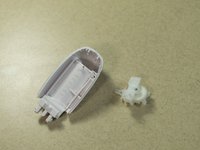
    • Unplug the device and remove the purple guard.

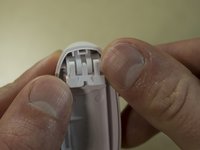
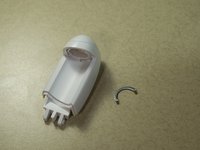
    • Remove the head by pressing the right side of the head (with the device facing away from you).

    • You will hear a 'click' and the head will become dislodged from the body of the device.

  2. Philips Satinelle Gear Replacement: adım 2, 3 resimden 1. Philips Satinelle Gear Replacement: adım 2, 3 resimden 2. Philips Satinelle Gear Replacement: adım 2, 3 resimden 3.
    • While wearing safety glasses, use a plastic opening tool to pry from right to left to pry out the tensor clip.

    • Be careful not to lose the clip. It will likely fly off when it releases.

  3. Philips Satinelle Gear Replacement: adım 3, 1 resimden 1.
    Bu adımda kullanılan alet:
    Tweezers
    $4.99
    • The left side will swing down.

    • Remove the Tweezers.

  4. Philips Satinelle Gear Replacement: adım 4, 3 resimden 1. Philips Satinelle Gear Replacement: adım 4, 3 resimden 2. Philips Satinelle Gear Replacement: adım 4, 3 resimden 3.
    • Remove the plastic component that swings down.

    • Use fingernails to lift clips from stubs.

  5. Philips Satinelle Gear Replacement: adım 5, 3 resimden 1. Philips Satinelle Gear Replacement: adım 5, 3 resimden 2. Philips Satinelle Gear Replacement: adım 5, 3 resimden 3.
    • Using Needle Nose pliers remove metal roller track on both sides of the Tweezers Head.

  6. Philips Satinelle Gear Replacement: adım 6, 3 resimden 1. Philips Satinelle Gear Replacement: adım 6, 3 resimden 2. Philips Satinelle Gear Replacement: adım 6, 3 resimden 3.
    • Use a spudger to pry the gear housing unit from the base.

  7. Philips Satinelle Gear Replacement: adım 7, 3 resimden 1. Philips Satinelle Gear Replacement: adım 7, 3 resimden 2. Philips Satinelle Gear Replacement: adım 7, 3 resimden 3.
    • Use your thumbnail and a pair of needle nose pliers to push out the gear housing retention pin.

  8. Philips Satinelle Gear Replacement, Gear Replacement: adım 8, 1 resimden 1.
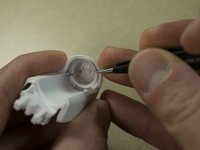
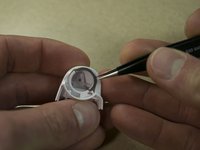
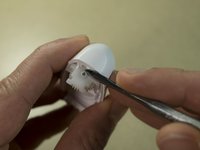
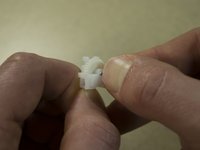
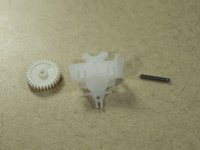
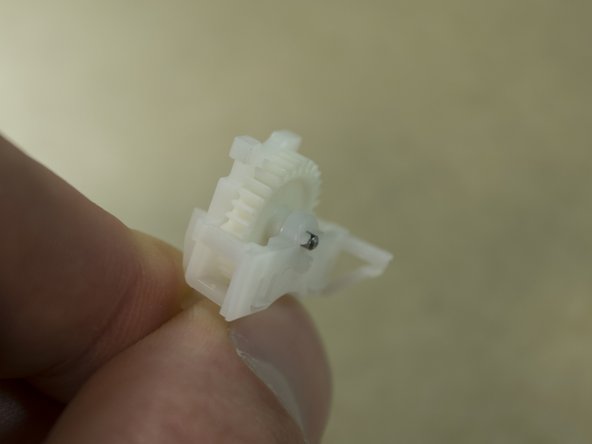
    • Replace the gear and re-insert the pin.

    • Ensure that pin is protruding slightly, it should not be flush.

    Where to find this gear from?

    n c - Yanıt

Sonuç

To reassemble your device, follow these instructions in reverse order.

Nathan Christian

Üyelik tarihi: 11/11/17

505 İtibar

3 adet Kılavuz yazıldı

Ekip

IUPUI, Team S5-G5, Wilson Fall 2017 IUPUI, Team S5-G5, Wilson Fall 2017 üyesi

IUPUI-WILSON-F17S5G5

3 Üyeler

8 adet Kılavuz yazıldı

3Kılavuz Yorumları

What size pinion is used in it? Kindly help.

Wilkis James - Yanıt

Can you send link to buy this piece?

Or 3d Printer file?

Thanks

Emilio Hernandez - Yanıt

Tienes las medidas de los engranajes

luis vega - Yanıt

Yorum Ekle

İstatistikleri Görüntüle:

Son 24 Saat: 1

Son 7 gün: 5

Son 30 gün: 32

Her zaman: 1,659