Giriş
Use this guide to remove and replace the glued-in battery from your 12-inch MacBook with Retina Display. This is best done with the help of an iFixit battery replacement kit; the liquid adhesive remover in your kit will dissolve the adhesive securing the battery, allowing you to remove it with ease.
iFixit adhesive remover is flammable. Perform this procedure in a well-ventilated area. Do not smoke or work near an open flame during this procedure.
For your safety, drain your MacBook's battery before you begin this procedure. A charged lithium-ion battery can create a dangerous and uncontrollable fire if accidentally punctured.
The MacBook's battery contacts are located under the logic board, and this guide recommends removing the logic board completely for battery replacement. While it's possible to remove the logic board screws and simply tip the board up slightly to remove the battery, it's very difficult to install a new battery correctly with the logic board still in place.
Note: The solvent used to dissolve the battery adhesive can damage and/or discolor certain plastics. Take care where you apply the solvent.
To avoid logic board damage, when your MacBook repair is complete but before powering it on, connect it to low-voltage power using a 5-Watt iPhone charger and a USB-C to USB-A cable. These accessories are not included with your MacBook, so make sure you have them ready before you begin.
Neye ihtiyacın var
-
Bu adımda kullanılan alet:Magnetic Project Mat$19.95
-
Remove the following eight screws securing the lower case:
-
Two 1.8 mm P5 Pentalobe screws
-
Four 2.9 mm P5 Pentalobe screws
-
Two 6.1 mm P5 Pentalobe screws
 FixBot'a Sor
-
-
-
Wedge your fingers between the upper case and the lower case, starting from the rear of the MacBook between the hinges.
-
Keeping a firm grip, lift steadily until the lower case separates slightly from the upper case.
-
-
-
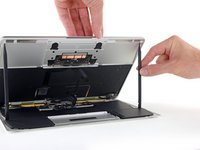
While holding the lower case in place, carefully flip the MacBook over so the Apple logo faces up.
-
-
-
Lift the upper case and display together from the front edge and raise it to about a 45˚ angle.
-
-
-
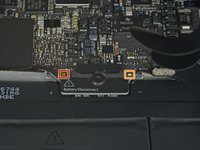
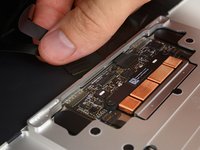
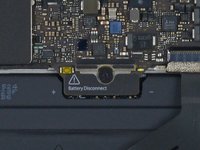
Use the flat end of a spudger to press and hold the small gold 'battery disconnect' button.
-
If the power LED is lit up, continue holding the button until the LED goes dark, and then release. This may take up to 10 seconds.
-
If the LED does not light, release the button after 5-10 seconds. Press and hold it again for 5-10 seconds, and release. Finally, press and hold it a third time for 5-10 seconds, and release.
-
-
-
Lifting from the front edge, open the lower case to an angle of about 45°.
-
-
Bu adımda kullanılan alet:Tweezers$4.99
-
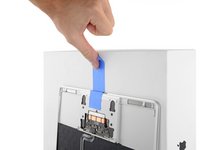
Use tweezers to peel back the tape covering the trackpad cable ZIF connector.
-
-
-
Use a spudger to carefully flip up the retaining flap on the trackpad cable ZIF connector.
-
-
-
Disconnect the trackpad ribbon cable from the trackpad by pulling it gently through its slot in the frame.
-
-
-
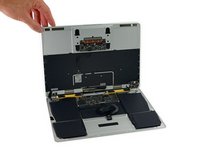
Carefully turn the MacBook over, so that the lower case lays flat.
-
Raise the upper case/display assembly to about a 90° angle, and prop it up against something sturdy so you don't have to hold it.
-
Add a piece of tape near the track pad to secure the upper case and prevent accidental movement.
-
-
-
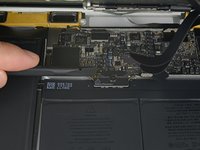
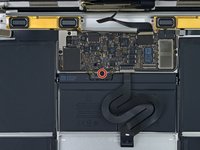
Remove the single 2.9 mm T5 Torx screw securing the battery connector to the logic board.
-
-
Bu adımda kullanılan alet:Battery Blocker$5.95
-
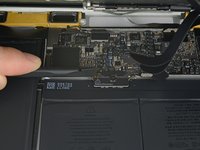
As an added precaution, you may physically disconnect the battery by inserting a battery isolation pick between the logic board and the battery connector.
-
-
-
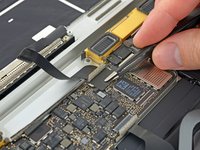
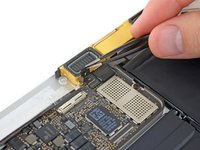
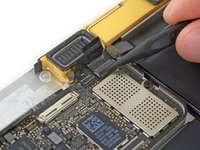
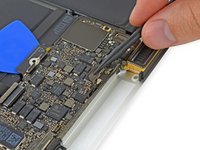
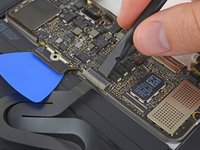
Remove the two screws securing the USB-C port cable bracket:
-
1.1 mm Tri-point Y00 screw
-
3.5 mm T5 Torx screw
-
-
-
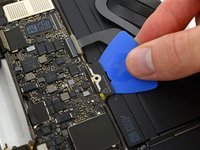
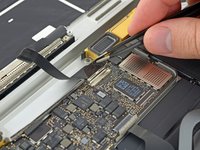
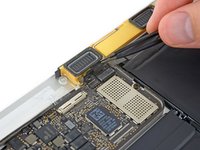
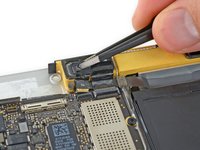
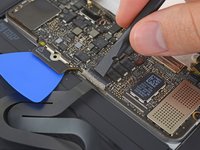
Use the flat end of a spudger to disconnect the USB-C port cable bracket by prying it straight up from the logic board.
-
-
-
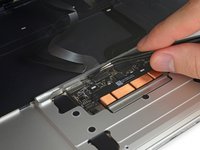
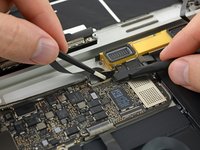
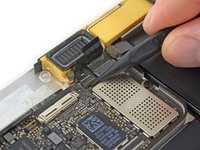
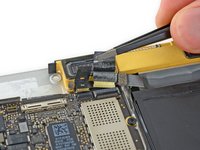
Use a spudger to flip open the retaining flap on the audio jack board cable ZIF connector.
-
-
-
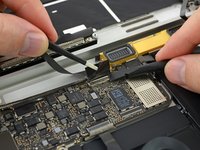
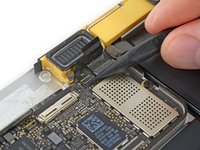
Disconnect the audio jack board ribbon cable by pulling it straight back out of the ZIF connector.
-
-
-
Bu adımda kullanılan alet:Tweezers$4.99
-
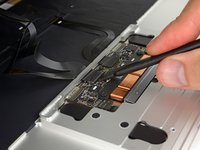
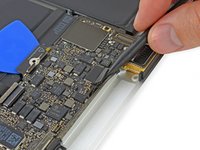
Use tweezers to peel back the tape covering the display cable connector.
-
-
-
If so, use the flat end of a spudger to hold down the retaining flap while peeling the tape away with the tweezers.
-
-
-
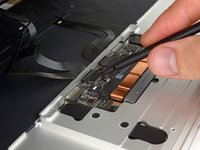
Use the flat end of a spudger to flip open the retaining flap on the display cable connector.
-
Try to keep it clear of the tape, or it may re-adhere and make cable removal difficult.
-
-
Bu adımda kullanılan alet:iOpener$14.95
-
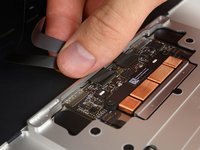
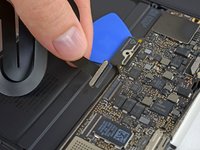
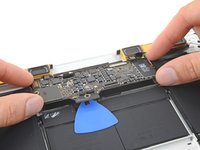
Carefully slide the flat end of a spudger underneath the display cable to separate the adhesive holding it to the lower case.
-
-
-
Disconnect the display cable by gently pulling it straight out of its connector.
-
-
Bu adımda kullanılan alet:Tweezers$4.99
-
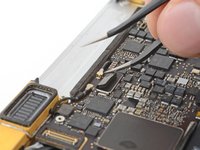
Use tweezers to peel up the tape covering the two ZIF connectors—one for the right speaker cable, and one for the audio jack board cable.
-
-
-
Use the point of a spudger to flip up both ZIF connector retaining flaps.
-
-
-
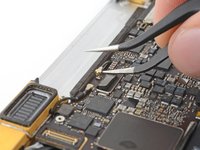
Carefully pull straight back on the two pieces of tape you just peeled up to disconnect the two ribbon cables.
-
-
-
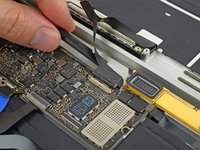
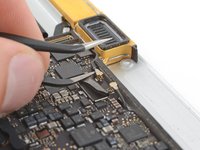
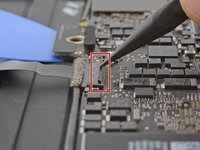
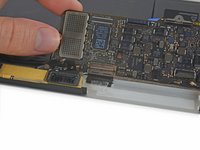
Use the point of a spudger to peel up the foam pad covering the two antenna connectors.
-
-
-
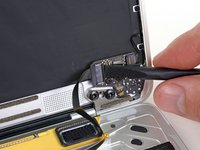
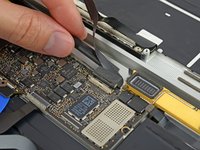
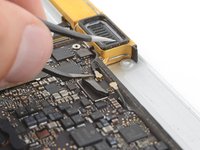
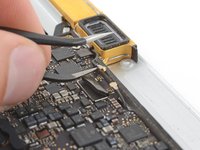
Insert one arm of your angled tweezers under the metal neck of the first antenna connector and pry up to disconnect it.
-
-
-
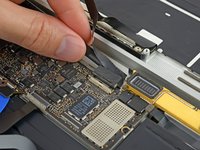
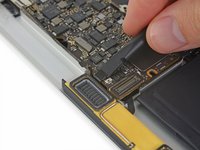
Use a spudger to disconnect the left speaker cable connector by prying it straight up from the logic board.
-
-
-
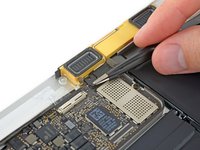
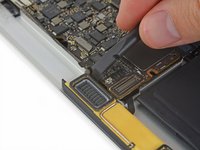
Use a spudger to flip up the retaining flap on the trackpad cable ZIF connector.
-
-
-
Disconnect the trackpad cable from the logic board by gently pulling it straight out of its connector.
-
-
-
Remove the single 3.5 mm T5 Torx screw securing the logic board to the lower case.
-
-
-
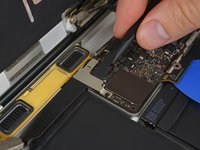
Flip up the front edge of the logic board.
-
Lift and detach the EMI tape securing the logic board to the lower case.
-
-
-
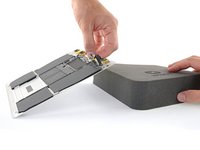
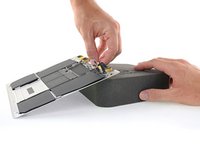
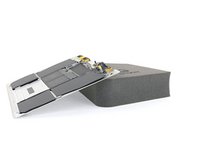
Lift the back edge of the lower case assembly and prop it up at an angle using a book or foam block.
-
-
-
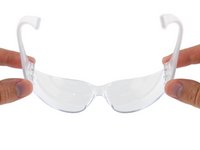
Wear eye protection when handling and applying the adhesive remover. (Eye protection is included in your kit.)
-
Do not wear contact lenses without eye protection.
-
Protective gloves are also included in your kit. If you are concerned about skin irritation, put your gloves on now.
-
-
-
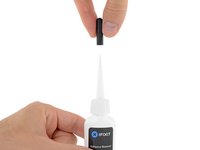
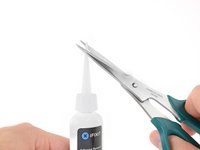
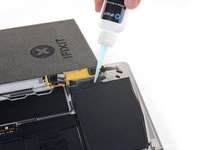
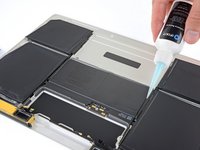
Pull off the black rubber stopper from your bottle of adhesive remover.
-
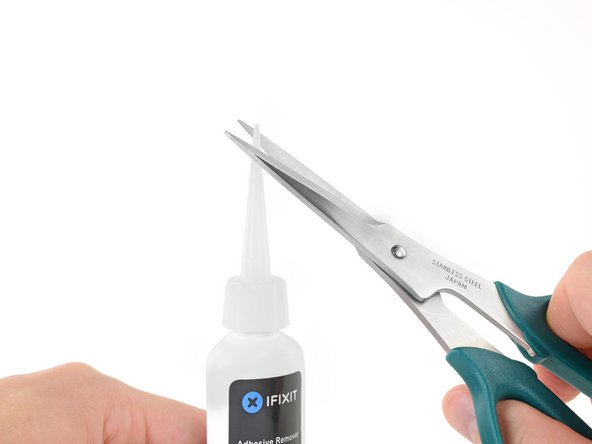
Use scissors to cut off the sealed tip of the applicator.
-
-
-
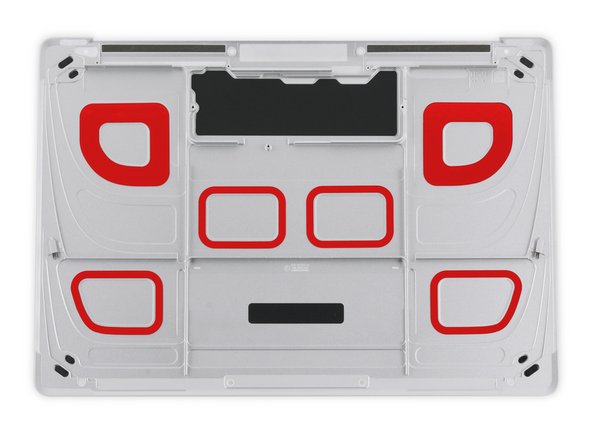
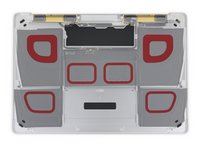
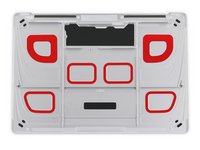
The adhesive securing the battery cells to the lower case is located in the areas marked in red.
-
-
-
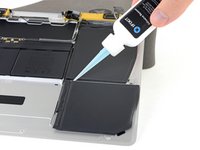
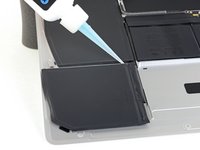
Apply a few drops of adhesive remover along the top edge of the front right battery cell.
-
Wait 2-3 minutes for the liquid adhesive remover to penetrate underneath the battery cell before you proceed to the next step.
-
-
Bu adımda kullanılan alet:Plastic Cards$2.99
-
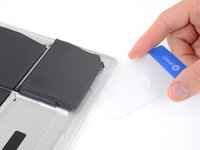
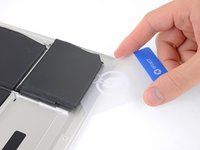
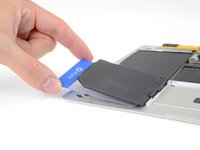
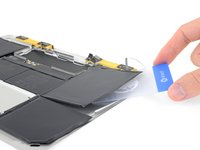
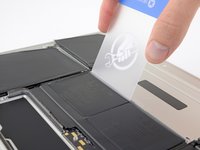
After 2-3 minutes, slide one corner of a plastic card underneath the battery cell.
-
Slide the card farther underneath the battery cell to separate it from the adhesive securing it to the case.
-
-
-
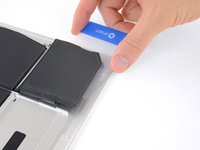
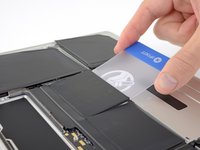
Lift the battery cell from the right edge to fully separate it from the adhesive, but don't try to remove it.
-
Leave the plastic card underneath the battery cell to prevent it from re-adhering as you proceed to the next step.
-
-
-
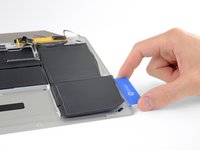
Repeat the previous three steps to separate the front left battery cell.
-
Leave the plastic card underneath the battery cell to prevent it from re-adhering as you proceed to the next step.
-
-
-
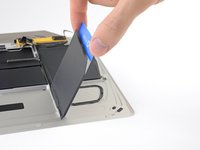
Repeat the previous steps to separate the large battery cell on the left side of the MacBook.
-
-
-
Repeat the previous steps to separate the large battery cell on the right side of the MacBook.
-
-
-
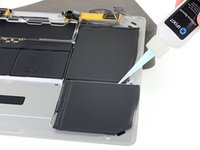
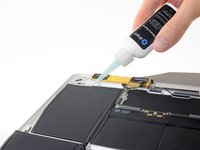
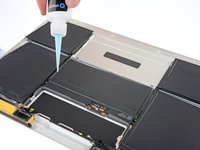
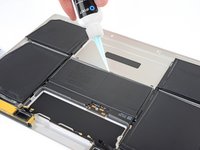
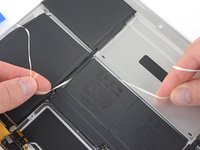
Lay the lower case assembly down flat, and apply adhesive remover to the two middle battery cells—at each side, and along the front edge (opposite the logic board area).
-
-
-
Apply some additional adhesive remover down the middle between the two battery cells.
-
Wait 2-3 minutes for the adhesive remover to penetrate before you proceed.
-
-
-
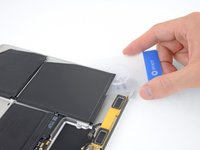
Insert your plastic card under the front edge one of the battery cells and separate it carefully.
-
-
Bu adımda kullanılan alet:Tweezers$4.99
-
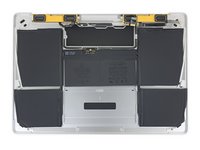
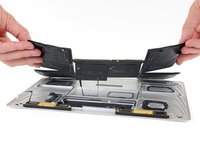
Remove the battery by lifting it away from the speaker and logic board area.
-
Peel off larger pieces of adhesive using tweezers or gloved fingers.
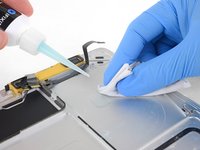
-
Scrape away any remaining adhesive with a plastic tool, and clean the underlying areas with adhesive remover or isopropyl alcohol. Wipe in one direction, not back and forth, until all the adhesive residue is gone.
-
-
Bu adımda kullanılan alet:Tesa 61395 Tape$25.95
-
Test your new battery's fit and alignment carefully before installing it.
-
Your replacement battery may come affixed to a thick plastic top liner to help keep the individual cells in position as you install it. Don't remove this liner until after the battery is installed.
-
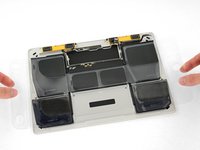
If your battery came with adhesive pre-installed on the bottom, peel away the bottom plastic liners to expose the adhesive. If your battery did not come with adhesive, apply a thin double-sided adhesive tape such as Tesa 61395 to the lower case in the areas marked in red.
-
Carefully position the battery and set it into place. Press and hold each cell firmly for 5-10 seconds to secure it to the lower case. Afterward, peel off the plastic top liner along with any foam padding.
-


For optimal performance, calibrate your newly installed battery after completing this guide.
To reassemble your device, follow these instructions in reverse order.
To avoid logic board damage, before powering on your MacBook, connect it to low-voltage power using a 5-Watt iPhone charger and a USB-C to USB-A cable.
If you notice any unusual behavior or problems after installing your new battery, you may need to reset your MacBook's SMC.
Take your e-waste to an R2 or e-Stewards certified recycler.
Repair didn’t go as planned? Check out our Answers community for troubleshooting help.
İptal et: Bu kılavuzu tamamlamadım.
127 farklı kişi bu kılavuzu tamamladı.


87Kılavuz Yorumları
Beautiful. ‘Followed the instructions to a T. No issues at all. Thanks!
Everything worked, except the keyboard. No backlight, no power. Using remote keyboard for now. Any ideas? Trackpad works fine.
@nabrams1 Check both cables that connect to the trackpad—make sure all four connectors are clean and fully seated, and that the cables aren’t damaged in any way. The first cable connects the keyboard to the trackpad, and should not have been disconnected, but check it anyway. The second cable connects both keyboard + trackpad to the logic board. Good luck!
I did try all of those and checked the cables and ZIF connectors under a microscope. I am thinking a bad trackpad now since it works fine, but the keyboard does not respond. The only way I have figured out o use the machine is to disconnect and reconnect the battery, which is not easy. Otherwise, I cannot power it on myself since the power button is part of the keyboard. Apple won’t touch this now since I replaced the battery myself, so it is kind of a brick. I can’t run AHT since the keyboard doesn’t respond (command-D). Any ideas?
Bad trackpad seems possible. If the keyboard was working before the repair, there may be damage to the trackpad or the logic board itself. It’s hard to say without swapping out parts to test, unless you have a microscope + multimeter + board schematic, and we’re rapidly getting out of DIY territory there. I’d probably take another look at the cables and sockets just to make extra sure it’s not something simple. Hope this helps!