Ana içeriğe geç

Samsung Galaxy S21 Back Cover Replacement

Neye ihtiyacın var

  1. Samsung Galaxy S21 Back Cover Replacement, Heat the bottom edge: adım 1, 1 resimden 1.
    • Completely power off your phone before you begin.

    • Heat an iOpener and apply it to the back cover's bottom edge for two minutes.

    • A hair dryer, heat gun, or hot plate may also be used, but be careful not to overheat the phone—the display, internal battery, and plastic back cover are both susceptible to heat damage.

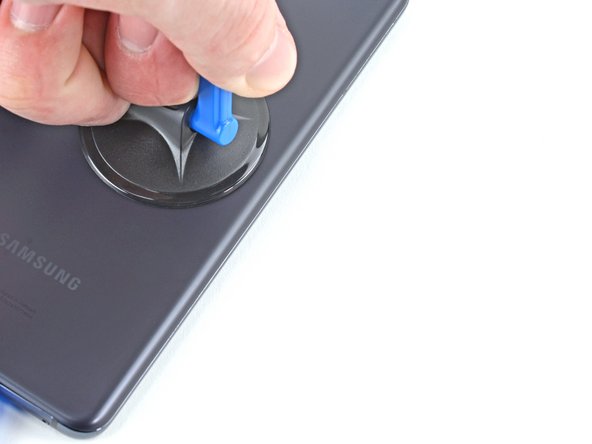
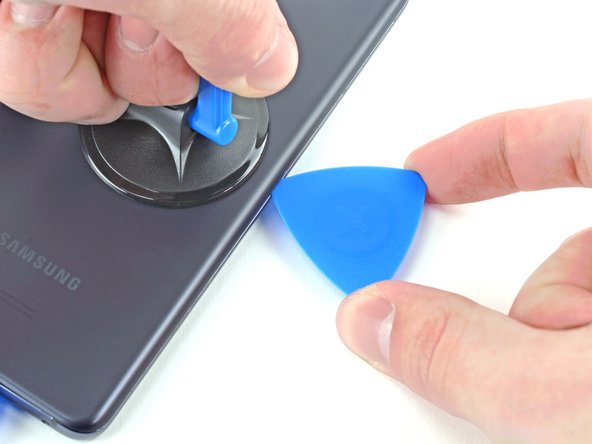
  2. Samsung Galaxy S21 Back Cover Replacement, Separate the bottom adhesive: adım 2, 3 resimden 1. Samsung Galaxy S21 Back Cover Replacement, Separate the bottom adhesive: adım 2, 3 resimden 2. Samsung Galaxy S21 Back Cover Replacement, Separate the bottom adhesive: adım 2, 3 resimden 3.
    • Apply a suction cup to the back of the phone, as close to the center of the bottom edge as possible.

    • Pull up on the suction cup with strong, steady force to create a gap between the back cover and the frame.

    • Depending on the age of your phone, this may be difficult. If you're having trouble, apply more heat to the edge and try again.

    • Insert an opening pick into the gap.

    • Only insert the pick up to 5 mm, as you may damage internal components if you go further.

  3. Samsung Galaxy S21 Back Cover Replacement, Slice the bottom adhesive: adım 3, 3 resimden 1. Samsung Galaxy S21 Back Cover Replacement, Slice the bottom adhesive: adım 3, 3 resimden 2. Samsung Galaxy S21 Back Cover Replacement, Slice the bottom adhesive: adım 3, 3 resimden 3.
    • Slide the pick back and forth along the bottom edge to slice through the adhesive.

    • Leave the pick in to prevent the adhesive from resealing.

  4. Samsung Galaxy S21 Back Cover Replacement, Heat the left edge: adım 4, 1 resimden 1.
    • Apply a heated iOpener to the back cover's left edge for two minutes.

  5. Samsung Galaxy S21 Back Cover Replacement, Separate the left adhesive: adım 5, 3 resimden 1. Samsung Galaxy S21 Back Cover Replacement, Separate the left adhesive: adım 5, 3 resimden 2. Samsung Galaxy S21 Back Cover Replacement, Separate the left adhesive: adım 5, 3 resimden 3.
    • Apply a suction cup to the back of the phone, as close to the center of the left edge as possible.

    • Pull up on the suction cup with strong, steady force to create a gap between the back cover and the frame.

    • Insert an opening pick into the gap.

    • Only insert the pick up to 5 mm, as you may damage internal components if you go further.

  6. Samsung Galaxy S21 Back Cover Replacement: adım 6, 3 resimden 1. Samsung Galaxy S21 Back Cover Replacement: adım 6, 3 resimden 2. Samsung Galaxy S21 Back Cover Replacement: adım 6, 3 resimden 3.
    • Slide an opening pick along the left edge towards the bottom left corner to cut the adhesive.

    • Don't cut past where the camera shell meets the back cover, as you risk cracking the plastic.

    • Leave the pick in to prevent the adhesive from resealing.

  7. Samsung Galaxy S21 Back Cover Replacement, Heat the right edge: adım 7, 1 resimden 1.
    • Apply a heated iOpener to the back cover's right edge for two minutes.

  8. Samsung Galaxy S21 Back Cover Replacement, Separate the right adhesive: adım 8, 3 resimden 1. Samsung Galaxy S21 Back Cover Replacement, Separate the right adhesive: adım 8, 3 resimden 2. Samsung Galaxy S21 Back Cover Replacement, Separate the right adhesive: adım 8, 3 resimden 3.
    • Apply a suction cup to the back of the phone, as close to the center of the right edge as possible.

    • Pull up on the suction cup with strong, steady force to create a gap between the back cover and the frame.

    • Insert an opening pick into the gap.

    • Only insert the pick up to 3 mm, as you may damage the secondary interconnect cable, which runs parallel to the right edge.

  9. Samsung Galaxy S21 Back Cover Replacement: adım 9, 3 resimden 1. Samsung Galaxy S21 Back Cover Replacement: adım 9, 3 resimden 2. Samsung Galaxy S21 Back Cover Replacement: adım 9, 3 resimden 3.
    • Slide an opening pick back and forth along the back cover's right edge to cut the adhesive.

    • Leave the pick in to prevent the adhesive from resealing.

  10. Samsung Galaxy S21 Back Cover Replacement, Separate the corner adhesive: adım 10, 3 resimden 1. Samsung Galaxy S21 Back Cover Replacement, Separate the corner adhesive: adım 10, 3 resimden 2. Samsung Galaxy S21 Back Cover Replacement, Separate the corner adhesive: adım 10, 3 resimden 3.
    • Rotate the right-edge opening pick around the top-right corner of the phone.

    • Only insert the pick up to 5 mm, as you may damage internal components if you go further.

    • This procedure can be applied to each corner, except the top-left where the rear-facing camera is located.

  11. Samsung Galaxy S21 Back Cover Replacement, Reposition the opening picks: adım 11, 3 resimden 1. Samsung Galaxy S21 Back Cover Replacement, Reposition the opening picks: adım 11, 3 resimden 2. Samsung Galaxy S21 Back Cover Replacement, Reposition the opening picks: adım 11, 3 resimden 3.
    • Slide the top-most opening pick as close to the camera shell as possible.

    • Repeat for the left-edge pick.

  12. Samsung Galaxy S21 Back Cover Replacement, Heat the camera shell: adım 12, 3 resimden 1. Samsung Galaxy S21 Back Cover Replacement, Heat the camera shell: adım 12, 3 resimden 2. Samsung Galaxy S21 Back Cover Replacement, Heat the camera shell: adım 12, 3 resimden 3.
    • Heat an iOpener and apply it to the camera shell for two minutes.

    • As you wait for the adhesive to loosen, note the following:

    • There's additional adhesive to the right of the camera that you need to cut through.

    • There's a plate on the back cover surrounding the phone's flash that the pick can get stuck on:

    • Angle the pick downward to avoid any damage.

  13. Samsung Galaxy S21 Back Cover Replacement, Separate the camera shell adhesive: adım 13, 3 resimden 1. Samsung Galaxy S21 Back Cover Replacement, Separate the camera shell adhesive: adım 13, 3 resimden 2. Samsung Galaxy S21 Back Cover Replacement, Separate the camera shell adhesive: adım 13, 3 resimden 3.
    • Rotate the back cover counterclockwise to create a gap between the camera shell and the frame.

    • Only insert the pick up to 5 mm to avoid scratching the camera.

    • Insert an opening pick in the gap.

    • If this method doesn't work, move to the next step for an alternative method; otherwise, skip the next step.

  14. Samsung Galaxy S21 Back Cover Replacement: adım 14, 3 resimden 1. Samsung Galaxy S21 Back Cover Replacement: adım 14, 3 resimden 2. Samsung Galaxy S21 Back Cover Replacement: adım 14, 3 resimden 3.
    • Slide an opening pick between the camera shell and the frame to cut the adhesive.

    • There's a significant amount of adhesive securing the frame to the camera shell, so multiple rounds of heating may be needed.

  15. Samsung Galaxy S21 Back Cover Replacement: adım 15, 3 resimden 1. Samsung Galaxy S21 Back Cover Replacement: adım 15, 3 resimden 2. Samsung Galaxy S21 Back Cover Replacement: adım 15, 3 resimden 3.
    • Line up the opening pick's tip with your phone's flash

    • Insert the pick slowly, making sure to avoid the flash's plate.

    • The plate's resistance can feel similar to adhesive. Angle the pick downward to keep the pick from sliding into the plate.

    • Slice the adhesive to the right of the camera.

  16. Samsung Galaxy S21 Back Cover Replacement, Remove the back cover: adım 16, 2 resimden 1. Samsung Galaxy S21 Back Cover Replacement, Remove the back cover: adım 16, 2 resimden 2.
    • Remove the back cover.

    • If your back cover is still sticking to the frame, slide the pick around the edges of the phone until the back cover completely separates.

    • During reassembly:

    • This is a good point to power on your phone and test all functions before sealing it up. Be sure to power your phone back down completely before you continue working.

    • Remove any adhesive chunks with a pair of tweezers or your fingers. Apply heat if you're having trouble separating the adhesive.

    • If you're using Samsung custom-cut adhesives, follow this guide.

    • If you're using double-sided tape, follow this guide.

Sonuç

Compare your new replacement part to the original part—be sure to transfer remaining components and remove adhesive backings from the new part before installing.

To reassemble your device, follow the instructions in reverse order and perform the opposite actions, e.g., "reattach" instead of "removing." Skip steps that use heating and prying, and pay close attention to the 📌 bullets as you work through the steps.

After you've completed the repair, download the Samsung Members App from the Galaxy Store or the Play Store, and Samsung Self-Repair document (beginning page 10) to make sure your device is fully functional.

Take your e-waste to an R2 or e-Stewards certified recycler.

Repair didn’t go as planned? Check out our Answers community for troubleshooting help.

Bir başkası bu kılavuzu tamamladı.

Alex Diaz-Kokaisl

Üyelik tarihi: 01/16/22

118.979 İtibar

549 adet Kılavuz yazıldı

Ekip

iFixit iFixit üyesi

Staff

135 Üyeler

16.732 adet Kılavuz yazıldı

0 Yorum

Yorum Ekle

İstatistikleri Görüntüle:

Son 24 Saat: 32

Son 7 gün: 167

Son 30 gün: 759

Her zaman: 16,442