Ana içeriğe geç

Samsung Galaxy S6 Daughterboard Replacement

Neye ihtiyacın var

  1. Samsung Galaxy S6 Daughterboard Replacement, SIM Card: adım 1, 2 resimden 1. Samsung Galaxy S6 Daughterboard Replacement, SIM Card: adım 1, 2 resimden 2.
    • Insert a paper clip or SIM eject tool into the hole in the SIM card slot on the power button side of the phone.

    • Press to eject the SIM card tray.

    • Don't press too hard or you may damage the SIM card tray.

  2. Samsung Galaxy S6 Daughterboard Replacement: adım 2, 1 resimden 1.
    • Remove the SIM card tray from the phone.

  3. Samsung Galaxy S6 Daughterboard Replacement, iOpener Heating: adım 3, 2 resimden 1. Samsung Galaxy S6 Daughterboard Replacement, iOpener Heating: adım 3, 2 resimden 2.
    • We recommend that you clean your microwave before proceeding, as any nasty gunk on the bottom may end up stuck to the iOpener.

    • Place the iOpener in the center of the microwave.

    • For carousel microwaves: Make sure the plate spins freely. If your iOpener gets stuck, it may overheat and burn.

  4. Samsung Galaxy S6 Daughterboard Replacement: adım 4, 1 resimden 1.
    • Heat the iOpener for thirty seconds.

    • Throughout the repair procedure, as the iOpener cools, reheat it in the microwave for an additional thirty seconds at a time.

    • Be careful not to overheat the iOpener during the repair. Overheating may cause the iOpener to burst. Do not attempt to heat over 100˚C (212˚F).

    • Never touch the iOpener if it appears swollen.

    • If the iOpener is still too hot in the middle to touch, continue using it while waiting for it to cool down some more before reheating. A properly heated iOpener should stay warm for up to 10 minutes.

  5. Samsung Galaxy S6 Daughterboard Replacement: adım 5, 1 resimden 1.
    • Remove the iOpener from the microwave, holding it by one of the two flat ends to avoid the hot center.

    • The iOpener will be very hot, so be careful when handling it. Use an oven mitt if necessary.

  6. Samsung Galaxy S6 Daughterboard Replacement, Alternate iOpener heating method: adım 6, 2 resimden 1. Samsung Galaxy S6 Daughterboard Replacement, Alternate iOpener heating method: adım 6, 2 resimden 2.
    • If you don't have a microwave, follow this step to heat your iOpener in boiling water.

    • Fill a pot or pan with enough water to fully submerge an iOpener.

    • Heat the water to a boil. Turn off the heat.

    • Place an iOpener into the hot water for 2-3 minutes. Make sure the iOpener is fully submerged in the water.

    • Use tongs to extract the heated iOpener from the hot water.

    • Thoroughly dry the iOpener with a towel.

    • The iOpener will be very hot, so be careful to hold it only by the end tabs.

    • Your iOpener is ready for use! If you need to reheat the iOpener, heat the water to a boil, turn off the heat, and place the iOpener in the water for 2-3 minutes.

  7. Samsung Galaxy S6 Daughterboard Replacement, Rear Glass: adım 7, 2 resimden 1. Samsung Galaxy S6 Daughterboard Replacement, Rear Glass: adım 7, 2 resimden 2.
    • Opening your phone will compromise its waterproof seals. Have replacement adhesive ready before you proceed, or take care to avoid liquid exposure if you reassemble your phone without replacing the adhesive.

    • If your glass is shattered, put packing tape over the entire panel to hold it together during the removal process.

    • Lay the heated iOpener over the rear panel for about two minutes to loosen the adhesive around the edge of the glass.

    • You may need to reheat and reapply the iOpener several times to get the phone warm enough. Follow the iOpener instructions to avoid overheating.

    • Shift the iOpener to heat the remaining section of the panel for another two minutes.

    • A hair dryer, heat gun, or hot plate may also be used, but be careful not to overheat the phone—the OLED display and internal battery are both susceptible to heat damage.

  8. Samsung Galaxy S6 Daughterboard Replacement: adım 8, 3 resimden 1. Samsung Galaxy S6 Daughterboard Replacement: adım 8, 3 resimden 2. Samsung Galaxy S6 Daughterboard Replacement: adım 8, 3 resimden 3.
    • Once the rear glass is hot to the touch, apply a suction cup near the bottom edge of the glass.

    • Lift on the suction cup to create a small gap underneath the rear glass, and insert an opening pick into the gap.

    • Optionally, once the pick is inserted, you can add a few drops of isopropyl alcohol into the gap to help weaken the adhesive in the following steps.

  9. Samsung Galaxy S6 Daughterboard Replacement: adım 9, 2 resimden 1. Samsung Galaxy S6 Daughterboard Replacement: adım 9, 2 resimden 2.
    • Slide the pick along the bottom edge of the phone to slice through the adhesive securing the rear glass.

    • Afterward, it may help to leave the pick in place and grab a second pick as you proceed to the next step. Leaving the pick inserted can help prevent the glue you just separated from re-adhering.

    • Re-heat the rear glass as needed to prevent the glue from cooling and hardening.

  10. Samsung Galaxy S6 Daughterboard Replacement: adım 10, 3 resimden 1. Samsung Galaxy S6 Daughterboard Replacement: adım 10, 3 resimden 2. Samsung Galaxy S6 Daughterboard Replacement: adım 10, 3 resimden 3.
    • Repeat the heating and cutting procedure for the remaining three sides of the phone.

    • Leave an opening pick under each edge to prevent the adhesive from resealing.

  11. Samsung Galaxy S6 Daughterboard Replacement: adım 11, 2 resimden 1. Samsung Galaxy S6 Daughterboard Replacement: adım 11, 2 resimden 2.
    • Use an opening pick to slice through any remaining adhesive.

    • Remove the rear glass.

  12. Samsung Galaxy S6 Daughterboard Replacement: adım 12, 2 resimden 1. Samsung Galaxy S6 Daughterboard Replacement: adım 12, 2 resimden 2.
    • To install new rear glass:

    • Use tweezers to peel away any remaining adhesive from the phone's chassis.

    • Clean the adhesion areas with high concentration isopropyl alcohol (at least 90%) and a lint-free cloth. Swipe in one direction only, not back and forth. This will help prep the surface for the new adhesive.

    • Peel the adhesive backing off of the new rear glass, carefully line up one edge of the glass against the phone chassis, and firmly press the glass onto the phone.

    • If you're reinstalling the old rear glass, or using rear glass without adhesive pre-installed, follow this guide.

  13. Samsung Galaxy S6 Daughterboard Replacement, Midframe Assembly: adım 13, 1 resimden 1.
    • Remove the thirteen 3.5mm Phillips #00 screws securing the midframe to the phone.

  14. Samsung Galaxy S6 Daughterboard Replacement: adım 14, 3 resimden 1. Samsung Galaxy S6 Daughterboard Replacement: adım 14, 3 resimden 2. Samsung Galaxy S6 Daughterboard Replacement: adım 14, 3 resimden 3.
    • Before you perform this step, make sure you've ejected the SIM card tray.

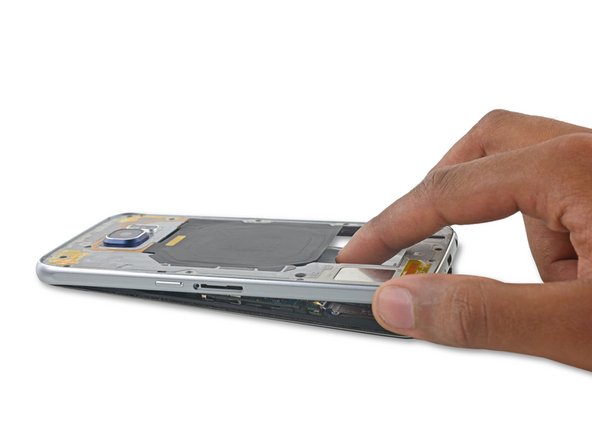
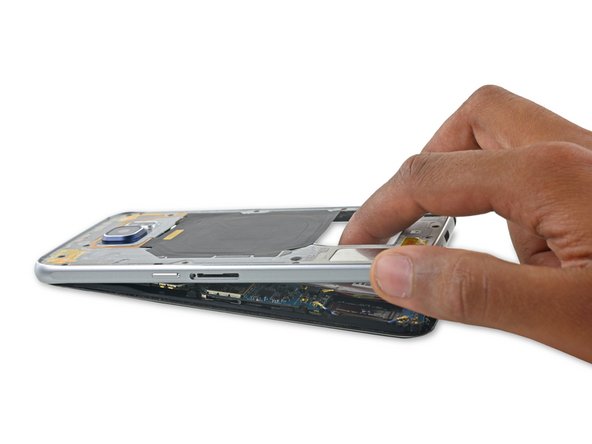
    • Firmly grasp the edge of the midframe assembly.

    • Lift up on the midframe assembly while pushing down on the battery to separate the midframe assembly from the rest of the phone.

    • While lifting the midframe, be careful to avoid snagging it on the audio jack or charging port.

    • Once the midframe is partially seperated, carefully run an opening pick around the edges of the rest of the phone to separate the top of the midframe.

    • Be careful not to accidentally insert the opening pick between the glass and display.

    • To avoid damage to the headphone jack, remove the top of the midframe first, then push the midframe downwards to disengage it from the headphone jack.

    • You may need to heat and apply an iOpener to the edges of the display to soften the display adhesive if midframe separation is difficult.

  15. Samsung Galaxy S6 Daughterboard Replacement: adım 15, 1 resimden 1.
    • Lift the midframe assembly up to separate it from the rest of the phone.

  16. Samsung Galaxy S6 Daughterboard Replacement, Disassembling Samsung Galaxy S6 Battery Connector: adım 16, 2 resimden 1. Samsung Galaxy S6 Daughterboard Replacement, Disassembling Samsung Galaxy S6 Battery Connector: adım 16, 2 resimden 2.
    • Use the flat end of the spudger to disconnect the battery connector from its socket on the motherboard.

  17. Samsung Galaxy S6 Daughterboard Replacement, Motherboard Assembly: adım 17, 3 resimden 1. Samsung Galaxy S6 Daughterboard Replacement, Motherboard Assembly: adım 17, 3 resimden 2. Samsung Galaxy S6 Daughterboard Replacement, Motherboard Assembly: adım 17, 3 resimden 3.
    • Use the pointed edge of a spudger to disconnect the Bluetooth and Wi-Fi antenna cable connectors from their sockets on the motherboard.

  18. Samsung Galaxy S6 Daughterboard Replacement: adım 18, 2 resimden 1. Samsung Galaxy S6 Daughterboard Replacement: adım 18, 2 resimden 2.
    • Use the flat end of the spudger to disconnect the home button connector.

  19. Samsung Galaxy S6 Daughterboard Replacement: adım 19, 2 resimden 1. Samsung Galaxy S6 Daughterboard Replacement: adım 19, 2 resimden 2.
    • Use the flat end of a spudger to disconnect the display assembly cable from the motherboard.

  20. Samsung Galaxy S6 Daughterboard Replacement: adım 20, 2 resimden 1. Samsung Galaxy S6 Daughterboard Replacement: adım 20, 2 resimden 2.
    • Disconnect the earpiece speaker assembly cable connector from the motherboard.

  21. Samsung Galaxy S6 Daughterboard Replacement: adım 21, 2 resimden 1. Samsung Galaxy S6 Daughterboard Replacement: adım 21, 2 resimden 2.
    • Lift the camera-side end of the motherboard to separate it from the display frame.

    • You may need to move some of the ribbon cables out of the way while you lift the motherboard. If the board is hard to lift, check that it is fully disconnected and not caught on any ribbon cables.

    • Do not fully remove the motherboard yet—it is still attached to the daughterboard via a ribbon cable on the underside of the motherboard.

  22. Samsung Galaxy S6 Daughterboard Replacement: adım 22, 2 resimden 1. Samsung Galaxy S6 Daughterboard Replacement: adım 22, 2 resimden 2.
    • Use the flat end of a spudger to disconnect the daughterboard ribbon cable connector from its socket on the underside of the motherboard.

  23. Samsung Galaxy S6 Daughterboard Replacement, Screen: adım 23, 2 resimden 1. Samsung Galaxy S6 Daughterboard Replacement, Screen: adım 23, 2 resimden 2.
    • If your display glass is badly cracked, tape over the glass to contain stray glass and make prying easier.

    • Reheat the iOpener.

    • Lay the iOpener across the S6 display. After two minutes, shift the iOpener to the other half of the screen.

    • You may need to reheat and reapply the iOpener several times to get the phone warm enough. Follow the iOpener instructions to avoid overheating.

  24. Samsung Galaxy S6 Daughterboard Replacement: adım 24, 3 resimden 1. Samsung Galaxy S6 Daughterboard Replacement: adım 24, 3 resimden 2. Samsung Galaxy S6 Daughterboard Replacement: adım 24, 3 resimden 3.
    • Insert the opening pick in the battery-side edge of the phone, between the frame and display, at an upward angle.

    • When done correctly, you will see a gap between the display frame and the display assembly.

    • When done incorrectly, the pick will be visible through the glass. If this happens simply remove the pick and start again.

  25. Samsung Galaxy S6 Daughterboard Replacement: adım 25, 2 resimden 1. Samsung Galaxy S6 Daughterboard Replacement: adım 25, 2 resimden 2.
    • Slide the pick down the edge of the display to separate the adhesive underneath.

    • Stop cutting when you get to the daughterboard to avoid the delicate capacitive button under the display.

    • If cutting becomes difficult at any point, reheat and reapply the iOpener.

    • After cutting the adhesive, leave the pick in the side of the display to prevent the display from re-adhering to the frame.

  26. Samsung Galaxy S6 Daughterboard Replacement: adım 26, 2 resimden 1. Samsung Galaxy S6 Daughterboard Replacement: adım 26, 2 resimden 2.
    • Slide the pick along the bottom edge of the phone, from the headphone jack to just past the charging port.

    • Do not insert the opening pick more than 0.25 inches (~6mm) to avoid damaging the home button.

  27. Samsung Galaxy S6 Daughterboard Replacement: adım 27, 2 resimden 1. Samsung Galaxy S6 Daughterboard Replacement: adım 27, 2 resimden 2.
    • Insert an opening pick about 0.5 inches (~12mm) under the bottom corner of the display, near the headphone jack.

    • Keep a close eye on the button's ribbon cable as you insert the pick. The cable is fragile and very easy to tear. If the pick is hard to insert or the cable starts to stretch, apply more heat.

    • Leave the pick under the display to prevent the button from re-adhering to the display.

    • If you do break either of the capacitive buttons or ribbon cables, you can replace the daughterboard assembly, which includes new capacitive buttons.

  28. Samsung Galaxy S6 Daughterboard Replacement: adım 28, 2 resimden 1. Samsung Galaxy S6 Daughterboard Replacement: adım 28, 2 resimden 2.
    • Insert an opening pick about 0.5 inches (~12mm) under the opposite bottom corner of the display.

    • Keep a close eye on the button's ribbon cable as you insert the pick. The cable is fragile and very easy to tear. If the pick is hard to insert or the cable starts to stretch, apply more heat.

    • Leave the pick under the display to prevent the button from re-adhering to the display.

  29. Samsung Galaxy S6 Daughterboard Replacement: adım 29, 2 resimden 1. Samsung Galaxy S6 Daughterboard Replacement: adım 29, 2 resimden 2.
    • Slide an opening pick along the side of the phone opposite the battery to separate the adhesive underneath.

    • After cutting the adhesive, leave the pick in the side of the display to prevent the display from re-adhering to the frame.

  30. Samsung Galaxy S6 Daughterboard Replacement: adım 30, 3 resimden 1. Samsung Galaxy S6 Daughterboard Replacement: adım 30, 3 resimden 2. Samsung Galaxy S6 Daughterboard Replacement: adım 30, 3 resimden 3.
    • Slide a pick along the top of the phone towards the vibrator.

    • Pull the pick out slightly to avoid the earpiece speaker grille.

  31. Samsung Galaxy S6 Daughterboard Replacement: adım 31, 2 resimden 1. Samsung Galaxy S6 Daughterboard Replacement: adım 31, 2 resimden 2.
    • Use an opening pick to gently pry the battery side of the frame away from the display.

    • If the display and frame to not separate easily, use an opening pick to cut any remaining adhesive. If cutting is difficult, reheat and reapply an iOpener.

    • Do not completely remove the display yet. The display cable is still threaded through the frame.

  32. Samsung Galaxy S6 Daughterboard Replacement: adım 32, 2 resimden 1. Samsung Galaxy S6 Daughterboard Replacement: adım 32, 2 resimden 2.
    • Route the display's flex cable through its hole in the frame in order to fully separate the right edge of the display.

  33. Samsung Galaxy S6 Daughterboard Replacement: adım 33, 1 resimden 1.
    • Before installing a new display, it's very important to remove all traces of the old adhesive from the frame, while taking special care to remove any small glass fragments.

    • After removing all traces of glue and glass from the frame, clean the adhesion areas with 90% (or higher) isopropyl alcohol and a lint-free cloth or coffee filter. Swipe in one direction only, not back and forth.

    • If the frame is bent, or if any glue or glass remnants are left behind, the new display will not mount correctly and may be damaged. If necessary, replace the frame.

    • The best way to secure the new screen is with a sheet of custom-cut double-sided tape. Apply the tape to the back of the screen, then carefully feed the display cable through the frame. Align the screen and press it into place.

  34. Samsung Galaxy S6 Daughterboard Replacement, Daughterboard: adım 34, 1 resimden 1.
    • Remove the single 3.0mm Phillips #00 screw securing the daughterboard to the display frame.

  35. Samsung Galaxy S6 Daughterboard Replacement: adım 35, 3 resimden 1. Samsung Galaxy S6 Daughterboard Replacement: adım 35, 3 resimden 2. Samsung Galaxy S6 Daughterboard Replacement: adım 35, 3 resimden 3.
    • Flip the display frame over so the home button is facing you.

    • Insert the pointed edge of the spudger into the groove next to the right soft button LED cable.

    • Gently lift the LED cable off the display frame.

    • Be careful to not rip these delicate cables when peeling them off the plastic frame.

  36. Samsung Galaxy S6 Daughterboard Replacement: adım 36, 3 resimden 1. Samsung Galaxy S6 Daughterboard Replacement: adım 36, 3 resimden 2. Samsung Galaxy S6 Daughterboard Replacement: adım 36, 3 resimden 3.
    • Insert the pointed edge of the spudger into the groove above the left soft button LED cable.

    • Lift the left soft button LED cable off the plastic frame.

  37. Samsung Galaxy S6 Daughterboard Replacement: adım 37, 3 resimden 1. Samsung Galaxy S6 Daughterboard Replacement: adım 37, 3 resimden 2. Samsung Galaxy S6 Daughterboard Replacement: adım 37, 3 resimden 3.
    • Flip the frame over again and lift up the daughterboard to peel it off the display frame.

Sonuç

To reassemble your device, follow these instructions in reverse order. When reinstalling the rear glass, refer to the rear glass adhesive replacement guide.

93 farklı kişi bu kılavuzu tamamladı.

Dante Mazzanti

Üyelik tarihi: 07/13/15

36.171 İtibar

26 adet Kılavuz yazıldı

31 Yorum

Step 41

I could not find any led cables... after the repair the led soft keys work and vibrate but do not light up... anyway to fix this problem? Fixing g925a

Devin Gonzales - Yanıt

It seems like you've damaged the Flex oder the Button itself. If youve allready checked the connection to Motherboard, then you need to replace the Daughterboard to solve the issue

Patrick -

For step 41

I could not find and led cables to remove... and after there repair the led light forsaken the soft keys do not light up but they do work and vibrate... what should I do?

Devin Gonzales - Yanıt

I would definitely recommend heating and prying before carrying out step 17. There is a lot of glue holding the frame together and not heating and prying could easily lead to screen damage.

Marty - Yanıt

STEP 30 - What about the glue between the plastic frame and display assembly. Is there a product to use to glue it up again?

aaron - Yanıt

Yorum Ekle

İstatistikleri Görüntüle:

Son 24 Saat: 2

Son 7 gün: 23

Son 30 gün: 85

Her zaman: 89,775