Giriş
Use this guide to replace a cracked or broken screen on your Samsung Galaxy Watch Active2.
Neye ihtiyacın var
-
-
Turn off the Galaxy Watch Active2 by pushing and holding the bottom button for approximately 3 seconds. You should feel a short vibration.
-
When the "Power off" symbol appears, tap the center of the screen to make it shut down. You should feel a longer vibration for confirmation.
-
-
-
Use a Tri-point Y00 screwdriver to remove the four 4 mm-long screws on the back of the watch.
Y1.5 works just as good
Bekomme ich nicht auf … Schrauben zu fest
The screws are attached to the cover. So you just need to loose them, not remove them.
Any tips for a too tight screw ?
-
-
-
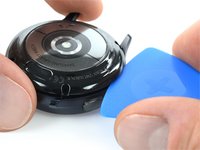
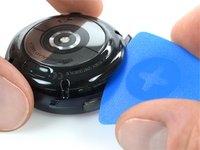
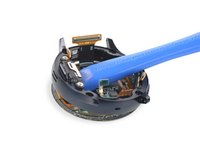
Use an opening pick and place it between the plastic back cover and the metal housing near the buttons.
-
Push the opening pick into the gap to separate the back cover from the housing.
There is a glue-ish gasket keeping it closed. I used an exacto knife to start it opening.
This was super helpful thank you! Perfect timing
Waarmee kan ik de achterste oplaadplaat weer vast lijmen op de achterste behuizing
-
-
-
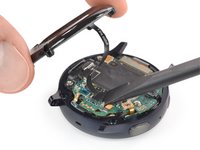
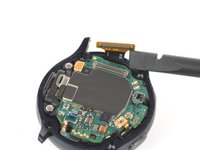
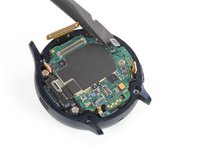
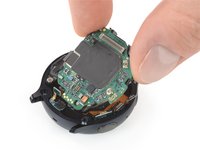
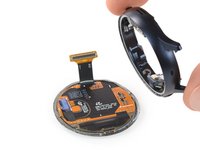
Carefully lift the back cover to access the sensor array connector.
-
Use a spudger to disconnect the sensor array from the motherboard.
-
-
-
-
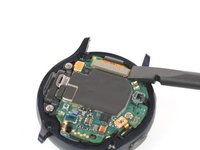
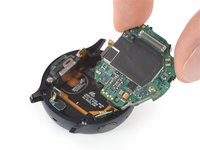
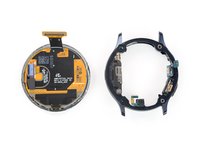
Remove the back cover.
Where would you recommend buying a new back panel/charger?
Una pregunta. y para poner el reemplazo sería necesario algún tipo de sellador o silicón?porque pues usualmente este tipo de tapas vienen sellados de fabrica para evitar cualquier posibilidad de que le pudiera entrar agua
-
-
-
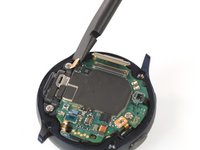
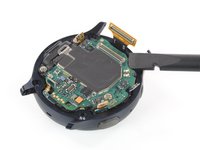
Use a spudger to disconnect the display assembly and the speaker.
-
-
-
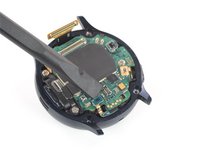
Use a spudger to disconnect the barometric sensor, the buttons, and the microphone.
-
-
-
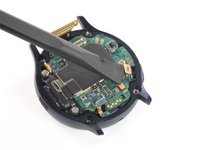
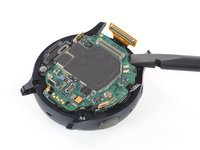
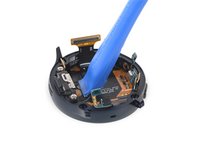
Place a spudger underneath the motherboard at the top right next to the display connector.
-
Slightly twist and lever the spudger to loosen the core assembly.
I would not suggest to do so. There are components underneath the motherboard as well. There are none in this specific corner, but the core assembly does not come out that easily and people might try other corners and positions. Rather unscrew the motherboard and remove the battery from the core assembly directly.
Yes! I was unable to remove the motherboard as pictured unless the screw was removed (Step 12). I suggest a re-ordering of steps in this guide.
You have to sort of wiggle it up from all sides and gradually lift out the corner/sides adjacent to the spludger as shown. I took a few minutes doing it carefully, it's fairly snug. Avoid pulling the motherboard out from only one side if you must at your risk.
-
-
-
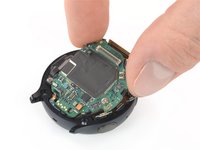
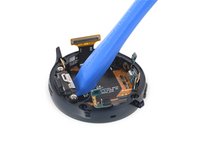
Grab the core assembly and carefully slide it out from under the cables.
-
Remove the core assembly.
I had to remove that screw on the core assembly using a Phillips 000. When I initially tried lifting, the core assembly started to bend. Mine also has a connector under the core assembly near the thumb in the picture. The connector goes from the underside of the core assembly to the screen/body. It prevents me from removing the core assembly as I'm not sure how it should be removed examining it
This step is really difficult, and I'm still not sure it was necessary. The core assembly is really packed in there, and it took me several attempts, lifting from various corners. Don't pull by the circuit board. It will bend if you're not careful. You've got to get under the core assembly. I had the most luck starting next to the display connector at the top, then moving to the sensor on the other end of the board (barometric sensor), then moving to the speakers on the left, and finally lifting from multiple points once it was out far enough. In really hoping I didn't damage anything.
I think the comments here should be added to the step before.
I would be very careful following Louis Finney's advice above. They are describing detaching the motherboard from the core assembly which also includes the battery and internal frame. Removing the motherboard from the rest of the core assembly exposes a very delicate looking ribbon cable that I nearly tore by trying to remove the screw holding the motherboard in place.
As Karl Arp notes, trying to pry the core assembly up by the motherboard feels like it puts a lot of strain on the circuit board, so it might be necessary to go at it from multiple angles.
Removing the whole core assembly was very difficult, and required a lot more force than I was expecting, and I had the luxury of being able to approach it from both sides, as the screen had already detached from the device (hence the need to repair), and still found it very challenging.I would advise, at a minimum applying mild heat to the metal outer frame to hopefully cause it to expand and give some additional clearance.
-
-
-
Place the edge of an opening tool under the speaker unit.
-
Lever the opening tool down to separate the display from the frame.
-
-
-
Remove the frame from the display.
Bonjour, mon écran c'est d'écolé mais fonctionne toujours. Comment je peux le recoller ou avec quoi ?
-


If possible, turn on your device and test your repair before installing new adhesive and resealing.
Apply new adhesive where necessary after cleaning the relevant areas with isopropyl alcohol (>90%). You may need to remove adhesive backings from the new part before installing.
To reassemble your device, follow these instructions in reverse order.
Take your e-waste to an R2 or e-Stewards certified recycler.
Repair didn’t go as planned? Try some basic troubleshooting, or ask our Answers community for help.
İptal et: Bu kılavuzu tamamlamadım.
29 farklı kişi bu kılavuzu tamamladı.

Ekip

Tobias Isakeit - Repairability Engineer Tobias Isakeit - Repairability Engineer üyesi
Business
1 Üye
1.132 adet Kılavuz yazıldı
17Kılavuz Yorumları
Does anyone know where to buy the replacement screen for Active 2? Or what keywords should I search for (SKU or model)?
SM-R830 for the 40mm version, SM-R820 for the 44mm one. People on ebay resell them but they cost upwards of $100. I’d look into broken watches of the same type that maybe the battery is dead and they’re selling it for cheap, then do a swap job on the (hopefully) working screen.
Seconding the question on where to buy a replacement screen
You could be lucky on rounded.com
What adhesive would be best to use?
This E600 adhesive could work for you if carefully applied not spilling it over the back of the display.
I broke my 40mm Active1 screen, anyone know if I can put in a 40mm Watch 4 screen in and get the better resolution?
Is there a way to test the existing display? I made mistake of swimming in watch and it went into a continual reboot loop before it quit doing anything. I've got a replacement battery and installed it pretty easily but even when everything is put together except the back screws, nothing happened on the display when I put it on a known to be working charger. When I compare the appearance of the display connector and the slot on the motherboard to the pictures in the tutorial it looks like there is some corrosion or the likes there that I am working on removing with Deoxit DN5. But I am trying to sort out if the display itself is damaged or if the bit of corrosion there is keeping it from powering up. I have a voltmeter and the battery seems to be putting out the power that it should be.
I just took mine apart due to water damage and it charges fully but no display. I also have some type of corrosion on the display connectors, so it sounds very similar.
Mi reloj se queda en reboot y no pasa de ahí, alguien sabe como repararlo?
I actually used a Tri-point Y0 screwdriver instead of the Y00 to remove the back screws. They both fit, but the Y00 was just too small to get a secure grip and started stripping one of the screws. After I switched to the Y0 I was able to remove the stripped screw and just continued to use that one without switching back.