Ana içeriğe geç
Tungsten E Disassembly

Tungsten E Disassembly

Kevin Hom

Kevin Hom ve 10 diğer katkıda bulunanlar

En son March 9, 2019 tarihinde güncellendi

15 dakika
Orta
İşlem Görüntüleri

This is a step by step guide to completely disassemble a Palm Tungsten E.

Neye ihtiyacın var

Aletler

  • iFixit Opening Tool
    iFixit Opening Tool
  • Spudger
    Spudger
  • T5 Torx Screwdriver
    T5 Torx Screwdriver

Daha fazlasını göster…

  1. Tungsten E Disassembly, Tungsten E Disassembly: adım 1, 2 resimden 1. Tungsten E Disassembly, Tungsten E Disassembly: adım 1, 2 resimden 2.
    • Remove the stylus and SD card.

    • Using a T5 torx screwdriver, remove all 4 back panel screws.

    • The screws are small and can be lost easily. Be sure to place them in a secure area.

  2. Tungsten E Disassembly: adım 2, 3 resimden 1. Tungsten E Disassembly: adım 2, 3 resimden 2. Tungsten E Disassembly: adım 2, 3 resimden 3.
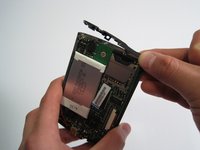
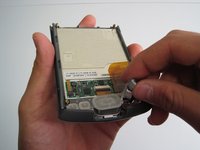
    • Insert a plastic opening tool under the USB and power input slots.

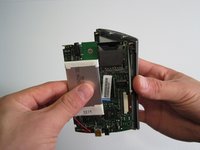
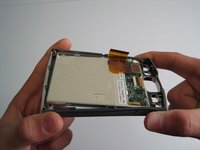
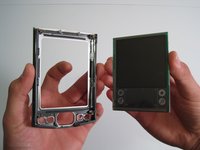
    • Slide the plastic opener along the seam and gently pry the cover from the PDA body to remove the cover completely.

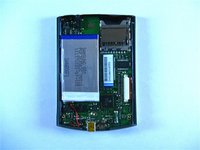
    I think it's better to open from the right, not the left. The right will separate if you lever the metal back to the outside and push the plastic to the inside. The lft is more like a inge and would damage more easily.

    Just my $0.02.

    Yishai Sered - Yanıt

  3. Tungsten E Disassembly: adım 3, 2 resimden 1. Tungsten E Disassembly: adım 3, 2 resimden 2.
    • Your device may not have a screen protector. If not, you can move on to step four.

    • Remove the screen protector by lifting the hinge out of the plastic housing.

    • Remove the top cover by gently pulling it away from the device with a plastic opening tool or your fingers.

  4. Tungsten E Disassembly: adım 4, 2 resimden 1. Tungsten E Disassembly: adım 4, 2 resimden 2.
    • Carefully remove motherboard from the standoffs without damaging the LCD flex connector.

    • Using a spudger, unlock both sides of the flex connector block by pushing down.

    • Remove motherboard completely.

    • Metal washers may pop out of the device during this step

  5. Tungsten E Disassembly: adım 5, 3 resimden 1. Tungsten E Disassembly: adım 5, 3 resimden 2. Tungsten E Disassembly: adım 5, 3 resimden 3.
    • Remove buttons using fingers.

    • Gently flex frame to release screen from plastic frame.

    • Lift out screen.

  6. Tungsten E Disassembly: adım 6, 1 resimden 1.
    • Congratulations! You have successfully taken apart a Palm Tungsten E.

Sonuç

To reassemble your device, follow these instructions in reverse order.

Kevin Hom

Üyelik tarihi: 01/21/10

103 İtibar

2 adet Kılavuz yazıldı

Ekip

Cal Poly, Team 13-22, Maness Winter 2010 Cal Poly, Team 13-22, Maness Winter 2010 üyesi

CPSU-MANESS-W10S13G22

4 Üyeler

4 adet Kılavuz yazıldı

1Rehber Yorum

How does one unplug the battery?

dlcatftwin - Yanıt

Yorum Ekle

İstatistikleri Görüntüle:

Son 24 Saat: 1

Son 7 gün: 6

Son 30 gün: 16

Her zaman: 7,937