
Whirlpool WFW94HEXW2 F9 E1 drain error
Giriş
1. adıma gitF9 E1 is the ‘slow drain’ error, often caused by a drain line blockage. This repair describes a shortcut for clearing the drain strainer for the whirlpool HE clothes washer - the drain pump has a removable strainer that has holes that get plugged with debris. However, on this particular model, the removable strainer faces the unremovable front panel, as if they just forgot to put access there. This guide describes how to clear the strainer without a full teardown.
-
-
Gaining access to the drain pump strainer on this model requires a complete tear down to the chassis level (removing front door, top, control panel, gasket, the entire enchilada). This guide shows how to bypass that teardown and quickly gain access to the strainer, and reassemble when done.
-
-
-
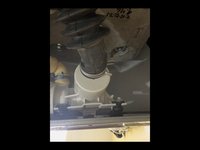
Remove the screws holding the back cover plate in place. You'll be astonished to observe that the drain pump is in the very front of the unit (in pic), and the inaccessible removable strainer faces forward, and you'll be unable to reach the strainer to remove it from the rear, or from the front.
-
It’s as if the mechanical designer forgot to put in an front access panel, or the drain layout guy thought there would be one. If there was a stupid design award, this should be near the top. But there’s a quick shortcut that avoids the full teardown.
-
Take off the bottom access panel. It’s flimsy, mine was all bent up and came off easily, you’ll need to squeeze 3 plastic cable harness standoffs from the bottom to free them from the access panel.
-
-
-
First we need to drain the water in the tub. It’s full and the machine is heavy because … the error code means ‘not draining’. You'll be draining about 2-3 gallons of water. But first, reach from behind and pull the drain pump (in front) off its rubber mounts so it’s free from the bottom support.
-
Next, Get 3-4 2x4s, stack them up, and tilt the machine backwards so the front is elevated ~5” and the back is on the floor. Put a baking dish or a couple nested aluminum turkey pans underneath and Manipulate the pump so the threaded strainer is accessible. Open it 1/2 turn until liquid dribbles out.
-
You can lift the pump and slide the aluminum turkey pan out for each liquid dump cycle. Be forewarned that the drain water will stink. Don’t get enthusiastic and unscrew it more than enough to dribble out or it overflow onto your floor, which is easy to do. When the last of the water is out, fully unscrew the drain pump strainer and remove it.
-
An amazing amount of garf and debris will come out with it. Clear the garf from the strainer and screw the strainer back together. Now comes the shortcut. At this point, you’ll not be able to put the drain pump back in because the rubber mounts to the base are inaccessible from either the rear or the front.
-
An internet search on this model will suggest a complete teardown to access/install the drain strainer, skip that and go to next step.
-
-
-
Now, tilt the washer fully on its back. Put a few 2x4s down as spacers so it’s not resting on the drum drive. You’ll now have clear access to the drain pump motor mounts from the bottom.
-
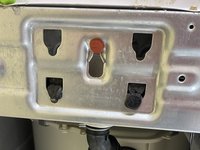
Install the two side (black) rubber mounts and one front (red) rubber mount onto the drain motor (first pic) and then manipulate the drain pump front mount into place starting with the red rubber mount, and then pull the drain pump black rubber mounts into place from underneath (second pic).
-
Turn the washer back upright, install the flimsy bottom pan, hoses, drain, and run a test load to check for leaks and proper operation. Then install the back panel, and you're finished.
-


To reassemble your device, follow these instructions in reverse order.
To reassemble your device, follow these instructions in reverse order.
İptal et: Bu kılavuzu tamamlamadım.
Bir başkası bu kılavuzu tamamladı.