Bu kılavuzda güncel değişiklikler var. En son onaylanmamış sürüme geçin.
Giriş
Older Xbox 360 models had major issues with the heat sink. Replace your heat sink in the (hopefully unlikely) event of RROD deja vu.
Neye ihtiyacın var
-
-
In the following steps, you will remove the top vent, secured to the top panel by the thirteen clips shown.
-
-
-
Orient the console so that the words "XBOX 360" on the sides are right-side up, and the faceplate is facing to the left.
-
Insert a metal spudger between the top vent and the top bezel near the rear of the Xbox.
-
Rotate the spudger away from the console, prying the edge of the fan vent up until the two plastic clips come free.
-
-
-
Rotate the console so that the rear of the Xbox 360 S is facing to the right, and the right case is facing you.
-
Insert a metal spudger through the rear-most slit on the right edge of the top bezel and between the bottom edge of the clip and the right case.
-
While lifting up on the top bezel with your fingers, rotate the spudger away from the console to free the clip.
-
-
-
Push the latch holding down the hard drive cover to the left.
-
Pull the hard drive cover away from the console.
-
-
-
Insert a metal spudger through the left middle slit of the bottom bezel, and between the bottom edge of the clip and the left case.
-
Simultaneously pull the bottom bezel up and rotate the spudger away from the console to free the clip.
-
In a similar fashion, free the clip at the front of the bottom bezel's left edge.
-
-
-
-
Release the clip near the front right corner of the top edge securing the right case to the faceplate.
-
-
-
Using a spudger or fingernail, lift the clear blue tab away from the connector.
-
Slide the locking tab on the power switch board cable connector toward the top of the console.
-
Pull the power switch cable straight out of the connector.
-
The faceplate is now free of the rest of the console.
-
-
-
Remove the two 5.6 mm T8 Torx screws securing the RF module to the metal case.
-
-
-
Remove the single T10 Torx screw holding in the wireless card.
-
Pull the Wi-Fi Board out of the console.
-
-
-
Remove the large white warranty sticker from the metal frame to expose a screw.
-
-
-
Disconnect the optical drive data cable from the back of the optical drive.
-
Disconnect the power cable from the back of the optical drive.
-
-
-
Remove the single 11.3 mm gold T10 Torx screw from the hole marked "G."
-
-
-
There are a total of 10 screws holding the logic board assembly to the metal case:
-
Five 11.3 mm silver T10 Torx screws, in the holes marked "M", "N", "P", "R", and "T".
-
Four 5.6 mm black T9 Torx screws in the holes marked "D", "E", "J", and "K".
-
A single 11.3 mm gold T10 Torx screw in the hole marked "A".
-
-
-
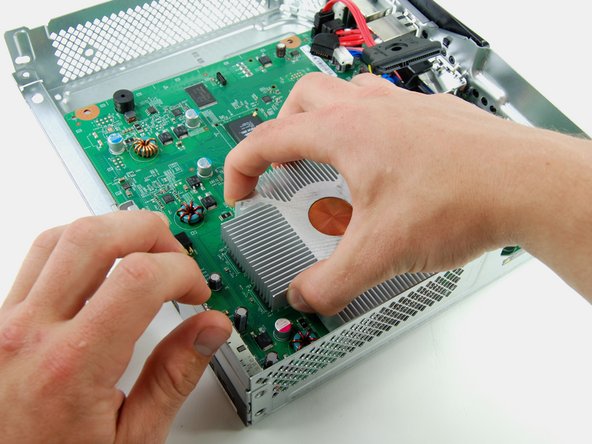
Starting at the front left corner of the x-clamp, insert a 1.5 mm flathead screwdriver between the heat sink's peg and the x-clamp's hook.
-
Gently rotate the screwdriver counterclockwise, releasing the x-clamp's hook from the peg.
-


To reassemble your device, follow these instructions in reverse order.
To reassemble your device, follow these instructions in reverse order.
İptal et: Bu kılavuzu tamamlamadım.
69 farklı kişi bu kılavuzu tamamladı.

16 Yorum
This is a great guide. Thank you for taking the time to make it.
Intercooler guys, purchase an intercooler and save yourself from this hassle
I had problems getting the x-bracket off the back (step 54-57).
I found this video using a pair of needle nose pliers that helped me immensely with this step:
I think we all ended up finding that video...
Thank you for taking the time to make this very instructional guide