Ana içeriğe geç

iPhone 6 Home Button Replacement

Neye ihtiyacın var

Videoya Genel Bakış

  1. iPhone 6 Home Button Replacement, Pentalobe Screws: adım 1, 1 resimden 1.
    • Before disassembling your iPhone, discharge the battery below 25%. A charged lithium-ion battery can catch fire and/or explode if accidentally punctured.

    • Power off your iPhone before beginning disassembly.

    • Remove the two 3.6 mm-long P2 Pentalobe screws next to the Lightning connector.

    When reconnecting be VERY careful not to over tighten. The connectors on the screen that these 3.6mm Pentalobe screws lock with are notorious for breaking off

    Blair Tryba - Yanıt

    what do i do if ive managed to tighten them too hard and now they wont come off?

    kristian686 -

    Before opening the phone, I gently warmed it using a buckwheat heating pad. This made removal of the adhesive strips (steps 20 to 24) easy.

    Howard Bales - Yanıt

    Exactly what I did as well, the gently warming made the adhesive removal work like a charm. The heat as well help to lift the screen easily, no need for the prying tools for me to open te phone.

    For the adhesive removal just pull it slowly to the bottom of the phone and keep in under tension.

    On reassembly, turn on the phone after getting all connectors back in place to verify all is working fine before putting all screws back in their spot.

    Maarten Vergauwen -

    Thanks for the suggestion! I heated up a hot/cold pack, and it worked great.

    Linda Chandler -

    I put mine back together but mine looks very different than this one. Why is it that when I make a call I cannot hear through the ear piece and have to put it on speaker. Also my screen doesn't go black when my face touches it

    Bailey Wilson - Yanıt

    Hey Bailey, which repair were you attempting? Is it possible you have a 6s, or maybe a 6 Plus? You may have better luck with faster troubleshooting if you post in our Answer Forum!

    Sam Goldheart -

    See its a long time ago you had this issue. You can try to remove the cable from front camera/sensor/earpiece from the motherboard port and gently push it back on. All the problems you relate to is thru the same cable. If this dont solve your problem, check if the earpiece is correctly placed onto the polarity poles, and that the proximity sensor is lying right down into the corresponding socket. If something is blocking the sensor, yeah then the screen wont turn on/off when you put it onto your ear.

    Kenneth Hilstan -

    I see in the preamble that when you replace your logic board, you would lose touch id functionality, so my question is what if you have the homebutton and thus the fingerprint reader for the logic board replacement, would touch id work?

    socratesmens - Yanıt

    The guide for the iPhone6 battery replacement needs to be revised. There are a couple of issues.

    1) While the battery cover has two screws, they are different lengths. Since they are very small, it can be hard to see the difference (until one tries to screw the smaller one into the longer hole). The video needs to mention this.

    2) The application of the adhesive strip if very different from what is mentioned. Also, there is a “one piece plastic” applique, and it is very unforgiving. The video should show this process in more detail.

    I believe the attention to this detail would help folks correctly install their iPhone 6 batteries, and with the recent Apple disclosed battery problem, would continue to show that iFixit is very committed to the end-user.

    Gary Long - Yanıt

    I felt a bit silly getting stuck at the end of a long repair, unable to screw one of these last screws back in. What worked was gently pinching the phone above and below the screw, to make sure the screen and back were perfectly aligned.

    Matt D - Yanıt

    Apple edits posts on their Communities website that link to this fix page justifying as follows:

    “We’ve edited your post because following the procedures at the site you provided may lead to damage to the user’s device.”

    What is certain is that following Apple Support’s advice of resetting our phones again and again never works whereas this fix works. Apparently Apple does not want people to know that their hardware fails and can be fixed, because then they would need to explain why they don’t offer neither the fixing service nor the fixing advice by directing us to this website.

    Brice - Yanıt

    Before you get started, I suggest you confirm you are replacing the correct camera. If you are thinking of a camera, the front is the side of the device with the main lens. On an iPhone this is actually known as the rear facing camera. Once the phone is disassembled your orientation can be distorted and it is not that hard to fail to realize your are replacing the wrong camera. Doh!

    William Miller - Yanıt

    I found it very useful to use a magnet sheet when doing these repairs. I use electrical tape or a sharpie to make a grid, and place each micro screw in a separate box on the grid.

    I work directly over the magnet sheet, so that if something drops I have a better chance at not losing it.

    If you do lose a screw, go over the work area with a fridge magnet. It will pick it up if it hasn’t popped too far away.

    Megan Telliano - Yanıt

    I agree. The Magnetic Project Mat makes your project incredibly easier and keeps your screws/parts organized. Here is the link for anyone interested:

    Magnetic Project Mat

    Cooper -

    or some masking tape with sticky side up and the ends folded underneath on a piece of paper, then you can write notes like

    “1.4mm for FOO bracket →”

    “7x2.3mm for EMI cover, different one by camera →”

    The arrows point as appropriate.

    If you drop something, put a flashlight on the floor & shine it across the floor — Turn off ceiling & other lights off to maximize the shadow from the flashlight.

    Bass Clef -

    These screws are tiny, and the first two are the biggest of the lot. Get a magnifying glass or good reader glasses.

    Jennifer Porter - Yanıt

    Which torx is this T?

    klemenecanze - Yanıt

    The screws are no torx screws they are Apple Pentalobe screws. You need to buy a Pentalobe screwdriver seen above.

    Claes -

    I have to use the P2 right?

    Aman Singh - Yanıt

    The best advice I can give is not to perform this operation over carpet.

    Bruce codding - Yanıt

    I'm an amateur, but I was able to replace the parts almost perfectly while looking at this explanation, thank you very much.

    irichin.3.26 - Yanıt

    was fairly easy more nerves than anything, one thing one should have on hand is alcohol just in case its needed. also if one doesn’t get the entire tape strips out, use the alcohol like suggested and lift the battery up. Then can grab the remaining tape strips with tweezers and pull it out. Easy to put back together just make sure the connectors are in. The screws are tiny so take your time. I plugged it in and it started charging and it worked. Great to have my 6 back for a trip as I wanted to use it for the camera, also my game phone so nice to have a battery that lasts. Yes having a flat place to put the parts and put them in separate area so they don’t get mixed up. It took about a hour with hunting for a spare bottle of alcohol.

    Greg Wischmeyer - Yanıt

    The first step should always to be to backup your phone as there is always a slim chance that even a simple battery replacement may render the phone inoperable and data on it lost.

    Jim - Yanıt

    Please do not forget to remove the SIM-Card tray!!

    Steffen Albrecht - Yanıt

    I didn’t need to remove my sim card tray when I did my iPhone 6 battery replacement. Why do you suggest to remove it?

    Jim -

    You dont need to remove sim card while battery replacement

    bertan - Yanıt

    Did mine today, with iFixit battery and iFixit tool kit. Did not need suction cup, to open case, as it had partially sprung open on left, as a result of a badly swollen battery. Supported base and screen with a bookend and rubber bands. This kept these parts at a 90 degree angle, so that screen did not need to be removed. IFixit screwdriver tips were perfect fit. Somewhat difficult to remove battery adhesive strips, but slow and steady got it done, after mild heating with hair dryer. Took about 3 minutes to reposition battery connector…just a wee bit tricky, to position correctly. Was careful to place top of screen in place first, and remainder snapped into place with light pressure, and replaced the 2 pentalobe screws.

    Will highly recommend iFixit for such a repair. Repair kit and battery, are first rate. I give this an 11, out of 10.?

    Len Drasin - Yanıt

  2. iPhone 6 Home Button Replacement, Anti-Clamp instructions: adım 2, 3 resimden 1. iPhone 6 Home Button Replacement, Anti-Clamp instructions: adım 2, 3 resimden 2. iPhone 6 Home Button Replacement, Anti-Clamp instructions: adım 2, 3 resimden 3.
    Bu adımda kullanılan alet:
    Anti-Clamp
    $24.95
    Satın Al
    • The next two steps demonstrate the Anti-Clamp, a tool we designed to make the opening procedure easier. If you aren't using the Anti-Clamp, skip down three steps for an alternate method.

    • For complete instructions on how to use the Anti-Clamp, check out this guide.

    • Pull the blue handle backwards to unlock the Anti-Clamp's arms.

    • Slide the arms over either the left or right edge of your iPhone.

    • Position the suction cups near the bottom edge of the iPhone just above the home button—one on the front, and one on the back.

    • Squeeze the cups together to apply suction to the desired area.

    • If you find that the surface of your iPhone is too slippery for the Anti-Clamp to hold onto, you can use tape to create a grippier surface.

    I found that the single suction cup from the kit worked very well. It didn’t take that much force to separate the front panel from the phone. I think any suction cup that you are able to get a firm grip on will probably work as well. There isn’t any adhesive holding the front panel in. It just snaps in and out. If you have a cracked screen and no screen protector, it may be hard to get a good suction seal. If that’s the case, someone else here suggested applying clear tape to the front glass to get a good surface for applying the suction cup. In my case, I already had a screen protector that was still intact so the suction cup sealed easily.

    fiftysomething - Yanıt

    WORKED PERFECTLY… easy, no harm at all…. thanks a lot

    carlos restrepo -

  3. iPhone 6 Home Button Replacement: adım 3, 3 resimden 1. iPhone 6 Home Button Replacement: adım 3, 3 resimden 2. iPhone 6 Home Button Replacement: adım 3, 3 resimden 3.
    • Pull the blue handle forwards to lock the arms.

    • Turn the handle clockwise 360 degrees or until the cups start to stretch.

    • Make sure the suction cups remain aligned with each other. If they begin to slip out of alignment, loosen the suction cups slightly and realign the arms.

    • Insert an opening pick under the screen when the Anti-Clamp creates a large enough gap.

    • If the Anti-Clamp doesn't create a sufficient gap, rotate the handle a quarter turn.

    • Don't crank more than a quarter turn at a time, and wait a few seconds between turns. Let the Anti-Clamp and time do the work for you.

    • Skip the next three steps.

  4. iPhone 6 Home Button Replacement, Manual Opening Procedure: adım 4, 1 resimden 1.
    Bu adımda kullanılan alet:
    Anti-Clamp
    $24.95
    Satın Al
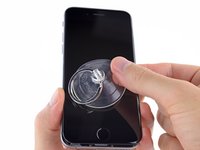
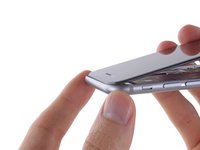
    • If you don't have an Anti-Clamp, use a single suction cup to lift the front panel:

    • Press a suction cup onto the screen, just above the home button.

    • Be sure the cup is pressed securely onto the screen to get a tight seal.

    • If your display is badly cracked, covering it with a layer of clear packing tape may allow the suction cup to adhere. Alternatively, very strong tape may be used instead of the suction cup. If all else fails, you can superglue the suction cup to the broken screen.

    This is nearly impossible on a screen that is shattered

    Erik Madsen - Yanıt

    You can put clear tape over it. it works.

    Owen -

    Try putting a strip of packing tape on the screen. That will make the surface smooth and help keep the suction.

    Joanna - Yanıt

    Argh!! Don’t put the suction cup over the home button to pull. While it works, it also breaks the screen at the weak point below the home button. Ask me how I know.

    -Tom

    tombuy - Yanıt

    How do you know Tom>

    Shawn - Yanıt

  5. iPhone 6 Home Button Replacement: adım 5, 1 resimden 1.
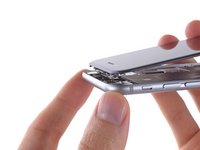
    • While holding the iPhone down with one hand, pull up on the suction cup to slightly separate the front panel assembly from the rear case.

    • Take your time and apply firm, constant force. The display assembly is a much tighter fit than most devices.

    • Using a plastic opening tool, begin to gently pry the rear case down, away from the display assembly, while continuing to pull up with the suction cup.

    • There are several clips holding the front panel assembly to the rear case, so you may need to use a combination of the suction cup and plastic opening tool to free the front panel assembly.

    Pulling up on the suction cup helped get me started, but what worked for me was pulling up gently while sliding the plastic prybar gently along the seam towards the top of the phone (on both sides), and it came open without having to put excess pressure on the suction.

    lauren carroll - Yanıt

    Same here, just open the gap a little with the suction cup and then use the opening tool on both sides.

    Tobias - Yanıt

    Along with the suction cup I used some Command adhesive strips to hold the bottom of the phone to a workbench as they easily pull/stretch away when you need to remove them!

    Dion Sosa - Yanıt

    That’s a very clever idea, thank you!

    Megan Telliano -

    I did this too and left it throughout the repair. Super easy, and prevented phone from slipping and damaging the display cables.

    Felicia Johnson -

    Suction cup pictured here is the older version (with ring). I have one from my previous battery replacement on iPhone 5 and used that instead. The new one (gray with blue handle) kept on popping off. Overall, popping out screen was not as hard as it seems with these instructions, but do proceed with caution.

    youmingc - Yanıt

    Dion's idea to use removable adhesive strips was great, even better, use it to attach the iPhone to a clipboard. This will allow for a sort of Lazy Susan function while you work. I also used adhesive strips to attach my iPhone box to the clipboard as well and used that as a back rest (with rubber band) for the screen as pictured in steps below. This allowed me to very comfortably skip steps 13-19 as others have commented.

    Adam - Yanıt

    The new suction cup (plastic handle) is not so suctiony. Prepare for this thing to pop off a couple of times when opening the case.

    Chet Seidel - Yanıt

    Be very careful because it feels that it holds very tight but with the last pull it can fly away.

    Kristaps Grinbergs - Yanıt

    Be very careful when you pull up the display! Do not keep your other hand on the display surface or you can broke it!

    Luke Man - Yanıt

    I did all the suggestions here and it just wasn’t moving until I repositioned the suction cup up over the home button for more leverage. It finally came up enough to slip the plastic opening tool under the edge.

    Alan Derrick - Yanıt

    Well, my glass immediately and easily shattered. The only reason I’m attempting this is because Apple didn’t have time and the kids at Best Buy, while they accepted my appointment, admitted they had no idea how to actually do it. So… I’m off to Apple to spend a gazillion dollars I don’t have on a new iPhone.

    scottrell - Yanıt

    dont have a panel so idk know cant buy one help please !!!!!!!!!!!!!

    Kemonie Elliott - Yanıt

    Suction cup with blue handle is so stiff it would not hold a suction. I ended up putting it in very hot water for about 5 minutes before I was ready to use it, that did the trick.

    lgjerry - Yanıt

    The MORE iFixit plastic tools you have available for this step the merrier. It was effortless with two.

    Michael Russo - Yanıt

  6. iPhone 6 Home Button Replacement: adım 6, 2 resimden 1. iPhone 6 Home Button Replacement: adım 6, 2 resimden 2.
    • Pull the plastic nub to release the vacuum seal on the suction cup.

    • Remove the suction cup from the display assembly.

  7. iPhone 6 Home Button Replacement, Opening up the phone: adım 7, 3 resimden 1. iPhone 6 Home Button Replacement, Opening up the phone: adım 7, 3 resimden 2. iPhone 6 Home Button Replacement, Opening up the phone: adım 7, 3 resimden 3.
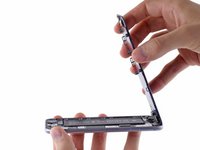
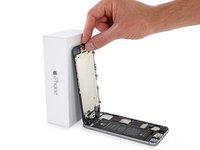
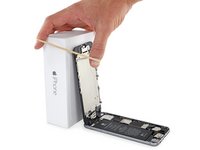
    • Open the iPhone by swinging the home button end of the front panel assembly away from the rear case, using the top of the phone as a hinge.

    • Several clips along the top edge of the front panel form a partial hinge.

    • During reassembly, align the clips just below the top edge of the rear case. Then, slide the front panel upward until its top edge is flush with that of the rear case.

    It's not clear from the instructions but it is shown correctly in the pictures: when the front panel assembly is just open (at a small angle with the rear case) pull the top edge clips out of the rear case to slightly separate the two components, then swing the front panel assembly away from the rear case. I assume not doing so would potentially damage the connecting ribbon and/or the alignment clips. Just a guess...

    ethanlust - Yanıt

    Yes! I wish I had read this before working on my phone. I read the instructions as they are and slowly started to open the case. This is when I heard my screen crack. So in the future, slowly open and when you are about 40% of the way, pull the screen forward so that the top clips pull away (we are talking a cm at most). Sigh just ordered a new screen

    Albert -

    Ein Tipp zum Zusammenbau: Das Display ca. in 45 Grad halten und vorsichtig an die obere Kante des Gehäuses drücken, bis es bündig und glatt anliegt.

    Dann das Display langsam und vorsichtig anklappen und die Clips von oben nach unten festdrücken.

    SAS - Yanıt

    This entire process went smooth. Final step of re-assembly , the assembly does not seat into the framing. The white gasket seats on one side not the the volume button side. Alignment looks good. How much pressure does one apply on the reassembly?

    Bruce Fournier - Yanıt

    My problem is the front panel does not want to joint together with the rear panel… it feel like the front is too big but it look perfect but does not clip in place… Help…

    Tony Chicoine - Yanıt

    same problem, in the final step, the screen does not fit entirely. it looks like the size is not 100% correct, but 99%… one side of the case stays open…

    Andrea Andreoli - Yanıt

    Same thing here, with a new screen it doesn’t fit quite right during re-assembly. It sits just a little bit higher and doesn’t look seated.

    Adam Carl - Yanıt

    Some people have noted that the screen doesn’t seat properly on the case. Here’s how I solved it:

    The issue is that rectangular brackets on the back of the display aren’t latching with the corresponding clips in the base. I think the brackets are missing the gap between the spring plate and bracket with the latching bumps on it on the base. Here’s my solution:

    Position the top of the display slightly below the top of the case so the clips on the back top of the display start to engage with the phone case. Important: don’t push it all the way up!

    Now press both sides of the top part of the display until the display seats on the back. Make sure both sides are flush with the case.

    Repeat for the middle of the display. The bottom of the display will remain bent up because it will interfere with the bottom edge of the case.

    Now push/slide the display up so the top of the display lines up with the top of the case. The bottom should then snap into the base, and the display should be flush with the case all round.

    nigel - Yanıt

    Yes - important to get those two rectangular brackets in place first but not all the way as you say.

    JustinO'Brien -

    Hola soy de Guatemala Me pueden ayudar a saber si puedo cambiar las partes de un A1589 a un A1549 iPhone 6

    alvarezgarcialuizfernando - Yanıt

    Good thing am reading this prior to beginning any disassembly or re assembly. Thanks guys for the great tips

    Anthony Arenas - Yanıt

  8. iPhone 6 Home Button Replacement: adım 8, 3 resimden 1. iPhone 6 Home Button Replacement: adım 8, 3 resimden 2. iPhone 6 Home Button Replacement: adım 8, 3 resimden 3.
    • Open the display to about a 90º angle, and lean it against something to keep it propped up while you're working on the phone.

    • In a pinch, an unopened canned beverage works well for this.

    • Add a rubber band to keep the display securely in place while you work. This prevents undue strain on the display cables.

    A picture is worth a thousand words! This idea at Step 9 is perfect and you can definitely do the entire rest of the battery replacement WITHOUT having to disconnect the display from the rear case. Just leave it secured exactly as shown in this picture and you're good to go. I just completed the repair and the most difficult part was just lining up the new battery connector! Excellent instructions and generally EASY repair because this step was so helpful!

    Ryan - Yanıt

    I did the same. Made the work go so much smoother!

    dcommins - Yanıt

    I do NOT recommend leaving the display and the rear case connected during this repair. If you run into any resistance removing the battery, or slip in the least removing it, you risk tearing the ribbon cables that attach the two pieces. I did and now I've got to replace the Front Camera and Sensor Cable. Sadness.

    Ergolad - Yanıt

    This procedure does not require the removal of the battery, so your comment is not applicable unless the batter is being replaced.

    Douglas Fichtner -

    I'm going to try it this way, because the odds of damaging the connector during removal seem greater than the risk of ripping the cable, however, I plan to cradle the phone in the "L" of simple, sheet metal bookend, and secure it using blue painter's tape. Seems more stable.

    bobcloninger - Yanıt

    If you do this step carefully- (rubber band the front panel, and carefully peel away the battery adhesive) you can SKIP 13 THRU 19!

    Larry House - Yanıt

    Rubber band and a large can of soup held the front in place. Go slow, steady firm pressure. Take the vibrator out though. Makes pulling the adhesive tape out much easier. Great video and written instructions!

    Sherman Homan - Yanıt

    I do NOT recommend leaving the display and the rear case connected during this repair. If you run into any resistance removing the battery, or slip in the least removing it, you WILL tear the ribbon cables that attach the two pieces. I did and now I've got to replace the Front Camera and Sensor Cable. MUCH Sadness.

    todd adelman - Yanıt

    Exactly!!!!!

    Bunny -

    I decided to do the repair on my iPhone 6 without detaching the screen. I ended up screwing two pieces of 3/4” x 3” x 6” wood together at right angles. I used 2 rubber bands to secure the screen to the vertical piece and 1 rubber band to secure the base to the horizontal piece. One of the two adhesive strips broke and I had to really work to get the battery out. The rubber bands held everything together nicely. The wood pieces were slightly wider than the phone which made it easy to hold everything together while I was working the adhesive strip out.

    brian - Yanıt

    Mine worked great install went perfect. Was like a new phone… for a couple months. Phone may be failing for other reasons, but there’s a ghost image in the shape of the battery in the display now. Very strange. The ifixit kit did give life to it for a while though.

    smahar - Yanıt

    Hey Smahar! If you still have your tools, I’d recommend opening your phone up to make sure the battery isn’t swollen. If it’s pressing against the screen, it’s possible that is the case. If it is swollen, I highly recommend you replace it, it can be dangerous to leave it in place.

    Sam Goldheart -

    I feel like I just pulled off a minor miracle, successfully detaching and reattaching those four connectors. In the past I have also used the lean-against-a-box variant. Now I carefully apply several short pieces of painter’s tape to create a temporary “hinge,” in combo with the lean-against-a-box variant. If the bottom piece could be SUCCESSFULLY SECURED [painter’s tape loops?] to my work surface this should avoid needing to deal with the four connectors. IMPORTANT NOTE: At the end of the day this repair will ALWAYS be about pulling the white stretchy adhesive tape out from under the battery. And again the painter’s tape comes into play. This last battery replacement when I started to pull out the two adhesive strips I also, several times, applied enough tape to combine the strips and form a single grab point. Also, removing the “vibration” block allowed the the pull angle to be insanely shallow. Slowly-but-surely, both strips successfully emerged and battery was totally released.

    Michael Russo - Yanıt

  9. iPhone 6 Home Button Replacement, Removing the battery connector bracket screws: adım 9, 1 resimden 1.
    Bu adımda kullanılan alet:
    Magnetic Project Mat
    $19.95
    Satın Al
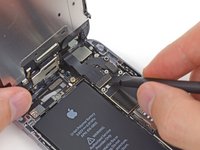
    • Remove the following Phillips screws from the battery connector bracket:

    • One 2.2 mm screw

    • One 3.2 mm screw

    • During your repair, keep track of each screw and make sure it goes back exactly where it came from to avoid damaging your phone.

    #000 needed here

    Dave - Yanıt

    ok well what exactly does 2.2 mm and 3.2 mm mean if a #000 is needed? why even mention those numbers?

    Cory Berends -

    Those are the screw lengths. They’re important to mention so that you don’t put the longer screw in the wrong place. If you start mixing up screws, you can end up with permanent logic board damage.

    Jeff Suovanen -

    I replace the antenna in the upper left-hand corner an in the bottom middle with the lightning connector because After disassemble it completely i lose my ability to have Cellular. After i replace both antennas i can find i nevertheless have cellular. anybody an idea ?

    kupies2011 - Yanıt

    With the phillips screwdriver included in the repair kit I cannot unscrew any of the interior screws because it is not the right size even though according to these comments all of the screws are #000 and on the product listing it says that the screwdriver I got is #000. Any suggestions?

    Wilson Styres - Yanıt

    Sounds like you need to adjust your technique. The included PH000 driver works fine; I’ve done many many phones with it.

    Jeff Suovanen -

    Upon reassembly I found the Red 2.2 mm screw won't seat. Is it possible it sheared off? The Orange 3.2 is solid in both holes but 2.2 doesn't securely fit in either.. Should I just leave off the 2.2?

    smcgreg - Yanıt

    My phone was missing this screw also!

    Gail Starr -

    Duh, had the cover on the wrong way. Switched it around and the screw fit. (:

    smcgreg - Yanıt

    When I insert the 3.2 mm screw... The phone shuts down, very weird because am not seeing what could cause this short...

    Juan Monge - Yanıt

    I’m having the same issue. Thinking about just leaving that screw out. Did you ever get your’s working?

    Cavell Blood -

    Using the Phillips 000 screwdriver included in the kit, I am able to remove the 3.2 mm screw, but not the 2.2 mm one.

    Dan Solovay - Yanıt

    None of the screwdriver heads in this kit are big enough for these screws!!! I now have an open iphone and i have to go to the store to buy a different screwdriver..I do not recommend this

    Elaine Eason - Yanıt

    I was unable to unscrew the 2.2mm screw with the provided screwdriver. I was able to unscrew the 3.2mm screw but not the 2.2mm

    Jameison Martin - Yanıt

    what did you do, i have the same problem i don’t know what to do. I should have read the comments at first now I am left with an open phone

    Francky Maemble -

    I'm stuck in the same boat here. The one screw came out no problem but the second isn't catching at all.

    Brian Adams - Yanıt

    Stuck with Jameison and Brian here... 2.2mm won't catch with all three provided screwdrivers.

    Matthijs Rog - Yanıt

    Agreed, the screwheads included in this kit didn’t work for me either. Fortunately my own toolbox has an appropriate screwdriver…. Seeing as how we are paying for this kit so we don’t need to purchase extra tools, iFixit should really include screwheads that actually work!

    Priscilla Cheng - Yanıt

    When putting everything back together, I took care of steps 10-12 (or, more accurately 12-10) after reinserting the SIM (so between steps 20 & 19). It was easier to do before dealing with reconnecting the screen.

    dhcohen67 - Yanıt

    why do i buy a kit from you guys but you don’t provide the necessary tools for unscrewing

    i dont have any screwdrivers at home the 2.2mm simply wont come off its ridiculous now i just have an open phone

    Michael Amara - Yanıt

    I had to use Phillips #00 for the 3.2mm (orange) and #0 for the 2.2mm (red). The #000 screw driver came in the toolkit is useless on both screws so I had to go out and buy new ones from a hardware store…

    Tung-wei Lin - Yanıt

    My two screws are the same diameter - 1.1mm, taking a Philips PH000 driver. However the one toward the middle is 3.3mm long, the one nearer the side is 2.2mm long.

    Alastair Lack - Yanıt

    So my kit didn’t come with the right screw driver, I should have read the comments first before buying.

    My iPhone 6 battery connector bracket has 3.2mm which the PH000 works. But the 2.2mm didn’t work with included Y000.

    What screw driver do I need for the 2.2 mm screw??

    John Palaganas - Yanıt

    The heads on both of those screws are identical. The included PH000 is the correct driver. There are no Y000 screws anywhere in the iPhone 6.

    Jeff Suovanen -

    The Phillips in the repair kit worked fine. I did 2 phones with it.

    Eric Craumer - Yanıt

    Just a followup to all the comments above for anyone who is confused: the drivers included in the repair kit work fine, assuming you know how to use a screwdriver correctly in the first place. There are quite a few folks who never learned, and that’s nothing to be ashamed of—in fact it’s common enough that we made a guide for it. Those bits were designed first and foremost to work with iPhone screws and have been extensively, extensively tested. You may come across stubborn screws or strip the heads if you’re not careful, and maybe that’s why some folks here are having trouble. In the very rare event that you actually received a malformed bit of some kind due to a manufacturing defect (which should be clear just from looking at it up close), reach out to customer service and they’ll get you squared away.

    Jeff Suovanen - Yanıt

    I just completed the battery replacement and I too found that the PH000 did not sit properly in either the 3.2 or 2.2 mm screws. Using a magnifying glass it seemed that the PH000 driver bit did not sufficiently fill the space of the screw. I happen to have the iFixit Pro Kit and used the PH00 driver bit instead, and this seemed to fill the space of both screws much better leading to successful extraction and replacement. My lack of experience with phone repair may have been a factor, but it seemed at least for my particular phone the PH00 was the proper driver bit for these two screws.

    Jimmy Doi - Yanıt

    The PH000 screwdriver I received cannot remove the smaller screw…

    Michael Pesenti - Yanıt

    So I spend 34 bucks on a kit of tools to repair my phone and they send the wrong sized screwdriver to get the battery cover off. Awesome. I can get the larger screw out but not the smaller one. What a waste of time and money.

    Michael Pesenti - Yanıt

    @michael_pesenti Those screw heads are the same; the screws are just different lengths. If you have the right driver for one, you have the right driver for both, unless someone put your iPhone together with the wrong screws.

    Jeff Suovanen -

    @jeffsu

    Nope. Actually turns out that ifixit just sent me a defective screwdriver that only was poorly sized and only managed to catch one of the screws. I had to order a new PH000 Screwdriver on Amazon and it got the screws out instantly and I was able to repair my phone.

    Michael Pesenti - Yanıt

    I used the “Maximum” precision set from Canadian Tire and the PH#00 works nicely for both these screws.

    Matt - Yanıt

    Screws in mine required different size drivers also - maybe because refurbished? But have had the same probs on mbps also. Felt silly but followed Jeff’s suggestion to look at the screwdriver best practice guide and realised I was stripping screws by using too small a driver - have a couple either side of the suggested size and use the largest one that catches - I mainly used PH#0 & 00, though some screws needed #000, and there wasn’t any consistency to which screws needed which driver.

    Trish - Yanıt

    You’ll want to secure each screw as you remove it - if you sneeze they will fly away and you’ll never find them. I recommend having a small bowl or container for each screw you remove and label them for reassembly.

    Jennifer Porter - Yanıt

    I was worried about getting the screws mixed up, so I used Sharpies to color-code each screw before I removed it (red, orange, or yellow - corresponding to the iFixit illustrations) When I marked the screw, the bracket got some color on it too, so when I was replacing the screw, I was confident that I was putting the right screw into the right position.

    I also made a template-board by tracing an outline of the phone in the center of a piece of cardboard, and then gluing pieces of masking tape onto the cardboard, sticky-side up, one piece of tape for each bracket I removed. I drew an outline of the part on the tape, and made a red or orange or yellow dot for each screw that came from the bracket. It made it super-easy to keep track of the disassembly and reassembly. Took a little longer, but I didn't damage the logic board by using the wrong screw, and I was relaxed throughout the repair.

    GPS and WiFi now work perfectly!!!

    Thank you iFixit and commentators

    Paul Austin - Yanıt

    Funny my one screwdriver fit all the screws with no problem!

    Thomas Hayes - Yanıt

    @Paul Austin: colouring the screws is a galaxy-brain tier idea, I will definitely be doing this!

    povman - Yanıt

    Are you just out of luck if you start to strip a screw? The first, 3.2 mm came out easily but the 2.2 mm is a little worse for wear. I’d be grateful for any tips you might have.

    Andrea Nixon - Yanıt

    Turns out the included PH000 head does work with both screws. They are both the same size gauge; only difference is the length. I had the same kind of trouble as most others trying to unscrew them. But if you carefully apply consistent direct downward pressure as you turn, the screw does disengage and unscrew. It helps to stand up over the work for more leverage. And it aids in keeping the screw driver head in full contact with screw head, so it doesn’t slip and strip the head.

    ARNOLD SCHWARTZ - Yanıt

    I am surprised by all of the comments about the screwdriver bits being the wrong size - I have done several iPhone repairs now with the tools provided by iFixit, and the screwdrivers work perfectly for me every time.

    Joe - Yanıt

    I bought the Ifixit tool kit on amazon for $70 and i don't see any 3.2 mm or 2.2 mm in the black box. does anyone know what screw i am supposed to use because i have no idea what i'm doing wrong. I opened the bottom screws on the Iphone 6 just fine but for the inside screws i dont see 3.2 or 2.2. can anyone help me? i hope I didnt waste $70 on the wrong thing.

    YuhBoiiJay - Yanıt

  10. iPhone 6 Home Button Replacement: adım 10, 1 resimden 1.
    • Remove the metal battery connector bracket from the iPhone.

    Why in the YouTube video do you skip removing the battery connector

    mjcoughlin70 - Yanıt

    The YouTube video could use an update, but unfortunately YouTube does not allow that. Always disconnect the battery before disassembling anything else.

    Jeff Suovanen -

    One of the screws is longer than the other, use it for the higher inside hole.

    Bobby Slone - Yanıt

  11. iPhone 6 Home Button Replacement, Disconnecting the battery connector: adım 11, 1 resimden 1.
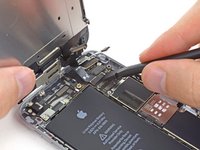
    • Use a plastic opening tool to gently pry the battery connector up from its socket on the logic board.

    • Take care to only pry up on the battery connector, and not the socket on the logic board. If you pry up on the logic board socket, you may break the connector entirely.

    I skipped steps 13-19 and just left the front panel rubber banded while I removed the battery. I just made sure to be careful while removing the adhesive strips so as not to move around the body of the phone too much. Skipping the steps made the whole process much faster and easier.

    Tonima Chaudhury - Yanıt

    I wish I had done that.

    Gail Starr -

    Thanks for this awesome tip. Made the replacement go much smoother - saved me from removing all those other screws. I also recommend watching the ifixit battery adhesive strip video before proceeding with step 21.

    Andy Milne -

    Me too, no need to detach the screen (when you take care),

    Tom Long -

    In trying to replace my antenna flex cable, I attempted to skip steps 13-19 but eventually gave up around step 31/32 as I simply didn’t have the access I needed - the space was just too cramped with the screen still attached and I was afraid I would break something. If you’re a novice, don’t have good lighting and a magnifying glass, etc. you may just want to go ahead and perform 13-19. (Yes it will take extra time of course.)

    Perrin Haley -

    I also skipped steps 13-19 after reading the first comment.

    youmingc - Yanıt

    I skipped those steps too and was successful. Thanks for this tip!

    jaksbackpack - Yanıt

    Can disconnecting the battery connector while power is on ruin the backlight? Or can disconnecting the power connector at a different stage ruin the back light?

    mitch Toler - Yanıt

    You should power down the phone before disconnecting the battery. That said, the backlight should be fine. A blown backlight circuit is most commonly caused by disconnecting the display when the battery is still connected.

    Jeff Suovanen -

    I did open the lcd without disconnecting the battery and my lcd wouldn't working

    Reza I. Permana -

    Thanks for that tip Tonima! This is another confirmation that skipping steps 13-19 worked out great!

    As an extra measure, in addition to leaving the front panel rubber banded in it's open, vertical position (I secured mine to a can of beans) and being very careful and controlled when removing the adhesive strips; before using the suction cup to separate the front panel from the rear case, I had secured the back side of the rear case to my working surface (kitchen table) with a strip of folded over duct tape (creating double sided tape). Such might not have been necessary as I held the rear case with one hand while removing the adhesive strips with the other, though it just felt safer having the rear case (as well as the front panel) well secured in place to help assure that I didn't accidentally cause any damage to those very fragile looking cables that were left connected, by any possible movements of either of the iPhone's halfs during the pulling to remove the adhesive strips.

    Russ Levey - Yanıt

    It happened to me, by prying the battery connector with another tool I broke part of the socket off the board. However, by placing it exactly back in place the connector could be placed correctly and it works. Lucky.

    Udo Schuehle - Yanıt

    I'd like a little more explanation on how to re-attach the battery connector. But in the end I lined it up and pressed gently down till it snapped into place.

    Garret Gray - Yanıt

    I skipped the steps removing the screen only because I didn't feel confident at all doing this. For someone who is used to electronics I would really suggest removing it because I imagine the whole process would've been easier. If there's a next time, perhaps I'll do that.

    Garret Gray - Yanıt

    The suggestions that recommend skipping step 13-19 apply to some other repair. We replaced the display, and to do so, steps 13-19 are, of course, necessary.

    Gabriel Zachmann - Yanıt

    When replacing the battery you should prepare the cable to sit in exactly as you see it in the picture. I had mine all the way back in (with sticky strips) and had to find a way to fit the cable in with the weird way it bends. Dry fit the battery with cable in place - lesson learned.

    Chet Seidel - Yanıt

    Good idea. All the instructions were great until I got to the last thing- reattaching the battery connector! I like your recommendation to dry fit the connector so you can get the right bend to the connector ribbon first.

    Tom Rohrer -

    I wish I had seen this also, I feel like this should be in the guide. Mine seems to be working out but I had to force the connector into place a little bit.

    Kevin Harvey -

    I wish I had seen this first! I also had the issue, now I have a permanent discoloration of the screen where the connector is pushing against the back. Hoping that it doesnt lead to other problems. This site is really lacking on the reassembly steps… shame..

    thomasjmaclean - Yanıt

    I'm just wondering if my computer would still recognize my phone with the battery disconnected?

    Sare - Yanıt

    It appears that I haven’t properly connected the battery back up, since the hard reset didn’t work. I did my best to connect the battery before adhering it to the battery spot, but the connector doesn’t seem to “click” or otherwise confirm that it is properly positioned. The left side of the connector (closest to the battery) seemed slightly raised, which made me wonder if I had done it correctly. So I’m probably going to have to try using my last adhesive strips to lay it in better to allow for a better connection. I’m also worried that I may have damaged the connection spot. Is there anywhere on here where this is discussed? This is my second battery replacement, but first on this particular phone, which is apparently a refurbished one (and which has a slightly different looking connector cover).

    Alex Kosmider - Yanıt

    Ah, it helps to discover that it’s actually a 6S rather than a 6.

    Alex Kosmider -

    For those of you replacing the Digitizer you to need follow steps 13 - 19.

    lowestseries - Yanıt

    Doing a lightning connector replacement - skipped steps 13-19 as well. No problems.

    cambo.robertson - Yanıt

    Hello, Is it necessary to do step 13 to 18 if I only want to change the battery?

    What does can happen if I don’t make all step?

    Juan - Yanıt

    I can’t seem to get the battery connector to connect to the logic board. Is there some reason it doesn’t click or do something to hold it in place before the battery connector bracket?

    Leif Rambjor - Yanıt

    @lrambjor No special technique; just line it up and press down, and it should snap into place. Make sure there’s no dirt/debris in the socket; give it a blast with some compressed air if needed. And make sure you’re not trying to jam an iPhone 6s battery into an iPhone 6 (or vice versa)—they aren’t compatible.

    Jeff Suovanen -

    So her guys I skipped 13 but when attaching the ribbons( which is the LCD,camera etc ) I got a little smoke while trying to attach the ribbons and now i am not seeing anything but the phone is vibrating and coming on but i cant see anything

    What is the reason

    juniour Bowens - Yanıt

    Who are you kidding? Plastic tool” is cute, but totally useless for lifting that battery connector off the logic board. But the smaller of the four long-handles Metal tools iFixit sells as a set worked perfectly well.

    Michael Russo - Yanıt

    Reattaching the battery connector was one of the more difficult parts of this repair. Once you place the battery on the rear cover and the adhesive sticks you cannot make any adjustments to position (even though I tried to just place it as lightly as possible at first). I did a dry run attaching the connector and placing the battery before removing the adhesive cover but I did not get it to sit the quite the same after removing the cover. I had to fiddle with the battery connector quite a bit to get it in place.

    Raymond Rinaldi - Yanıt

  12. iPhone 6 Home Button Replacement, Removing the front panel assembly cable bracket screws: adım 12, 1 resimden 1.
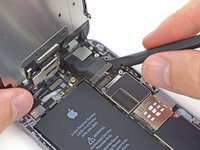
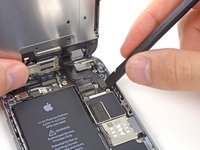
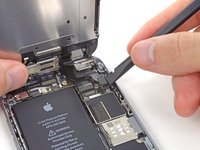
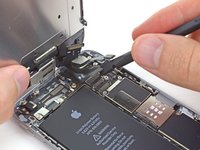
    • Remove the following five Phillips screws securing the front panel assembly cable bracket:

    • Three 1.2 mm screws

    • One 1.7 mm screw

    • One 3.1 mm screw

    • Incorrect placement of these screws during reassembly will cause permanent damage to your iPhone's logic board.

    Be careful when replacing the screws, not to accidentally put the 1.7mm screw into the center hole, where the 1.2 screw belongs. This can cause "Long Screw" damage, and render your phone unusable.

    damianodessgillett - Yanıt

    I don't have the magnetic pad but use duct tape face up in a tray. I write the step number and color of the screw on the sticky surface and let the screw stand heads up on the goo. The screw is presented for the driver when reassembling.

    griffn - Yanıt

    I seriously draw a picture of the part, and mark where the screws belong, then place the screw on its location on the drawing! I so don’t want to screw it up(no pun intended)

    lisa OBrien -

    Can't stress enough how important it is not to mix up these screws! Using the 1.7mm screw for the lower left fixing will cause "long screw damage" and kill the backlight on the phone. I believe @damianodessgillett made the same point. Wish we could display a small warning message here to be extra careful for future fixers!

    kev - Yanıt

    I use a screw ID technique similar to griffn's; I print out the PDF version of the guide, then Scotch-tape each screw type to the guide at the step where the screw was removed. The screws are then distinguished by size and type at the point where they need to be reinstalled.

    adlerpe - Yanıt

    i am trying but only could open 2 screws and cannot open the rest of them, can you help me??

    girlsrock742 - Yanıt

    @girlsrock742 - I'm new here, but from what I've seen, questions like yours don't get answered. I have 2 suggestions:

    # Be more specific about what your issue is.

    # Make sure you're using the right screwdriver. (Get a magnifying glass & make sure the screwdriver fits nicely in the screwhead.) This guide is included in a guide I'm looking at, and my guide has a comment that #000 phillips is required for the battery connector bracket above, not #00 as documented. (That comment did not convey to this guide....)

    Good luck!

    Bass Clef - Yanıt

    Nate, you are my hero at the moment! Phillips head screw driver PH000 resolved my issue. Greatly appreciative of your chiming in on this comment! Appreciatively, C.

    Carol N -

    Thanks to @griffn & @adlerpe! I've updated the tools list to include the magnetic pad, and -- for us infrequent fixers -- I made a note in the intro text to describe the sort of thing you two noted here in place of the mag pad.

    Also, to @damianodessgillett & @kev - I've submitted an update to the instructions to add the caution you recommend to the step. Hopefully others will avoid the pain of the Long Screw damage.

    Bass Clef - Yanıt

    It's possible to damage only a slot of flex cable ? I've opened my iPhone 6 but now front camera, speaker and the proximity sensor are not working. I've bought a new flex cabe to test it, but I have to be sure about that.

    cruz.giovanni - Yanıt

    I'm so worried I'm going insert the wrong screw. Does anyone have any suggestions to knowing how to properly tell the size of each screw? I bought a screw set and a magnetic pad but still have the same issue. Not knowing the correct placement of each screw. I'd definitely appreciate any help.

    Patric - Yanıt

    Hi Patric! We use a set of calipers to measure our screws, failing that you could use a very fine ruler. If you don't have any kind of measuring equipment, line the screws up on the magnetic mat and sort them by size there. Ideally you only have screws from this step! If you are trying to determine the size of all the screws in this guide, it's probably best to get a real ruler/caliper for the fine distinctions.

    Sam Goldheart -

    Do you have to remove the display to replace the battery?

    Michael Aguilera - Yanıt

    It's not absolutely necessary to remove the display, I kept my display propped up throughout the operation. Removal of the display doesn't seem to offer any particular benefit, unless you have problems with the adhesive strips.

    Adam - Yanıt

    I agree that it is not necessary to perform steps 13-19. I just successfully replaced my battery and skipped steps 13-19. I kept the screen assembly out of the way be securing it with a rubber band to a heavy candle jar. Note that even Gwendolyn, in the video for this batter replacement, does not mention disconnecting the screen.

    Robert Blackburn -

    Hi. I messed up with the screws in the cover guard sheet for the display ribbon and my iPhone 6 plus isn't turning on. Does that mean the logic board is dead or the battery ? Should I throw the phone in the garbage can ?

    nzf - Yanıt

    Did anyone even answer your question? I'm having the same issue

    Sare -

    I can confirm it's not necessary to remove anything other than battery bracket. If you support the screen against something as in the picture, just make sure you hold the iPhone absolutely still with one hand while pulling out the adhesive strips with the other. I also used a small piece of tape to hold the screen in place against the box while I worked.

    I am now a very happy customer and am looking forward to another few years life from my awesome iPhone 6!

    Matt Whiteley - Yanıt

    There is no need to do this step. No need to remove these 5 screws. Just make sure the screen is propped up against something strong and this step is unnecessary for the proper removal and re-insertion of battery.

    arunhn - Yanıt

    100% agree. Step 13-19 are totally unnecessary and just adds the risk of breaking the display connector. “Don’t disassemble stuff that doesn’t need disassembling.” Just ensure there’s no strain on the display cable when removing the battery, i.e. by placing the phone on a non-slippery rubbery surface and fix the display to something sturdy with rubber bands.

    Dormouse -

    I left the front panel connected and it was much quicker. But, if you have to wrestle with the battery, it is much safer with the front panel removed. If you have worked on a few phone before, I'd try removing the battery with the front panel connected. If the battery is giving you problems(like if you tear the strips and have to heat the backside), you can always come back to this step.

    Joel Horie - Yanıt

    I strongly recommend you leave the display connectors alone if you can. My battery came out without a fight, but I found the display connectors to be almost tragically delicate, and I had white lines in the display when I booted it. During the subsequent attempts to remedy that situation, things went down hill and now I'm waiting for an entirely new display to try to rescue the phone from repair oblivion.

    kevin hekman - Yanıt

    I also skipped all of the screen-removal steps and had nary a problem. Just rubber band the screen around whatever it is propped against and I believe you'll be fine.

    Billy Bob Baler - Yanıt

    Hello! I put the screws on in the wrong order and I believe my backlight is dead, iTunes still recognizes my phone when I plug it in, but the screen is blank. Is it possible to replace the logic board or is the phone useless forever?

    Tanya Lyn Willard - Yanıt

    You probably connected the cables wrong, try doing this step again and carefully correct your cables.

    June Beltran -

    Remove each screw, tape it to a piece of letter paper, mark what spot it came out of. red, yellow, orange and the 3 reds. This way you can not possibly put them back in the wrong spots.

    smahar -

    I totally recommend doing this step first before removing the battery connector bracket, it will be much easier and comfortable with the screen out of the way.

    Also I recommend drawing the bracket on a piece of paper and place the screws on top of the respective position on the drawing, this way you won't be confused when putting them back.

    June Beltran - Yanıt

    I accidentally lost a 1.2mm screw while doing a screen replacement. Will this make the phone malfunction in anyway after I close it back up or its fine?

    Walter White - Yanıt

    DO NOT DO THIS STEP. It is totally unnecessary to remove the connectors, and they are a really big pain to put back in, and there is risk of damaging them, and it adds a lot of time to the process of replacing the battery. Just securely prop up the front panel, and then if you gently heat the back of the phone when removing the adhesive strips, the battery comes off easily. I could have saved myself about 2 hours and a lot of frustration if I had just left these connectors in. I wish the instructions here would just include this step (connector removal) ONLY IF the battery doesn't come out easily.

    J Marr - Yanıt

    Exactly, just like J, Marr indicates, this step is not necessary. Just make sure you're careful to not move the phone too much, otherwise you can damage the film connectors. Other than that I even heated my phone to remove the adhesive, and thank God, nothing bad happened to it.

    Mc Floyd -

    It’s only necessary if you’re like me an need to fix the screen or water damage (mine fell in water…)

    jacobdanderson -

    I do NOT recommend leaving the display and the rear case connected during this repair. If you run into any resistance removing the battery, or slip in the least removing it, you risk tearing the ribbon cables that attach the two pieces. I did and now I've got to replace the Front Camera and Sensor Cable. Sadness.

    Ergolad - Yanıt

    How can't you do step 33 if you don't do 13-19? iPhone 6.

    predylindsay - Yanıt

    This procedure is for replacing the iPhone 6 battery and there is no Step 33. You may have been referred to this page from another procedure. Keep that in mind while reading the comments here that may or may not apply to your original procedure.

    Don Lawton -

    I'm missing something here, I want to swap out the screen. How does one skip steps 13-19 if wanting to remove the screen?

    BW Lee - Yanıt

    This procedure is for replacing the iPhone 6 battery. You may have been referred to this page from another procedure. Keep that in mind while reading the comments here that may or may not apply to your original procedure.

    Don Lawton -

    Any tips for removing the 1.2 mm screws? Mine won't budge at all with the PH000 and I'm afraid I'm stripping the screws.

    MClare - Yanıt

    I had to use the larger bit for ALL of the screws as the small one was too narrow at the tip to actually grab anything. It worked but made it a bit more difficult.

    Heather Best - Yanıt

    Is it really necessary to remove the front panel at all, can't you just ask a friend to hold it in an upright position while you work on the battery?

    Peter - Yanıt

    I also skipped steps 13 - 19. Just be very careful not to apply to much stress to the connectors in between the screen and the base. For me I also used another box to keep the base from sliding around while removing the battery.

    Patrick Reed - Yanıt

    You cannot skip these steps, of course, when you want to replace the display (which was the kind of repair we did).

    When putting the little connectors in place again afterwards, I can recommend to hold the connectors to the display using a little rubber band. That way, they don’t get in the way when you put them in place one by one.

    Gabriel Zachmann - Yanıt

    You SHOULD do the steps of removing the display. I have done battery replacements on several dozen phones. Of the ones I did NOT remove the cables, 2 of them had issues directly related to components related to these cables (front facing camera, earpiece speaker, etc.). Although tedious, I recommend removing these connectors to prevent any short circuit when reconnecting the new battery.

    ACMT - 4 years.

    jonbessom - Yanıt

    I skipped this step and just affixed the screen to the Iphone box with a rubber band during replacement. I decided to take this risk to prevent some of the other issues that have been discussed when removing the screen. I understand it is risky because if you slip or need to use any significant force to remove the battery, disaster awaits. On my repair, it worked out fine and I ensured that I took my time and kept the bottom of the phone held to the worksurface.

    Michael Kirkpatrick - Yanıt

    There are only 2 screws when i opened mine.The centre one and the left top corner one..Is it okay to use it like that..Please help

    Naresh Annepu - Yanıt

    If you can try to leave your display how it is. I removed it and it ended with white stripes and touchscreen not working. After a while it touch started to work and stripes went away. I think it was static electricity.

    Kristaps Grinbergs - Yanıt

    If you decide to go ahead with this step… I did it prior to removing the battery bracket and found it to be easier. Having the screen off made things a lot easier during the battery removal process.

    Eric Craumer - Yanıt

    Two of the screws are damaged and I can’t open them. What can I do to remove the bracket?

    L He - Yanıt

    Stay organized with the screws with just a piece of paper. Lay them out, mark ‘em up. Go slow, take your time.

    Sherman Homan - Yanıt

    I'm noticing some questions I have that others are asking yet no one is answering. You're all talking about the same problem that I find completely pointless. If you skip steps and it works, good for you move on. There are real questions being asked. Someone asked about losing a screw, would that effect anything? You all talk about the importance of having the screws organized, yet don't explain if someone either loses the screws or have them put into the wrong places. Since no one talks about it, I figured it wasn't as important as you all claim it is. Now my phone seems to not want to do anything anymore. Stop arguing with each other about something so miniscule like skipping steps. 40 comments on this part and 5 people actually have real problems but no answers. So, if anyone actually took the time to read this, my questions are; what happens if the screws are put in the wrong order?(other than the obvious long screw damage) and what happens if we put the phone back together without some screws?

    Sare - Yanıt

    @sarery I’m a little puzzled by your question. If you’re not willing to put the screws back in the right place as instructed, despite all the warnings in both the guide and the comments, why would you want to attempt this repair in the first place? But nevertheless I will try to answer. Some screws, if left out, have no noticeable effect. That’s the best you can hope for. Other screws perform a vital function such as providing a path to ground. Some screws are made of nonferrous materials—getting those mixed up can interfere with things like compass functionality. And putting a wrong screw pretty much anywhere can result in cross-threading or component damage. The reason we go to the trouble of providing all these screw markings and measurements is to help you put your phone back together in perfect working order. Which you may still be able to do, if you are careful, and patient. Good luck.

    Jeff Suovanen -

    Thank you very much for that information. That's all I and I believe some other people were curious about.

    That's what I thought this website was for, not post fighting over who's the smarter one and not putting others down. This isn't Facebook

    Sare - Yanıt

    well said Sare - perhaps if folk stuck to the subject instead of proving how clever they are (not) there wouldn’t be 44 comments to scroll through to find an intelligent answer

    philbjh - Yanıt

    For those who are removing the digitizer, you do need to remove the bracket to get access to cable.

    lowestseries - Yanıt

    Definitely do NOT disconnect the screen for the battery replacement!

    The battery replacement worked like a charm but now I am left with whit e stripes in the screen and touch screen functionality is lost despite many tries to get the screen reconnected.

    Indiana Jones - Yanıt

    Hello, well I accidentally put the screws back in the wrong order after replacing the charging port, phone turns on but stays on Apple screen, any suggestions? Thank you

    d.rando90 - Yanıt

    i have replaced my iphone 6’s screen twice now, first the phones fingerprint sensor wouldn’t work ( the original one ), so i replaced the entire screen ( new fingerprint sensor), but still doesn’t work and now the phones brightness is extremely dim on both screens. So now both screens now are dim and finger print sensors dont work.

    Regan Murray - Yanıt

    I have some issue with the 3.1 mm screw. Only this one can’t put it back, but I take off the metal that can turn it on. (I just feel 2~3 circle to turn the screw.) What it’s happen?

    AndyKao - Yanıt

    Bottom left 1.2 screw assembly broke off from the mother board and now my phone will not power up . Can there be another reason for the phone not switching on . How important to the function of the phone is the broken screw assembly ?

    Gary Brinkworth - Yanıt

    The phone will power on and work just fine without any of the screws in this particular step—the screws are for securing the bracket and keeping the connectors from popping out. I’m not sure what your issue could be, but a missing screw isn’t it! I’d probably start by reseating all the connections and giving it another try. Check the board carefully for damage. Try posting your question in our Answers forum with all the details and you may be able to get some troubleshooting help there. Good luck!

    Jeff Suovanen -

    Thanks for your reply

    even though the screw assembly has broken away from the mother board, this screw assembly was soldered in would not damage the back light or power to the phone ?

    Gary Brinkworth - Yanıt

    Initially thought I would skip these steps, as many people said to skip steps 13-19, but I tried proceeding without removing the front panel, and my adhesive strips simply would not remove, even with heating….so off the front panel came. Putting it back (connecting the cables back) was definitely a little panic-inducing, but managed to do it without damage - definitely watch some youtube videos!

    Hannah Hyun - Yanıt

    Most companies standardize the screws on their products, but since Apple does not want you to fix your phone on its own, it has set a trap for you to damage it. I think that this criminal action may be entailing a lawsuit.

    br_flavio - Yanıt

    I have to use PH000 right?

    Aman Singh - Yanıt

    Xmas day here 2020 and i decided to skip separation of the screen from the base. got the battery out no problem. did remove the vibrator plate and felt that really helped to remove the adhesive strips. just keep the screen nicely propped up and you should have no problems. not seeing any reason at all to remove the cables and screen.

    keith florine - Yanıt

    Are there any other alternative i can use to unscrew the 1.7 mm screw?

    mormi mormi - Yanıt

  13. iPhone 6 Home Button Replacement: adım 13, 1 resimden 1.
    • Remove the front panel assembly cable bracket from the logic board.

    I can’t get the top left screw back in if the cable bracket. Any reason why. My phone has power and back light is coming on. But screen is blank

    Joan Fitzgerald - Yanıt

    In my case the top left screw - the orange screw - stayed in the front panel assembly cable bracket and would not come out. Later on I realized that the standoff screw which is underneath stayed fixed in the 1.7 mm screw. In fact this was no problem and I didn’t need to figure out how to remove the standoff screw at step 36. I just put it back in altogether and it worked fine. I actually removed both screws at once.

    Anja S - Yanıt

  14. iPhone 6 Home Button Replacement: adım 14, 2 resimden 1. iPhone 6 Home Button Replacement: adım 14, 2 resimden 2.
    • In the next four steps, take care to pry up only on the cable connectors, and not on their sockets on the logic board.

    • Use a spudger or a fingernail to disconnect the front-facing camera and sensor cable connector.

    I can not get these electrical connections to reconnect. If there is some secret to this it should be noted. I now have a phone all taken apart and can not get it back together. It makes no sense to only give directions to take a phone apart and not to put it back together.

    douglas hughes - Yanıt

    Use sideways bright light and peek underneath as you mate the contacts to align properly. Press very gently and evenly. Others have written that too much pressure in the center may warp the contact.

    mahoffman - Yanıt

    I'm having the same problem as above...really upset and frustrated at this point. :( 2/4 connectors (top and right) will 'click' just fine...the other two (bottom two) for the life of me wont connect!!!! :( any suggestions? i feel like i have tried everything. Sucks that is only thing stopping me screen from being repaired....

    alyssaavaldezz - Yanıt

    Hi alyssa. Were you able to connect the cables? I am having the same problem

    Veronica del Rio -

    regarding cable connects - if two of the ribbon cables are not properly overlapped around each other, then it will appear as if cable #2 will need to plug into the closest jack, which is actually for cable#3. Look at the two connectors carefully - they are opposite gender and can't be interchanged.

    David Panak - Yanıt

    This is good advice, and usually the problem people experience here. There is a very specific way the ribbon cables are layered, and if not correct when reassembled, the reach of the cables will cause you to assume which cable goes where and to try to insert the wrong plugs into the wrong sockets. Please do not try to force them. If they don't snap in easily, examine them closely, and you'll see the plugs and sockets are slightly different sizes, with one wider than the other. Better to take care to note how the cables layer during disassembly, or perhaps mark them to avoid this frustration on reassembly.

    gybeho -

    omg…. thank you!!!!!!!!!!!!!!!!!

    Stephanie Mille -

    Check order of cables. From screen replacement.

    lee moran - Yanıt

    my problem is that the connectors are different the screen i replaced it with the connectors were longer than the broken screen even though there the exact same type of screen

    andrew midgett - Yanıt

    Probably just have the cables out of order. Check the posts above.

    gybeho - Yanıt

    "gybeho" Ok, but it's impossible to install flex cables out of order. Each one has diferent sizes of docking...

    cruz.giovanni - Yanıt

    it is very possible to install flex cables out of order. to most people working on their first screen replacement they do not have the experience to notice that their flex cable connection is different than the dock connection. this causes them to press harder and force the connection into the dock, ruining the connections, if they do not think the they have the cables out of order

    Dakota Navarrete - Yanıt

    I'm with Andrew Midgett. The connectors are just plain different in size and orientation. My phone matches what's shown in the picture above. You can see an example of the replacement part if you search Amazon for "Sanka LCD Touch Screen Digitizer Frame Assembly Full Set Screen Replacement for iPhone 6". And Sanka isn't the only iPhone 6 replacement that looks like that, so no hating on that manufacturer here.

    Does this mean that some iPhone 6 phones have one set of connectors and some have a different set? FWIW, the model on the back of my phone says A1549.

    PG McLaughlin - Yanıt

    Update: Searching for iPhone 6S instead of 6 on Amazon, I see lots of replacement screens with connectors that look a lot more like what I have and what's shown in the picture above. (One connector has a horizontal orientation, the other is vertical. I can't be sure whether the pins or dimensions match otherwise.) Any wisdom here?

    PG McLaughlin - Yanıt

    Had the same problem with the correct layering of cable harnesses. Perhaps an additional photo showing the correct layering would be helpful for 1st timers?

    William Breen - Yanıt

    +1 for a photo showing the correct layering and routing of cables. I accidentally routed the home button ribbon above the digitizer ribbon and beneath the power and backlight ribbons. The uneven pressure it put on the digitizer connector after tightening the plate caused my digitizer to not recognize touching the display or made touches appear off center.

    drpotter -

    For everybody who thinks they can skip these steps I commend you. No way I would have been able to get my battery out - two broken strips - without removing the screen. Re-inserting these cables was not really difficult - once the first one is back in place the rest follow quickly.

    Chet Seidel - Yanıt

    I tried to reconnect these for ages until I watched a video of someone else doing it.

    Don’t try to line up the connectors by looking at them with the screen leaning on a soda can, just hold the two halves in each hand and line the first one up by feel. Really. After that it’s plain sailing.

    Even with great lighting I couldn’t make this work with the bits on the bench - yet when I picked them up it was really easy to feel them line up. I had all four popped back on in about 60 seconds.

    Pitt Monqui - Yanıt

    Please how much is the battery if converted into Ghana cedis?

    Pappy Joe - Yanıt

    1 Ghanaian Cedi equals $0.19 United States Dollar. Therefore, the $30 USD iPhone battery kit equals 161.04 Ghanaian Cedi.

    Don Lawton -

    Got it all connected properly but front facing camera won’t work. I heard that connector snap into place but it just doesn’t work anymore. I even took it all apart again and redid that connection but nothing. Bummer, but I’m not a selfie person, I only used it when I was holding my dog on my lap. Everything else works fine after the battery re-install so…whatever.

    C Trigger - Yanıt

  15. iPhone 6 Home Button Replacement: adım 15, 2 resimden 1. iPhone 6 Home Button Replacement: adım 15, 2 resimden 2.
    • Use a spudger or a fingernail to disconnect the home button cable connector.

    Muy buenas....una pregunta tecnica...si el botón falla o no está bien conectado...al conectar este conector ¿ se apagaría el teléfono?. Repare mi iphone y al conectarlo se me apaga el movil, sin embargo si no lo enchufo el movil enciende perfectamente.

    Gracias.

    Berta fernandez - Yanıt

    I have the same problem. The phone turns on when I disconnect the home button cable, but turns off some seconds after I reconnect it. Does anybody have a solution?

    Tim Wende -

    If you look in the prior steps , it clearly says to disconnect the battery when disassembling and reassembling.

    Anthony Arenas -

  16. iPhone 6 Home Button Replacement: adım 16, 2 resimden 1. iPhone 6 Home Button Replacement: adım 16, 2 resimden 2.
    • Make sure the battery is disconnected before you disconnect or reconnect the cable in this step.

    • Use a spudger or a fingernail to disconnect the display data cable connector.

    • When reassembling your phone, the display data cable may pop off its connector. This can result in white lines or a blank screen when powering your phone back on. If that happens, simply reconnect the cable and power cycle your phone. The best way to power cycle your phone is to disconnect and reconnect the battery connector.

    you missed the name of the second connctor. there are four total

    copykatt - Yanıt

    My screen is completely black and i can see the lights turning on when i press the home or lock button. Maybe this cable got damaged ?

    Gabriel Hirata - Yanıt

    Perhaps you bought a faulty screen. Often this is the case when it shows completely black.

    William Mullan - Yanıt

    When I was preforming this step, while reassembling, I had to connect the digitizer cable four times. On the last time, before screwing the Front Panel Assembly Cable Bracket on, I reconnected the battery connector and turned my phone on (ensuring that I was careful not to damage any cables!) to ensure that all cables were connected correctly and that the screen was fully functional.

    Christopher - Yanıt

    NO NO NO ! i am a professional iphone repairman and i strongly recommend against using ANY tool to disconnect the flex connectors if u slip or use to much force you will damage the connector and may cause permanent damage to the phones logic board rendering it completely UNrepairable! Instead gently use the edge of your fingernail and pry up and the connectors will usually come off with very little effort .

    taylor sparks - Yanıt

    Fingernails work great as well! However, there's nothing wrong with using a tool, as long as you exercise a little caution. If you've ever seen one of Apple's iPhone service manuals, you'll note that they use the exact same tool as iFixit (Apple calls it a "black stick" and iFixit dubs it a "spudger.")

    Jeff Suovanen -

    I'm pretty sure ifixit are pros, I used them 4 times to fix phones and no problems with using tools for flex cables.

    Dave - Yanıt

    If you still have white lines after you've tried reconnecting the connectors and power cycling. Just do a hard reset a few more times, let the phone stay on and wait a while. As long as it's not damaged, the lines will fade over the next hour or so. Your phone will be as good as new.

    grjos - Yanıt

    If my screen is giving me white lines and occasional ghost clicks on the right side does anyone know if it’s possibly only a faulty cable vs needing a full screen swap? I’d rather not waste a perfectly good screen.

    Andrew Hill - Yanıt

    what if my phone wont turn back on even after following all these steps carefully . i even put the old screen back on and it wont turn on still???

    Daniel Murcia - Yanıt

    what if the batery was not disconnected?

    Sergio Midence - Yanıt

    Re-connecting display data cable was trickiest part for me - my eyes are old! I had to do it a couple of times as the cable had indeed popped off its connector, resulting in a black screen when turned on. Needs lots of patience and good lighting, also helped to have a really good look at plug and socket under magnifying glass to see how they fit together, and to reconnect using finger rather than tool - this helped me feel when I had eventually connected properly.

    Trish - Yanıt

    Followed steps to a “T” - got phone up and running successfully! However, there is a vertical line in the center of the screen that changes color with whatever button is being displayed in the center screen. For example, a dead battery icon shows a red vertical line, acknowledging a blue “OK” button when setting up the phone shows a blue vertical line, etc. Essentially it’s not a black screen or white lines. Could it be that the display data connector is not correctly attached or perhaps a faulty connector?

    Cyndi - Yanıt

    I finally got the cables to reconnect. I actually was being to gentle pushing them down. Line them up gently then firmly press them in place.

    halac6 - Yanıt

    i went through all the steps, except i forgot to disconnect my battery, now my phone has lines and i can see horizontal pixels (as in the images are not smooth anymore). when i performed power cycle, the screen is still the same. What can i Do

    kingsley Jide - Yanıt

    During the reassembly, the ordering of the ribbons on the iFixit part at the top of the phone were mis-layered. The display data cable connector and the digitizer cable connector (steps 18 and 19 in the guide) were swapped in there ordering. This was fixed by my disassembly of the camera bracket following the guide 'iPhone 6 Front-Facing Camera and Sensor Cable Replacement'. This allowed me to fix the layered ordering of the connectors.

    Ryan - Yanıt

  17. iPhone 6 Home Button Replacement: adım 17, 2 resimden 1. iPhone 6 Home Button Replacement: adım 17, 2 resimden 2.
    • Use the flat end of a spudger to disconnect the digitizer cable connector.

    • When reconnecting the digitizer cable, do not press the center of the connector. Press one end of the connector, then press the opposite end. Pressing in the center of the connector can bend the component and cause digitizer damage.

    Reassembly was harder than other i devices I have worked on. A bench light from the side helped a lot with the first cable, the digitizer. The others went a bit better in this crowded space. I had screen lines when testing it out before closing the top, so reinstalled all four connectors here with the aid of a side light and happily, that worked!

    griffn - Yanıt

    i crossed over the first two cables initially, when re-assembled; make sure by the WIDTH that you are trying to connect them in the right order.

    awr - Yanıt

    How many times can i peel these connections without braking the connection between screen and logic borad

    falken1337 - Yanıt

    Is this the breaking down process for the Verizon version of the iPhone 6s? I know the flex cables were different for other versions and with my last iPhone I made the mistake of ordering one that had completely different cable places. Someone please send me a link to one that fits the Verizon 4.7 display!!!

    Bailey Duncan - Yanıt

    This break down isn't for a 6S. It is for a plain 6 (no S). Yes there is some differences because of the 3D touch feature.

    Keith Mullins - Yanıt

    So what is the fix if there is digitizer damage? Replacing the screen?

    After reinstallation, I am encountering issues with an area of the screen that is not responding to touch. Everything else works fine.

    Anyone have any ideas how I should proceed?

    Jonathan Rivera - Yanıt

    I had the exact same problem. I tried 10-20 times and the screen had vertical lines in the middle and the touch function didn't properly work. Then I discovered the issue. I had damaged the first connector (lcd connector) when reassembling the screen.

    What I did was to carefully with a tweezer press the damaged ones in to the correct position. Than I heard a solid "click" when I attached it and I got really hopeful.

    I finished with the rest of the connectors and put the bracket and screws back to Place and hit the powerbutton. IT WORKED!

    So, look at the first connector with a magnifying glass, the shortest one, closest to the camera. Maybe I got a little lucky when I managed to fix the connector without replacing it. Good luck. I feel your frustration all the way to Sweden.

    // Simon

    Simon Tengstrand -

    I mean digitizer Cable= the first connector (lcd connector).

    Simon Tengstrand -

    I had the most issues when reassembling with this step. The plastic tool is a fail in my experience since not enough pressure could be applied using it. I just ended up using my finger and that worked 10Xs better. My advice, watch a few YouTube videos of people reconnecting the connectors and you'll be fine.

    grjos - Yanıt

    I have dis-connected and reconnected several times with the white line appearing each time. The screen however seems to be responsive. I did lose a 1.2 mm screw. Is it the missing screw or did I damage the digitizer connection?

    Charlotte - Yanıt

    I had the exact same problem. I tried 10-20 times and the screen had vertical lines in the middle and the touch function didn't properly work. Then I discovered the issue. I had damaged the first connector (lcd connector) when reassembling the screen.

    What I did was to carefully with a tweezer press the damaged ones in to the correct position. Than I heard a solid "click" when I attached it and I got really hopeful.

    I finished with the rest of the connectors and put the bracket and screws back to place and hit the powerbutton. IT WORKED!

    So, look at the first connector with a magnifying glass, the shortest one, closest to the camera. Maybe I got a little lucky when I managed to fix the connector without replacing it. Good luck. I feel your frustration all the way to Sweden.

    I had three screws left when I did some repairs on my iphone 4 and that didn't matter. It worked like a charm :)

    // Simon

    Simon Tengstrand -

    I mean digitizer Cable= the first connector (lcd connector)

    Simon Tengstrand -

    Be especially careful in this step or your iPhone won’t respond to your touch after reassembling.

    Ume Nishikino - Yanıt

    My home screen button is not working after reassembly, not only the Touch ID but the actual button doesn't work. I have iPhone 6S . How can I fix this? Thanks

    Sissy -

    I noticed that I had bent this connector. Barely. After about a dozen connect/reconnect attempts, bent it back and everything works as intended. Prior to bending it, was getting white lines and touchscreen was unresponsive. After bending and reconnecting, fired up exactly as it had prior to disassembly.

    Heywoz - Yanıt

    I had the exact same problem. I tried 10-20 times and the screen had vertical lines in the middle and the touch function didn't properly work. Then I discovered the issue. I had damaged the first connector (lcd connector) when reassembling the screen.

    What I did was to carefully with a tweezer press the damaged ones in to the correct position. Than I heard a solid "click" when I attached it and I got really hopeful.

    I finished with the rest of the connectors and put the bracket and screws back to place and hit the powerbutton. IT WORKED!

    Thank you Simon - this was really helpful. I too suspected I had broken the digitizer connector also. Tried reconnecting 5 times before I saw your comment with resulting white lines and no touch screen. Applied moderate gentle force using long nose tweezer across width of connection and clicked and worked. Glad I read the comments as was looking at new digitizer purchase prior to reading your comment.

    Will - Yanıt

    I Had two repairs on separate phones, and got sloppy on the second one and pressed the middle of this connector with my finger. It bent the right side ever so slightly. I thought I’d read the comments before ordering a new screen and I’m glad I did. I then took a closer look and saw on the right side the two rows of points at the end weren’t running parallel anymore. Using the tweezers from the kit I squeezed the misaligned rows back true and tried one more time to install, focusing on the right (previously damaged) side first to ensure it snapped into place. Voila! All is well.

    Excellent instructions, great products, and REALLY HELPFUL COMMENTS! Thanks!

    Clint Casanova - Yanıt

    This was the hardest step for me. The iHold helped a lot. Used my fingers for all the connectors. Just make sure the cable that goes to the lowest connector is placed above all before trying to insert any.

    Pau - Yanıt

    I’ll strongly agree that this is the most difficult and time consuming step of reassembly. As Pau has stated it is vital that the cables are layered in the correct order before you begin attempting the connections.

    Check back to Step 21. It’s not clear from the photos, but the ribbons can be run under each other. The display connection and the home button connection can become transposed at Step 21.

    If in doubt, check the size of the connections and re-order accordingly.

    Dom Gernon - Yanıt

    After reassembling I have 3 letters on the virtual keyboard that don’t do anything anymore. It is the B, H and U. Could this be related to this (another) connector. (the screen is also broken but this time I only replaced the battery an it worked before this

    Erik Wegman - Yanıt

    Bonsoir je voudrais savoir si c'est possible que l'a ou l'on coche la nape de l'écran tactile peut se de fixé

    Et comment faire si c'est le cad

    francoislevi akolia - Yanıt

    My first attempt resulted in loss of touch response to a vertical column of app icons on the screen. From the Safari app at the bottom to the top of the screen, every app icon in that column was unresponsive to touch. Couldn’t open them. And this was true for every screen, including a corresponding bundle of letters and numbers in the same screen location when trying to use the keyboard. I did a hard reset any number of times without success until I finally realized the pattern: the vertical column of unresponsiveness.

    I remembered the caveat about connecting the digitizer cable — don’t press the center, do each side — and figured I must have made a bad connection. So I opened up the case again and went all the way down to the digitizer connection and did it more carefully, as advised. Sure enough, problem solved. Take the precaution.

    William Damkoehler - Yanıt

    Replacing the digitizer cable was accomplished by moving the base to line up with the flexible connection then using a finger to press into place feeling that the connection was correct worked, then pressing into place with a click of confirmation. the rest of the cables fell into place afterword.

    Teri Wright - Yanıt

  18. iPhone 6 Home Button Replacement, Separating front panel assembly and rear case: adım 18, 1 resimden 1.
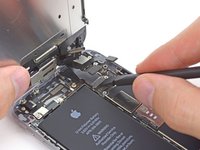
    • Remove the front panel assembly from the rear case.

    Is it not possible to start here? Just leave the screen assembly attached and only replace the home button?

    Joeri Boersen - Yanıt

    Please don’t do that. You will break your cables almost assuredly if you leave it attached to your phone trust me

    Curtis Jordan Lenox - Yanıt

    Is front camera supposed to be attached to the digitizer?

    Neos Kosmos - Yanıt

    It would be worth noticing, either at this step or below, the order of the stripes. Reassembling the fron panel requires them in the correct order, and “follow the instructions in reverse order” is not enough if there is not a detail on how the cables are ordered.

    Roger - Yanıt

    I successfully left the screen assembly attached while replacing my battery. I even had my adhesive strips break off and had to spray isopropyl underneath the battery and then grab the strips with tweezers, but I was still ok. I can see why it’s recommended to detach the screen assembly, but if you rubberband it to a stable support and are careful not to jerk the lower case, it’s possible to accomplish the repair while skipping several steps.

    eswecker - Yanıt

  19. iPhone 6 Home Button Replacement, Home Button: adım 19, 1 resimden 1.
    • Remove the two 1.9 mm Phillips screws securing the home button bracket.

    Again, you need a #000

    Tobias - Yanıt

    My new part had the left home button bracket screw installed. You need to remove it (and can re-use it) before putting the home button bracket back on. If you are attempting this repair, you probably don’t need this tip. But just in case!

    eschrank - Yanıt

    Confirming what eschrank said. When re-assembling the home button onto the new front panel assembly remove the pre-installed screw, place the home bracket on the assembly then re-use the pre-installed screw to fasten the home bracket (left side).

    Gregory Hall - Yanıt

    After I finished reassembling my phone, I had an annoying clicking noise when using the phone. I opened it again and found a lose screw sitting near the jack module! It’s the one you can see in step 21 picture, over the circled one on the right. It shouldn’t be removed (there’s no reason) and I absolutely don’t know how it got lose. I’ve put it back where it belongs and will see how things go. (If I don’t add anything after this comment, that means everything’s back to normal.)

    gourgou - Yanıt

  20. iPhone 6 Home Button Replacement: adım 20, 2 resimden 1. iPhone 6 Home Button Replacement: adım 20, 2 resimden 2.
    • Remove the home button bracket from the front panel.

    It is possible to over-tighten these screws, causing the home button to malfunction.

    doog - Yanıt

    Helpful - thanks for the heads up! :)

    Will Reid -

    It is also possible for the tiny metal piece (not really a screw) that goes over the center of the home button to come out of the bracket & be lost, which will cause issues for making contact when the button is pressed. Now I can't seem to find any kits with a complete replacement...not sure if this is going to affect my fingerprint id capability because I'm having another issue of my phone being disabled due to the cracked lcd that caused the security code to be input several times which has locked me out completely. I'm still trying to find a way to not lose the pictures and videos that I haven't downloaded to my computer. Anyone have any ideas on either issue? Thanks in advance! ;-)

    Dawn - Yanıt

    Are the home buttons for a 6 plus and 6s plus interchangeable?

    Sheila Smith - Yanıt

    HI THERE, I WAS WORKING ON IPHONE 6g. I REPLACE THE HOME BUTTON AND AFTER I FINISH THE PHONE WAS DEAD. I WENT BACK AND REPLACE LCD SHIELD PLATE. AND STILLS THE PROBLEM. WHAT ELSE CAN I DO? ANY ONE DOES HAVE ENCOUNTER THIS ISSUE BEFORE CAN YOU PLEASE HELP ME. rosyavellaneda6@hotmail.com

    Rosie Godinez - Yanıt

    When going backwards, and reassembling, this is where you change from Phillips #00 driver, back to Phillips #000 driver.

    Robert de Schepper - Yanıt

  21. iPhone 6 Home Button Replacement: adım 21, 2 resimden 1. iPhone 6 Home Button Replacement: adım 21, 2 resimden 2.
    • Use the point of a spudger to disconnect the home button cable connector by pushing it up and away from the home button.

    During this step, I couldn't separate the two connectors. I accidentally managed to tear the flex cable which passes under the LCD shield/plate and up to the other LCD connectors which attach to the motherboard. Can this cable be replaced to restore Touch ID functionality if everything else is intact?

    I can't see any special chip on that part, just seems like an I/O connector?

    James - Yanıt

    Yep you can. Touch ID functionality won't be lost.

    Didier Daniel -

    I have managed to separate the connector with quite a lot of patience and perseverance. Although there is no sign of physical damage on either side (button end, button-cable/plate end) the Touch ID functionality was lot. Assuming that the damaged side is that of the button cable/plate, this item is not sold on the EU store.

    Massimo Pinto -

    I have found by gently heating the broken screen side with a heat gun or reworker, it makes removing the home button and the connector so much easier to remove with the tip of the spudger and a press on the home button from the front side

    darren - Yanıt

    During reassembly the home button did not function. I verified the connectors were seated correctly but no read of touch nor of even pressing to return to home screen. This was resolved by me following the guide 'iPhone 6 Home Button Cable Replacement' to swap out my old, original shield plate with the one on the iFixit unit (effectively replacing the home button cable connector with my original one).

    Now up and running.

    Ryan - Yanıt

    Disconnecting the connector is tricky. Take your time and don't rush it. The pointed spudger end is a little thick to get under there, so I used a corner of the flat end, very carefully.

    DJ Billings - Yanıt

  22. iPhone 6 Home Button Replacement: adım 22, 2 resimden 1. iPhone 6 Home Button Replacement: adım 22, 2 resimden 2.
    Bu adımda kullanılan alet:
    iOpener
    $19.99
    Satın Al
    • The rubber membrane surrounding the home button is very thin and tears easily.

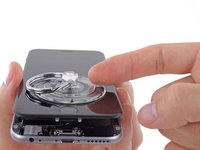
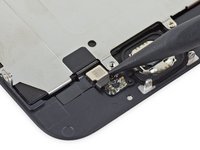
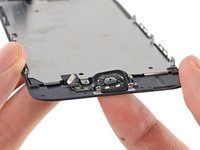
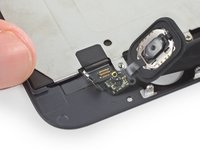
    • Apply mild heat (with an iOpener, heat gun, or hair dryer) to soften the adhesive securing the home button membrane.

    • Using your fingertip, apply firm, constant pressure on the home button from the front side of the display assembly, until the membrane starts to separate from the front panel.

    • Do not push the home button all the way through—you only need to get a corner free so that you can pry it free with a spudger.

    I used a hair dryer on this part. It made removing the home button extremely easy. Just take it slow

    peterhubner - Yanıt

    I too used a hair dryer and slow pressure as did Peter. I found that the adhesive would slowly release if I just held a little constant pressure with my finger and waited.

    Patrick Langvardt - Yanıt

    This being my first time I found that this step and the following steps to be the most difficult and time consuming. It required A LOT of patience because the rubber membrane and the adhesive holding the cable really don’t want to release without sufficient heating and I was concerned about overheating the assembly. Using a hair dryer on the slowest setting finally worked.

    fiftysomething - Yanıt

    Cette étape demande vraiment de la patience. J’ai juste attendu en exerçant une faible pression et au bout d’un moment ça s’est décollé.

    Il ne faut pas mettre trop de pression et avoir un bon éclairage pour voir l’état de la membrane au fur et à mesure.

    Chloé Bossuette - Yanıt

    I made the mistake of not using a hair dryer, I slowly pried the part up but in doing so the adhesive strip was no longer reusable. With no glue in the house I used a piece of the old battery adhesive strip as I changed the battery first. I cut the strip into very fine pieces, placed them under the steel cover plate in order to pinch the rubber gasket. Changing the battery and glass plate was easy but the tiny adhesive strip held me up for over an hour. Without the adhesive strip on the rubber gasket the push button will not work. I need to find out what glue is suitable for this application.

    Joseph O'Brien - Yanıt

    Joseph, I use this tape. The version I use is made by 3M. I find it’s a good compromise—strong enough to hold well, but loosens with heat and isn’t so strong that you rip the membrane (or whatever delicate phone part you’re working with) should you need to remove it. I’m not endorsing Amazon; you can get this stuff on eBay, from most phone repairers, etc. It comes in 1mm, 2mm, 3mm, 4mm, 6mm, 8mm, 1cm—just about any width you’d want, and is fairly easy to work with.

    ​1mm x55M Clear Double Sided Strong Adhesive Tape For Phone LCD Screen Repairby GENNEL DirectLearn more: https://smile.amazon.com/dp/B019OSYR1Q/r...

    Bonnie Baxter -

    Hair dryer worked the best!!! just be patient, takes like 5 min… use the tip of the spudger and skratch a little bit on the corner.

    Renata Torres Balderas - Yanıt

    I used the heat from my halogen bulb desk lamp and it did the trick right-away

    Rich Tea - Yanıt

  23. iPhone 6 Home Button Replacement: adım 23, 2 resimden 1. iPhone 6 Home Button Replacement: adım 23, 2 resimden 2.
    • Peel the home button the rest of the way off of the display by prying gently with a spudger.

    Don't get in a hurry with the ribbon. Heat and a gradual constant pressure did the trick.

    Patrick Langvardt - Yanıt

  24. iPhone 6 Home Button Replacement: adım 24, 2 resimden 1. iPhone 6 Home Button Replacement: adım 24, 2 resimden 2.
    Bu adımda kullanılan alet:
    iOpener
    $12.99
    Satın Al
    • Use the point of a spudger to carefully separate the home button cable from the adhesive securing it to the front panel.

    • If the cable doesn't separate easily, apply heat using an iOpener or hair dryer to soften the adhesive, and try again. Be careful not to damage the cable.

    This step really requires patience- I had to heat the area several times and “spudge” from both sides before the cable successfully loosened. Even under a strong magnifying glass, it will look like the middle section with the tiny circuit board is fused into the plastic, but it’s just strong adhesive, which eventually softens.

    Dan - Yanıt

    Dan, is there any source that indicates the maximum temperatures to which you can heat the different areas of an iPhone when necessary to loosen adhesives? Or time/power parameters for specific heat guns?

    Tomas Delaveau -

    This part almost killed me. In the video, they’ve already loosened the adhesive so she pops it right off. The hair dryer should be set to hot and low blowing. It’ll take a few minutes & a few tries) to loosen the adhesive. I aimed at all sides of the cable (ie at both ends where the cable meets the case & straight on at the circuit board). To finally get it off, I mixed up using a spudger to play with it and a very fine tweezer to finally get a good enough grip to pull the button assembly off.

    dhcohen67 - Yanıt

    I believe is better to heat the panel from te outside because the heat transfer would flow in a way that the adhesive will be at a higher temperature than the cable

    Tomas Delaveau - Yanıt

    would love to know temperature allowances/tolerances here. how hot is too hot? What temp does the adhesive relax at?

    flow in - Yanıt

    How do you remove the metal backplate shield's connector [which interfaces with the home button] glued to the plastic coating on the screen?

    Valtér Hégér - Yanıt

    The rubber gasket adhesion was minimal when I removed the button. I cleaned and replaced it, but it had no adhesion. I’m not sure if that’s how it is meant to be.

    Teri Wright - Yanıt

  25. iPhone 6 Home Button Replacement: adım 25, 1 resimden 1.
    • Once all the adhesive has been separated, remove the home button from the front panel.

    • If you are replacing a broken front panel, there may be glass shards stuck to the home button. Carefully remove any remaining glass before transferring your home button to a new display.

    • Your replacement part may come with an extra Phillips screw already installed left of the Home Button. Remove the unnecessary screw so that you can reinstall the home button bracket.

    One thing to note for re-assembly. You have to make sure the home button is firmly in place. Otherwise, a lack of adhesive will cause the home button to sink into the iPhone after it's fully assembled when you try to press it.

    rskrobe - Yanıt

    Are you sure that you screwed the metal plate back in far enough? I don't have any issues and can't believe that Apple would rely on adhesive to hold the home button from sinking into the phone. Especially as it's the most pressed button on the iPhone.

    Thomas Hallett -

    Yeah, you have to buy new gaskets if you want you're home button to stick to the digitizer frame when pressing. Don't believe me? Just see what happens when you press the button without new adhesive :) And heck I bought 50 gaskets for only $5 from China.

    Didier Daniel -

    On the old screen,there were 2 little rubber covers that fit on the screw mounts (that hold the pentalobe screws from Step 1) that I transferred to the new part.

    jefowler4th - Yanıt

    I would add a few extra steps to this (i had to disassemble and reassemble 5 times).

    First, adding the Ifixit forward facing camera replacement, and I would add the steps 12-16 fromt his guide on how to take off the heat shield (also has the fingerprint cable).

    http://www.instructables.com/id/iPhone-6...

    Thanks again.

    Roland Bodenheim - Yanıt

    after placing the home button again, it dose not read my finger prints anymore! any idea? Thanks.

    Khal Sh - Yanıt

    For all the iphone 6 series once the original home button ribbon is torn or damaged the touch ID will never work again. Even if you replace the home button/ribbon. This is a security feature implemented by Apple. Once the original cable for the phone has been damaged or replaced, the touch ID functionality is gone forever.

    Tony - Yanıt

    Dear After replacing the cracked screen successfully I turn it ON and the apple logo keeps coming and going as if it is like rebooting continuously any IDEA?

    Cesar

    cesarclaudio - Yanıt

    I'm having the same issue. Did you ever get a response to your question?

    Kevin Rivera -

    This is missing a step ... most replacement screen assemblies also are missing a small metal plate that sits under the place where the home button connector and flex cable connector rest. Apparently without this metal the touch ID cannot be enabled. That said .. I'll not know on this phone since after following these directions and finding out I needed to pull apart the home button a second time to place this metal plate there the connector would not separate and it ripped the flex cable from the connectors completely. Now it's time to get a new home button and touch ID will never work on this phone again :(

    cueball - Yanıt

    My new screen comes with the home button cable, if I just swap the original home button to the new front panal will I retain touch ID? Or do I need the original cable too?

    nathanation - Yanıt

    if you want touch id to work the cable going from the home button to the logic board must be changed also

    https://www.youtube.com/watch?v=8IEWAQiu...

    Eric Ocegueda - Yanıt

    That isn't what my home button looks like? It didn't have the little sensor on it, just the button and it still worked but now doesn't... Anyone know why?

    Emie Jayne - Yanıt

    despues de serguir la guia fue exitosa solo que tengo un problema no reconoce la huella me dice error al configurar el touch id alguna solucion???

    CHARLES - Yanıt

    When I was transferring my home button, it was covered in tiny shards of glass as the instructions warned. I found I was able to remove many of the shards and to clean up the button by wrapping a piece of scotch tape around my finger sticky side out and then gently dabbing at the shards.

    davechar - Yanıt

    https://support.apple.com/en-us/HT205628

    Does this iOS update mean that it is no longer necessary to replace the cable going from the home button to the logic board as well?

    Peter Barnett - Yanıt

    The only “problem” that I had, was that the home button connector on the iFixit replacement screen assembly was “floating” and made it very difficult initially to connect the home button cable connector. i eventually glued it down to the screen assembly with some Pritt glue and the connection was easy.

    Peter Barnett - Yanıt

    Thanks for everything.

    I just bout the Fix Kit from iFixit, I did every step 9-11 times, carefully. Everytime I try to turn on the phone when everything is assembled it won’t turn on. The screen remains black eventhough the phone is on and itunes can detect it. if I put the broken screen back I get the creen powered on.

    Is my recently aquired screen replacement broken? Thanks

    Will - Yanıt

    Solved. The new screen was not working. I now hace some stains on the upper part of the screen.

    Will -

    I had set my phone up as an erased “new iPhone” prior to the repair. After completing this repair my Touch ID appeared to be working normally and I added 4 fingerprint profiles. After a few hours Touch ID failed and the fingerprint profiles disappeared. Attempting to add them again would not work. After performing a “Hard Reset” the previously entered fingerprints returned and functionallity has been completely normal for a couple of days now. I will repost if another failure occurs.

    Steve Mattson - Yanıt

    When moving original home button to new screen, a tiny dab of adhesive from a Pritt Stick helped hold the cable onto the front panel. Great guide, all worked well, and touch ID working, thanks.

    Mike Cowley - Yanıt

    My home button was extremely loose when installed in this fashion. To help remedy it, I installed the gasket sandwiched between the button and glass instead of on the rear face of the button. Not perfect, but a much better feel. Prior to that, the button actually stuck out further than the glass.

    kwschnautz - Yanıt

    So my repair went off without a hitch, but my home button when I click it kinda has a hollow-like sound/feel to it, is it something I did wrong?

    Peter Keller - Yanıt

    You didn’t show removing the top part, camera, etc.

    William Wong - Yanıt

    I did not have a hair dryer on hand so I used the metal tweezers very carefully to lift the gasket and connector. Reinstalling it was tricky but I found sticking the connector back onto the two tiny pins made it a lot easier to guide the button into place.

    Nicholas Hooker - Yanıt

    I replaced my battery and my screen on an Iphone 6 for under $100. My phone looks and works like new. Great online tutorial, just go slow and be careful. I dropped a screw in the carpet and thought I was screwed. By some miracle I spotted it, the size of a pin head. Use a magnetic try if possible and do the work over a tile floor. I’m 66 years old, you can do it!

    Thomas m Burke Jr - Yanıt

    On the screen I purchased from iFixit, the the connector’s cable was .5mm too long so that it wouldn’t fit on the two tiny pins. But I have put it all back together and it works great.

    Greg Scott - Yanıt

    My IFixIt kit worked well. Gifted to me by a friend along with the project tray. The tiny screws are hard to handle, but the guide got me through. The phone charged and turned on like the screen was never dead. Only thing is the home button doesn’t respond to fingerprints. No big deal for me. Thanks for the great products and instructions.

    Lo'real Barrow - Yanıt

    The new screen from your Store came with not one—but 2—screws, and they were loose in the package. I used one where the photo shows a screw in the top right of the button bracket, but I didn’t compare the new screen to the old one further to figure out where the second one *might* have been needed. So far, phone is restored, and I’ll only go back to place the screw if the phone ever acts up (or someone here comes on to warn me of certain doom). Thanks once again iFixit for the part, the tools, the video, the step-by-steps, and this community. Could not have done this without any of you!

    Sue Livingston - Yanıt

    There seems to be a step missing? The little connector that the home button is plugged into seems to be glued pretty hard onto the frame. How is that supposed to be loosened?

    mortenskogly - Yanıt

    It's not glued in, it's "plugged into" the logic board. You just need to unplug it. Take your time and gently pry it up from one corner. Eventually it will pop off.

    DJ Billings -

  26. iPhone 6 Home Button Replacement, Home Button: adım 26, 3 resimden 1. iPhone 6 Home Button Replacement, Home Button: adım 26, 3 resimden 2. iPhone 6 Home Button Replacement, Home Button: adım 26, 3 resimden 3.
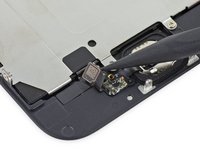
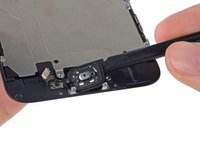
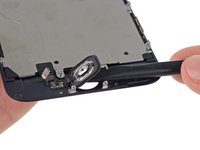
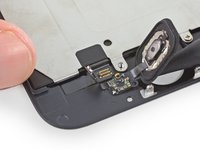
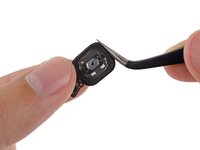
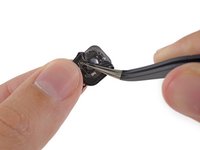
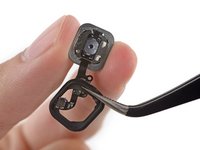
    • Depending on your replacement part, you may need to remove the rubber gasket around your home button.

    • Use a set of tweezers to carefully pull the gasket up from the home button.

    • Be careful not to snag the gasket on the home button cable.

    Excelente aporte, y si es verdad solo el botón original nos dará la función de touch id

    David Molina - Yanıt

    Si reemplazo el nuevo home button con un nuevo screen si va a funcionar la huella?

    Renato moreno - Yanıt

    Ich habe meine Homebutton nach Anleitung ausgetauscht. Alles funktioniert immer noch einwandfrei, allerdings kann ich den neuen Homebutton nicht drücken (ist zu fest)...hat jemand eine Lösung?

    lorydory95 - Yanıt

Sonuç

To reassemble your device, follow these instructions in reverse order.

386 farklı kişi bu kılavuzu tamamladı.

Sam Goldheart

Üyelik tarihi: 10/18/12

465.119 İtibar

538 adet Kılavuz yazıldı

Ekip

iFixit iFixit üyesi

Staff

135 Üyeler

16.476 adet Kılavuz yazıldı

68 Yorum

is this the original home button?

costasefth23 - Yanıt

My home button doesnt working while my touch id is working fine. I ask this repair shop he said , if u get this phone repaired, ur touch id wont working. How can i settle this down with free risk

sufian ahmad -

جهاز أيفون 6 البصمة تخرب بسرعة

Abdulaziz Alhammad -

You can't update your phone when you don't have the original home button, any solutions?

brampeeters122 - Yanıt

I work at an Apple repair centre in based in the UK and we have recently encountered MAJOR issues with replacement home buttons. It turns out that home buttons are linked too the logic board on each handset due to the method in which Apple stores you biometric data. Due to this, to the greatest extent of our knowledge, any update (through setting on the phone, updating on the phone, updating through iTunes or resting on iTunes) will cause an ERROR 53 to occur. As of yet we have not be able to rescue a handset from this state. If any body has any further knowledge it would be massively appreciated, as a community we need to get to the bottom of this before anybody had any major disasters.

jakebennettyoung - Yanıt

hi

any luck with the issue ?

Mohamed -

Do you ever encounter this if swapping the original home button over or is it just a problem with replacement home buttons?

mollariipod -

Error 53 has been fixed in most recent IOS. Yay!

markalohaaina -

Maybe its because the sensor/homebutton is not only connected to the logicboard but also to the original lcd digitizer..

Mac -

Hi man, I hope you can help me on this. I just updatet my iPhone 6 to the last software after have done it the home button was extremely hot and stays that hot all the time and also the finger print recognizer does not work anymore, so you have any suggestion on this please? (it's the OEM home button)

Thank you

Bd U -

HI, What if i have changed the screen and kept the original home bottom. It's work that way.

spikyy123 - Yanıt

For those who encounters a huge problem with their touch id sensors by replacing a new lcd.. its because the fingerprint sensor is not only connected to the logicboard but also to the original digitizer. hopes this helps a lot :)

Mac -

That’s what I did sir I change my screen and then my biometrics doesn’t anymore but the home button still works

John -

Just completed the repair and can confirm that it works with the original home button.

Emil Babin - Yanıt

+jakebennettyoung

I use an Android, so Touch ID is non-existent. (If you know what I mean!!!)

Kaleb White - Yanıt

I've replaced my home button. Currently still running on OS Ver. 8.1.3. I didn't dare to update my set due to error 53. Have anyone successfully update to the latest ios without encountering the error?

kenneth887 - Yanıt

I bought the home button gasket to go with a new home button assembly and I'm glad I did. Managed to get the old gasket off but it wasn't very clean or sticky. The new one felt like it stuck quite well. Great instructions. The rest of the repair went perfectly. Thanks!

Scot Morse - Yanıt

Hey I broke my iPhone 6 plus. And I lost the home button . Can I replaced with iphone 6 or 6s home button.

Khan - Yanıt

Hey I broke my iPhone 6 plus. And I lost my home button. Can I replaced the home button with iphone 6 or 6s ?

Khan - Yanıt

My iPhone 6 charge still go down although not using ,and the fingerprint sensor doesn't work but the home botton works

So if there any solution to my problem?

alhusseintolan - Yanıt

The home button is linked to CPU and Baseband - replacement with other then original will not only removes Touch Id function , but also bricks the phone on the next Restore / Firmware update. Before this it will work fine without Touch Id.

Linking the button is a part of Apple security measures.

Kind regards

andrejs - Yanıt

Replacing your home button will not brick your phone—if you're referring to the Error 53 problem, Apple rolled out a fix for that a while ago. You'll definitely still lose Touch ID function however. ;)

Jeff Suovanen -

I replaced my home button with original but still have the new home button cable install (because I damaged original). Last night I contacted apple support "chat" with my iPad. Told them I did the repair myself and there was no 3rd party repair shop involved. The tech had me run a diagnostics check on iPhone. Then the tech had me back up iPhone, then restore iPhone from iTunes. After 30 mins my Touch ID fully functions. My suggest to everyone with this issue is to contact Apple. It worked for me!

tjack10514 - Yanıt

Hi tjack10514, I have my iphone 6 both home button and touch id malfunction, it was just happened a month after my speaker replaced by third party. I contacted Apple shop and they told me my iphone out of warranty and had to pay $400 (converted from my local currency), to replace both home button and main board.

Other 3rd party I contacted to repair the home and touch id, says same as Apple, need to replace the mainboard and home button, but they can fix my home button working but touch id will not works.

Any idea if I replace the cable with original touch id, follow your steps, Touch Id will be back to life?

Boim -

I Am Using iPhone 6S And Home Button Is Hard And I Submit My iPhone To Apple Authorized Service Center And iPhone Is Under Warranty . Anyone Have Any Idea That They Will Repace My iPhone Or Reair It?

def - Yanıt

I am going to replace the screen assembly with a replacement due to a cracked screen - there is nothing wrong with the home button. The new assembly came with a home button. I plan on exchanging the home button since my research here leads me to understand that unless I install the old home button into the new assembly, Touch ID will not operate. With this understood, as long as I install the new assembly with the original home button, I should have 100% functionality (provided I don't damage anything during the swap.)

Does this sound reasonable?

Uncle Reggie - Yanıt

Exactly, swapping the original button to a new front display assembly should work perfectly fine. Just take care removing the original home button, low heat is your friend. And if you're using your original lcd shield take care removing that as well. Again low heat and fine tip tweezers under the little metal piece adhered to the socket.

Charlie Yarbrough -

Is there a place that I can get the rubber part that goes around the home button?

Addison Ramsey - Yanıt

hi.......... my home button in my iPhone 6 is getting heat when my phone is not in use can and one of you give any tips

Hamish Anto - Yanıt

Does one iPhones Touch ID works with another iPhone when swapped?

Saba eas - Yanıt

Your home button's Touch ID sensor is paired to your iPhone's logic board at the factory. Generally speaking, it will not work in any other iPhone.

Jeff Suovanen -

I made the mistake of taking my wife's phone to the booth in the mall to get the broken screen replaced (was driving her crazy...). Had several problems with it afterwards (proximity sensor working intermittently, screen responsiveness inhibited when texting and using apps, excessive battery drain.... Decided to get the screen assembly from iFixit and just move the home button over. Everything went smoothly according to the instructions. No problems with the phone afterwards.

Happy wife, happy life!

glarmstrong - Yanıt

Excellent instructions. I transferred the home button from broken screen to new replacement one and now the touch id works flawlessly!

Yogesh - Yanıt

I lost my original home button ,and I use my broken iPhone 6s home button on my current iphone

larren.archibold - Yanıt

I swapped out screens and the new home button didn't work so I had to put the old home button back because the new screen didn't recognize the print ID.

John Allen - Yanıt

Had an iPhone 6s (Brand New) almost 5 Months Old when I broke it (slip on My Hand, Caseless) then there and that afterwards, I went to Service Center to Replace the Whole Front Panel LCD (because it Shattered like !&&* same as the Home Button) and same problem as y'all guys, Home Button and Touch ID

Kenneth - Yanıt

I recently installed a new Home Button on my iPhone 6. Everything worked out but when I turned the device on, the Home Button just wouldn’t work. I already tried a hard reset by draining the battery. Does anybody has some suggestions? Is this a software problem? I think I installed the hardware correctly, but could this be the problem?

Jonas - Yanıt

https://support.apple.com/en-us/HT205628

After you try to update or restore your iOS device in iTunes on your Mac or PC, you might see error 53 in iTunes and "Connect to iTunes" on your device. Error 53 appears when a device fails a security test. This test was designed to check whether Touch ID works properly before the device leaves the factory, and wasn’t intended to affect customers.

For anyone who experienced error 53, Apple released an update in iOS 9.3 to allow you to successfully restore your device using iTunes on your Mac or PC. Use the steps in this article to restore and recover your device. If you believe that you paid for an out-of-warranty device replacement based on an error 53 issue, contact ++Apple Support++ to ask about reimbursement.

qonjin - Yanıt

It’s easy - if you got an iFixit tools. It took only 15 minutes to install and check.

iSlack it’s my favourite.

Yan - Yanıt

Is there any way to separate the home button face from the home button assembly so that I can retain the secure enclave chip on the cable and just replace the cracked face? The original button assembly seems to be micro-spot welded?

Jimmy - Yanıt

Important to note that in Step 22 you may need to fold the small connector back towards the home button to allow it to snap into the connector socket if you purchased a replacement home button. This part comes as a single piece so be very careful when folding the ribbon cable back over itself. Also don’t over-tighten the screws that hold the protective plate in place in Step 21 when reassembling or the button will not be able to “click” on pressing when the phone is reassembled and the screws are put back in place on either side of the lightning connector (step 1).

A smooth repair nonetheless and home button back to normal now ^_^

Etcher - Yanıt

You can not fix your phone with the part, that Ifixit suggest in the “parts.” (See below) Because you can not separate the actual button from the metal ring. The repair guide should be update to explain that.

iPhone 6 and 6 Plus Home Button Cable Assembly

Item code: IF268-043-1

Identify your iPhone

$14.99

You need this part.

iPhone 6 and 6 Plus Home Button Assembly

Item code: IF269-006-1

Come Ifixit correct the repair guide and put the correct part on the link. I wasted 15 dollars on the button cable.

https://www.ifixit.com/Store/Guide/31935...[Buttons]=on

craig walters - Yanıt

Hi Craig! Sorry for the mixup, the button assembly you mentioned is linked at the top of the guide, and boxed to make it more prominent. The cable assembly is the last on the list, and the product description explains the missing components and links to the more complete part. You can also click through the guide on the product page to see that we don’t go into the in-depth replacement procedure.

That said! If you feel you were lead astray, please don’t hesitate to contact our customer service department!

Sam Goldheart -

Yes thanks for the quck reply. It is prominent, but for someone that already has a kit, I look for the individual parts. So it’s somewhat misleading. I figured it afterwards that you can purchase the button with out the kit from the drop down menu. Just a little confusing I think because you sell both the home button cable assembly and home button assembly,

craig walters - Yanıt

Hi my iphone 6 home button intermittently quit working then sometimes it worked but now its completely unresponsive. This all happened immediatly after updating the iphone software. Touch id isnt working either. Iphone 6- original everything never been opened. Thank you in advance.

ball00231 - Yanıt

Hi, I replaced my home button as the original got hot and wouldn’t allow Touch ID. The replacement appeared to work (obviously without Touch ID) but the battery drain was horrendous! I’ve now disconnected the home button, battery is back to normal but would really like to have a working home button that doesn’t kill the battery. Anyone else had this problem? Any ideas on how to solve it?

sarahandlyndon - Yanıt

Replaced the home button due to my original not taking me back to the home screen. Once replace with ifixit parts, the functionality of it did not work successfully. Not happy. Triple checked my work and everything is where it is supposed to be. I was hesitant on repairing myself initially and not happy that it isn’t successful. Doubt I will use these parts again to fix my phones in the future. NOT Pleased…

Justin Raftery - Yanıt

Sorry to hear about the unsuccessful repair experience, Justin. If you contact iFixit Customer Support via help.ifixit.com and provide them with your order number, they can assist with this issue.

Kadan Sharpe -

If both the original part and the replacement part had the same problem, the fault is probably not with the part. You could have a bad home button cable or some other issue. If possible I would borrow the entire display assembly from a known good phone and see if that fixes it, and then work backward from there.

Jeff Suovanen -

Hi,

I just bought a home button assembly and a new front panel (my screen was cracked and I had no home button), but unfortunately the hone button doesn’t fit the hole in the front panel…both parts are from Ifixit. I should mention that I got a black front panel and white/silver button. It’s hard to believe that different colors have different sizes, so most probably the parts just don’t fit?

Thanks

Tudor Obretin - Yanıt

Ho cambiato il tasto home ma nel momento in cui sono andato a rimontare il display non si vede più nulla..ho anche gia provato a staccare e riattaccare il connettore della batteria ma niente

Pasquale Priore - Yanıt

After replacement screen in iphone 6 the touch ID not work agen (note the home button is orignal on)

mark diet - Yanıt

Hello guys i have good News for you. After replacement screen on iPhone 6 (3 times, 3 different Displays) my Touch-ID doenst work since 1-2 years, but now after updating to iOS12 it works again. I think Apple give us this possibilities back, to use old iPhones like a normal device .

Vi T - Yanıt

A have a verical lines at the top of screen after doig this steps and i dont know why? It is onli about 2 mm big ? What is the problem?

zoran bozic - Yanıt

@boza Read this step and double-check the connector. Make sure it’s firmly seated and there’s no dust or contamination in the socket. If you still have problems, the display cables may be damaged, in which case you’ll have to replace the whole display.

Jeff Suovanen -

Hello, I have two iPhone 6 and one of them (lets name it as iPhone 1) has an original display but the home button os not working anymore, the other (name it as iPhone 2) has a non original display but the home button working fine even the Touch ID.

I want to know if I use the original display from the iPhone 1 and the home button from the iPhone 2, place it on the skeleton of iPhone 2 (remember that the home button is original form the iPhone 2), will the Touch ID work?

Daniel Brito - Yanıt

Worked the id touch?… mine is broken and I want it to work

Renato moreno - Yanıt

Me da rara sensación que en algunas imágenes tiene una batería Apple y en otra iFixit

Martín - Yanıt

How can I clean the home button? I buyed a iPhone 6 with a lot of dust in it and I want to free the home button from it, before imstalling it with the new display. I thought about cotton bud and acetone. Does anyone have a good working hint for me?

Katrin - Yanıt

Allright guys, I used acetone-free nail polish and a q-tip… worked fine for me

Katrin -

Merci beaucoup pour ce tutoriel très bien fait. J’ai réussi à changer mon bouton home en suivant à la lettre les consignes. Un seul petit bémol sur l’utilisation de la ventouse qui risque de décoller l’écran de son support. Une ancienne carte bancaire fait l’affaire pour séparer l’écran du dos du téléphone.

Chasseriau - Yanıt

when putting it all back together d oyou really need the cable brackets? i understand the home button bracket is very important bjut the other ones?

fekaylius - Yanıt

Are steps 10 to 19 nessesary?

Can Köprülü - Yanıt

almost my whole iphone 6s is broken and i need a whole different button and glass screen replacement

Joseph Armstrong - Yanıt

فارسی زبانان عزیز میتوانند این مقاله و دیگر مقالات ifixit را که در حوزه آموزش تعمیرات موبایل است، در سایت مجتمع آموزشی پل مشاهده نمایند.

برای مشاهده ترجمه این مقاله روی لینک زیر کلیک نمایید.

آموزش تعویض دکمه هوم آیفون 6

poul gilan - Yanıt

Home missing on a iPhone 6. Is there possible to replace with a new one without any error?

ibo - Yanıt

posso sostituire tasto home di un iphone 8 con tasto di un iphone 5s?

riccardo mello rella - Yanıt

Yorum Ekle

İstatistikleri Görüntüle:

Son 24 Saat: 20

Son 7 gün: 146

Son 30 gün: 529

Her zaman: 605,845