
iPod Touch 4th Generation Upper Logic Board Replacement

Giriş
1. adıma gitThis guide is a prereq.
Neye ihtiyacın var


-
-
Remove the following three screws near the top edge of the logic board:
-
One 2.0 mm Phillips screw
-
Two 2.3 mm Phillips screws
-
-
-
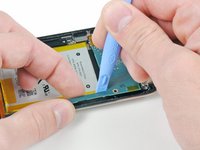
Use an iPod opening tool to slightly lift the edge of the logic board next to the battery enough to grab it with your other hand.
-
Be very careful not to lift too much as the volume control ribbon cable is still connected and will tear very easily.
-
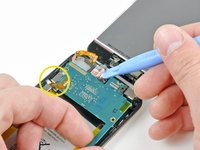
While gently lifting the logic board with one hand, use an iPod opening tool to lift the logic board near the copper tape at the logic board's top edge.
-
The logic board will be lifted adequately when the last display assembly connector has cleared the top edge of the rear case.
-


To reassemble your device, follow these instructions in reverse order.
To reassemble your device, follow these instructions in reverse order.
İptal et: Bu kılavuzu tamamlamadım.
Bir başkası bu kılavuzu tamamladı.
