Ana içeriğe geç

MacBook Pro 15" Retina Display Late 2013のバッテリーの交換

Uyarı: Ön koşul olan bir kılavuzu düzenliyorsunuz. Yapacağınız herhangi bir değişiklik bu adımın yer aldığı bütün 2 kılavuzları etkileyecektir.

Adım 22 çevriliyor

İngilizce
Japonca
Adım 22
MacBook Pro 15" Retina Display Late 2013 Battery Replacement: adım 0, 2 resimden 1. MacBook Pro 15" Retina Display Late 2013 Battery Replacement: adım 0, 2 resimden 2.
  • Lift and remove the battery.

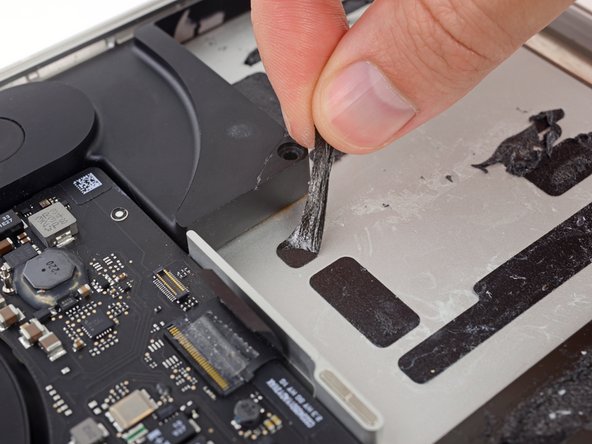
  • Before installing your new battery, remove all the old adhesive from the MacBook Pro's case.

  • With a little luck, you can slowly pull out each strip of adhesive with your fingers.

  • Otherwise, soak each strip of adhesive with a bit of adhesive remover for 2-3 minutes, and then scrape it out with a plastic tool. This can take quite a bit of work, so be patient. While scraping, take care not to damage the trackpad cable.

  • Mop up any remaining adhesive remover and give your MacBook Pro a few minutes to air dry.

  • The replacement battery included in your iFixit kit comes with adhesive pre-installed. Test the battery's fit and alignment carefully before peeling off the film covering the adhesive, and then press each cell firmly into place. If any additional films/liners are present that weren't on your original battery, remove them now.

  • Calibrate your newly installed battery: charge it to 100%, and keep charging it for at least 2 more hours. Unplug and use it normally to drain the battery. When you see the low battery warning, save your work, and keep your laptop on until it goes to sleep due to low battery. Wait at least 5 hours, then charge your laptop uninterrupted to 100%.

  • If you notice any unusual behavior or problems after installing your new battery, you may need to reset your MacBook Pro's SMC.

バッテリーを持ち上げて取り出します。

新しいバッテリーをインストールする前に、MacBook Proのケースから残りの接着剤を除去してください。

上手くいけば、素手でも接着剤を剥がせます。

そうでない場合、残りの接着剤に接着剤剤リムーバーを塗布して2-3分待ってから、プラスチックのツールで擦り落としてください。これは時間を要する作業なので、ゆっくりと作業を続けましょう。接着剤を削ぎ落としている間、トラックパッドケーブルを破損しないようにご注意ください。

残りの接着剤リムーバーを拭きとり、MacBook Proが完全にドライになるまでまで数分間待ちます。

iFixitキットに入っている交換用バッテリー接着ストリップが貼られています。接着ストリップのシールを剥がす前に、バッテリーの装着位置をきちんと確認してください。それから、各バッテリーをそれぞれ正しい箇所に押し込んで装着します。もしオリジナルのバッテリーには付いていなかった追加のフィルムやライナーが交換用バッテリーに付いている場合は、ここで除去してください。

この修理ガイドを完成したら、新しく装着したバッテリーのカリブレーションを行なってください。100%になるまで充電します。充電後も最低2時間はプラグを繋げたままにします。それからプラグを外して、通常通り使用しながら、自然に放電させます。バッテリー残量小のサインが表示されたら、これまでの作業を保存して、スリープ状態になるまで放置してください。スリープ状態に入ったら、少なくとも5時間置きます。それから一気に100%まで充電します。

新しいバッテリーを装着後、通常通り作動しない場合は、MacBook ProのSMCをリセットしなければならない可能性があります。

Katkılarınız, açık kaynak Creative Commons lisansı altında lisanslanmaktadır.