Ana içeriğe geç
Lenovo Thinkpad T450 Fan and Heatsink Assembly Replacement

Lenovo Thinkpad T450 Fan and Heatsink Assembly Replacement

Justin Ogihara

Justin Ogihara ve 2 diğer katkıda bulunanlar

En son February 15, 2024 tarihinde güncellendi

10 - 35 dakika
Orta

The heatsink (or heat sink) is a passive heat exchanger that transfers heat in a device. The heatsink disperses heat from another component in the device to prevent the device from overheating. In this device, the fan is attached to the heatsink. The fan cools the internal components and keeps them from overheating.

If you find that your laptop is experiencing the following symptoms, it may be time to replace the fan and heatsink assembly:

  • Easily overheats
  • Running at higher temperatures than normal
  • Loud whirring noises
  • Laptop is getting louder

Follow these instructions to remove and replace the fan and heatsink assembly in your Lenovo ThinkPad T450 laptop. Make sure to turn off your laptop and let it cool for 20 minutes before proceeding with the guide.

Don’t forget to follow our thermal paste application guide after you have removed your heat sink and are ready to reassemble your device.

Neye ihtiyacın var

Aletler

  1. Lenovo Thinkpad T450 Fan and Heatsink Assembly Replacement, External Battery: adım 1, 3 resimden 1. Lenovo Thinkpad T450 Fan and Heatsink Assembly Replacement, External Battery: adım 1, 3 resimden 2. Lenovo Thinkpad T450 Fan and Heatsink Assembly Replacement, External Battery: adım 1, 3 resimden 3.
    • Using your hands, slide the two locking tabs away from each other to release the battery.

    • Slide the battery up and out of the device.

  2. Lenovo Thinkpad T450 Fan and Heatsink Assembly Replacement, Back Cover: adım 2, 1 resimden 1.
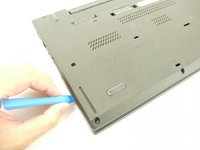
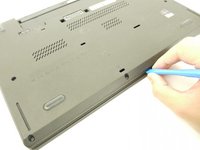
    • Using the JIS #00 screwdriver, unscrew seven screws from the back cover.

    • These screws are not removable and will remain in the back cover.

    • Use the JIS #00 screwdriver to remove the single 2.8 mm screw from the back cover.

  3. Lenovo Thinkpad T450 Fan and Heatsink Assembly Replacement: adım 3, 3 resimden 1. Lenovo Thinkpad T450 Fan and Heatsink Assembly Replacement: adım 3, 3 resimden 2. Lenovo Thinkpad T450 Fan and Heatsink Assembly Replacement: adım 3, 3 resimden 3.
    • Insert a plastic opening tool into the edges of the laptop and work your way around the edges to pry off the back cover from the device.

    • Remove the back cover from the device.

  4. Lenovo Thinkpad T450 Fan and Heatsink Assembly Replacement, RAM: adım 4, 2 resimden 1. Lenovo Thinkpad T450 Fan and Heatsink Assembly Replacement, RAM: adım 4, 2 resimden 2.
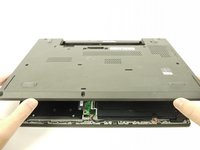
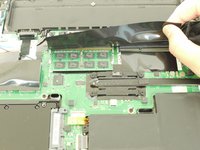
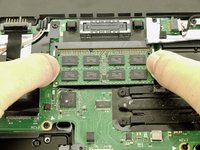
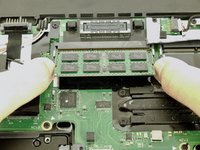
    • Lift up the black piece of tape and remove it to uncover the RAM sticks underneath.

  5. Lenovo Thinkpad T450 Fan and Heatsink Assembly Replacement: adım 5, 2 resimden 1. Lenovo Thinkpad T450 Fan and Heatsink Assembly Replacement: adım 5, 2 resimden 2.
    • Using your fingers, push the two clips securing the RAM away from each other to release the RAM.

    • The RAM stick should pop up at a 30 degree angle.

    • Remove the RAM stick from the device.

    • Repeat this step for any additional RAM sticks.

  6. Lenovo Thinkpad T450 Fan and Heatsink Assembly Replacement, Fan and Heatsink Assembly: adım 6, 1 resimden 1.
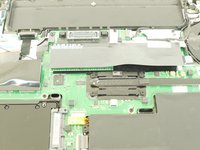
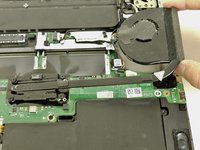
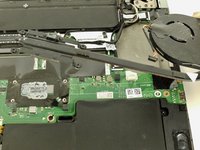
    • Using the JIS #00 screwdriver, unscrew the four screws securing the fan and heatsink assembly to the motherboard.

    • These screws are not removable and will stay on the fan and heatsink assembly.

  7. Lenovo Thinkpad T450 Fan and Heatsink Assembly Replacement: adım 7, 1 resimden 1.
    • Disconnect the fan and heatsink assembly from the motherboard using the plastic opening tool.

  8. Lenovo Thinkpad T450 Fan and Heatsink Assembly Replacement: adım 8, 2 resimden 1. Lenovo Thinkpad T450 Fan and Heatsink Assembly Replacement: adım 8, 2 resimden 2.
    • Lift up the fan and heatsink assembly and remove it from the device.

    • When you reassemble your device, don't forget to reapply thermal paste to the back of the heatsink and fan assembly. For proper technique and thermal paste application, please visit the How to Apply Thermal Paste guide.

Sonuç

To reassemble your device, follow these instructions in reverse order.

Don’t forget to reapply thermal paste to the fan and heatsink assembly when you reassemble your device.

For proper technique and thermal paste application, please visit the How to Apply Thermal Paste guide.

Bir başkası bu kılavuzu tamamladı.

Justin Ogihara

Üyelik tarihi: 09/18/17

29.060 İtibar

52 adet Kılavuz yazıldı

Ekip

EDU Team EDU Team üyesi

Staff

7 Üyeler

753 adet Kılavuz yazıldı

0 Yorum

Yorum Ekle

İstatistikleri Görüntüle:

Son 24 Saat: 4

Son 7 gün: 28

Son 30 gün: 57

Her zaman: 2,905