Giriş
To get to the battery in the Yoga Book X90F you will need to review the guide on how to remove the bottom screen/keyboard. Once the bottom screen is removed all you need is a pair of tweezers and a pick to wedge the battery out with. The battery can be diagnosed with the following troubleshooting page.
The battery provides power to the device, and a poor battery will not perform tasks on the computer well or for very long.
Prior to starting the replacement, please turn off the power on the device and disconnect any external power sources, such as the device charger.
Use caution when removing the battery as it may begin to bend and crack when prying off the board.
Neye ihtiyacın var
-
-
Turn off and power down the device before beginning this process. A heat gun or hair dryer will be suitable to heat the adhesive that holds down the screen. Apply heat to the entire surface area of the bottom screen.
-
-
-
Once the adhesive has been heated up, take the iFixIt suction cup and lift in a corner. The screen should be separating from the adhesive here.
-
While the screen is lifted, insert the ifixit opening pick to help pry off the screen.
basically by this technique the screen WILL be cracked (as the images here show, and as I was actually expecting sadly). I wonder if there is a safer technique to remove the screen, even though it is too late for me now?
This is barbaric work. The keyboard is broken at the edges. In other words, it's not just the battery that needs to be replaced 😁 It wasn't heated enough at the edges. You shouldn't tense up
-
-
-
Bu adımda kullanılan alet:Tweezers$4.99
-
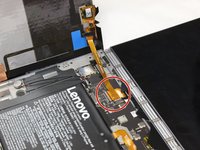
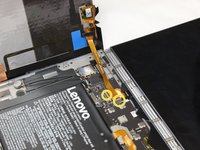
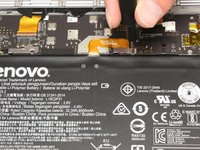
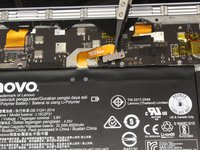
After the screen has been opened, disconnect the ribbon connecting the bottom screen to the motherboard by gently pulling the ribbon with tweezers.
-
If there are black coverings on the tabs as shown in the second image, carefully remove them using a pair of tweezers.
-
-
-
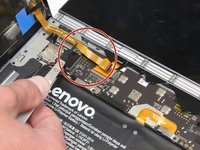
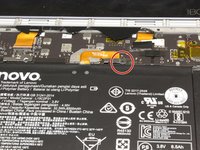
Using a JIS #0 screwdriver, remove the single 8 mm screw.
-
Disconnect the battery cable from the motherboard.
there was a screw in this position in my tablet, but not connected to the ribbon in anyway. Also, it was an extremely soft screw, just ground away under the appropriate screwdriver!! so lucky it didn't need to be removed!
-
-
-
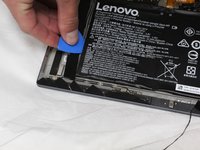
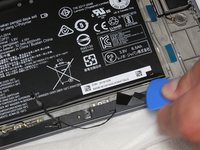
Use the opening pick to remove the two black strips on each side of the battery so the battery is cleared of any obstructions.
Maybe it depends on the particular placement of the battery, but I can't see the need for this step unless the black strips have been very poorly placed.
-
To reassemble your device, follow these instructions in reverse order.
For optimal performance, after completing this guide, calibrate your newly installed battery.
Take your e-waste to an R2 or e-Stewards certified recycler.
To reassemble your device, follow these instructions in reverse order.
For optimal performance, after completing this guide, calibrate your newly installed battery.
Take your e-waste to an R2 or e-Stewards certified recycler.
İptal et: Bu kılavuzu tamamlamadım.
Bir başkası bu kılavuzu tamamladı.
7 Yorum
Make a plan to replace the keyboard/second screen after installing a replacement battery.
How to calibrate the battery?
I like how the screen is broken in the pictures from step 1 to step 2. :P
Thanks for the writeup! too bad the cost of replacement parts make this repair almost not worth the effort. =(
Excellent but i find nowhere an explanation of how to reassembly, mainly how to adhere the keyboard glass surface to the base chasis. I mean, is still usable the same original adhesive heated in the first step or a two sides adhesive frame has to be placed after removing the old adhesive (or just aplying a sort of glue -¿wich one?-). I’ not sure I’ve made it clear, I hope yes. Thanks in advance.
1) The original adhesive would be 100% unusable. You can use a double-sided red table from 5mm to 10mm. Rule of thumb for future repairs, put in the cover/screen/part and the chassis you want to glue together. Also, wear heat-resistant gloves and when you stick them together, reheat the areas and press and move your finger along the path of the tape to soften the glue and remove any imperfect bonding.
2) If tape is not your forte, you can use T8000 black/clear glue but be aware that you must be fast. This glue can dry in less than a minute! Also, you must be frugal with its use because it's very sticky and can make a mess.
3) Finally, and this is an ABSOLUTE MUST, if there are any cables, antennas, plastic covers, or flex cables in the path or near the areas where you need to put glue or tape, put Kapton tape on top before anything else.
For easier separation, when there is glass involved, you can use isopropyl alcohol. Put it in a small plastic bottle with a small opening, the best for this are medical bottles you can buy in a pharmacy and also put the tip of a syringe so you can have total control of the dosage you use and also you can put the liquid in tiny dosages along the path of the adhesive, effectively loosening the adhesive even further.


