Ana içeriğe geç
Onarım Topluluğuna Katılın - Hesap Oluşturun

MacBook Neo Screen Replacement

Neye ihtiyacın var

  1. MacBook Neo Screen Replacement, Prepare the MacBook for disassembly: adım 1, 3 resimden 1. MacBook Neo Screen Replacement, Prepare the MacBook for disassembly: adım 1, 3 resimden 2. MacBook Neo Screen Replacement, Prepare the MacBook for disassembly: adım 1, 3 resimden 3.
    • Allow the MacBook's battery to drain below 25% before starting this repair. A charged battery may catch fire if damaged.

    • Fully shut down the MacBook and close the lid. Keep the lid closed until you've physically disconnected the battery.

    • Disconnect any cables and accessories.

    • Flip the computer upside‑down on a clean work surface.

  2. MacBook Neo Screen Replacement, Remove the bottom cover screws: adım 2, 1 resimden 1.
    • Use a P5 pentalobe driver to remove the eight screws securing the bottom cover:

    • Six 4.1 mm‑long screws

    • Two 4.5 mm‑long screws

    • During reassembly, partially install the screws to ensure alignment, then tighten the screws at each corner (like top‑right, bottom‑left, etc.) before the rest.

  3. MacBook Neo Screen Replacement, Pry up the bottom cover: adım 3, 3 resimden 1. MacBook Neo Screen Replacement, Pry up the bottom cover: adım 3, 3 resimden 2. MacBook Neo Screen Replacement, Pry up the bottom cover: adım 3, 3 resimden 3.
    • Use your fingers to pry up the bottom cover from the top‑right corner, near the USB‑C ports, until the clip along the right edge of the laptop pops up.

    • If you're having trouble, use the flat end of a spudger to pry up the corner until you can grab it with your fingers. You can also slide an opening pick down each edge to release the clips.

    • Repeat this process on the left side to release its clip.

  4. MacBook Neo Screen Replacement, Remove the bottom cover: adım 4, 2 resimden 1. MacBook Neo Screen Replacement, Remove the bottom cover: adım 4, 2 resimden 2.
    • Pick up the bottom cover and lift it off the MacBook.

    • During reassembly, align the bottom cover with its screw holes, then press on the two short sides until the clip on each side snaps into place.

  5. MacBook Neo Screen Replacement, Remove the battery connector cover: adım 5, 1 resimden 1.
    • Use a Torx Plus 3IP driver to remove the two 1.7 mm‑long screws securing the battery connector cover.

    • While the MacBook Neo uses Torx Plus screws, standard Torx bits also work (T3 in place of 3IP, for example). Apply constant, downward force to prevent stripping.

  6. MacBook Neo Screen Replacement: adım 6, 2 resimden 1. MacBook Neo Screen Replacement: adım 6, 2 resimden 2.
    • Use tweezers or your fingers to remove the battery connector cover.

  7. MacBook Neo Screen Replacement, Disconnect the battery: adım 7, 2 resimden 1. MacBook Neo Screen Replacement, Disconnect the battery: adım 7, 2 resimden 2.
    • Use the flat end of a spudger to pry up and disconnect the battery press connector.

    • To reconnect, align the connector carefully over its socket and press down—first on one of the short sides, then the other—until it clicks into place. Don't try to force the connector into place. If you're having trouble, reposition it and try again.

  8. MacBook Neo Screen Replacement, Remove the antenna connector cover: adım 8, 1 resimden 1.
    • Use a Torx Plus 3IP driver to remove the 1.7 mm‑long screw securing the antenna connector cover.

  9. MacBook Neo Screen Replacement: adım 9, 2 resimden 1. MacBook Neo Screen Replacement: adım 9, 2 resimden 2.
    • Use tweezers or your fingers to remove the antenna connector cover.

  10. MacBook Neo Screen Replacement, Disconnect the antenna: adım 10, 3 resimden 1. MacBook Neo Screen Replacement, Disconnect the antenna: adım 10, 3 resimden 2. MacBook Neo Screen Replacement, Disconnect the antenna: adım 10, 3 resimden 3.
    • Insert one arm of angled tweezers under the metal neck of one of the antenna coaxial connectors and lift straight up to disconnect it.

    • Repeat the process to disconnect the second antenna cable.

    • To reconnect, use tweezers to hold each connector in place over its socket and gently press down with your finger or a spudger—the connector should "snap" into place. If you're having trouble, reposition the head and try again.

  11. MacBook Neo Screen Replacement, Remove the antenna: adım 11, 1 resimden 1.
    • Use a Torx Plus 5IP driver to remove the four 2.9 mm‑long screws securing the antenna.

  12. MacBook Neo Screen Replacement: adım 12, 2 resimden 1. MacBook Neo Screen Replacement: adım 12, 2 resimden 2.
    • Pick up the antenna by its edges and remove it.

  13. MacBook Neo Screen Replacement, Disconnect the display cable: adım 13, 2 resimden 1. MacBook Neo Screen Replacement, Disconnect the display cable: adım 13, 2 resimden 2.
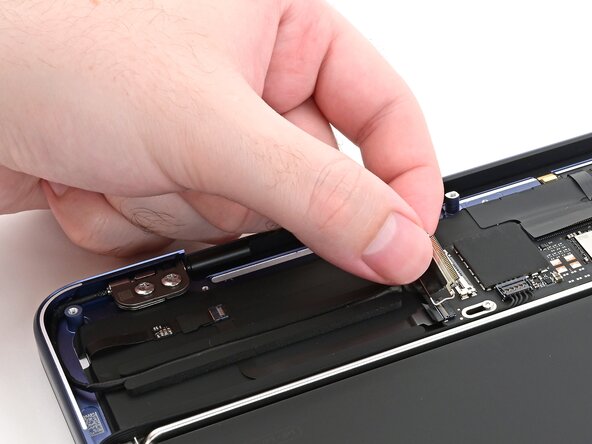
    • Use the flat end of a spudger to gently push under the metal buckle of the display cable connector, located on the top‑right corner of the logic board, to unclip it.

  14. MacBook Neo Screen Replacement: adım 14, 2 resimden 1. MacBook Neo Screen Replacement: adım 14, 2 resimden 2.
    • Grab the buckle and cable together and gently pull the connector straight out of its socket.

  15. MacBook Neo Screen Replacement, Disconnect the camera cable: adım 15, 3 resimden 1. MacBook Neo Screen Replacement, Disconnect the camera cable: adım 15, 3 resimden 2. MacBook Neo Screen Replacement, Disconnect the camera cable: adım 15, 3 resimden 3.
    • Repeat this procedure to disconnect the camera cable, located on the left edge of the logic board.

    • To reconnect:

    • Grip the cable and buckle together and insert the connector fully into its socket. Realign it as necessary and don't try to force it into the socket.

    • Flip the buckle over the socket and use a spudger to press the buckle down until it clicks into place.

  16. MacBook Neo Screen Replacement, Free the camera cable: adım 16, 3 resimden 1. MacBook Neo Screen Replacement, Free the camera cable: adım 16, 3 resimden 2. MacBook Neo Screen Replacement, Free the camera cable: adım 16, 3 resimden 3.
    • Pick up the buckle and cable together and gently pull it out of its channel securing it to the frame.

    • Free the cable so it's not wrapped around the corner of the laptop frame.

  17. MacBook Neo Screen Replacement, Free the display cable: adım 17, 2 resimden 1. MacBook Neo Screen Replacement, Free the display cable: adım 17, 2 resimden 2.
    • Hold the display cable's buckle and cable together and free it from the laptop frame.

  18. MacBook Neo Screen Replacement, Loosen the hinge screws: adım 18, 2 resimden 1. MacBook Neo Screen Replacement, Loosen the hinge screws: adım 18, 2 resimden 2.
    • Use a Torx Plus 8IP screwdriver to loosen (not remove) all four hinge screws.

  19. MacBook Neo Screen Replacement, Reassembly information: adım 19, 3 resimden 1. MacBook Neo Screen Replacement, Reassembly information: adım 19, 3 resimden 2. MacBook Neo Screen Replacement, Reassembly information: adım 19, 3 resimden 3.
    Bu adımda kullanılan alet:
    IC-LOC-Blue Nonpermanent Threadlocker
    $6.99
    • During reassembly:

    • Install the hinge screws without tightening them, then close the lid.

    • Adjust the screen until it is correctly centered and aligned on each side. The screen should sit flush with the rest of the laptop. Finally, tighten the screws.

    • If the screen clicks or snaps upon opening, loosen the hinge screws and adjust the alignment. Make sure the screen doesn't sit too far forward, or it can catch on the body when opening and closing.

    • If desired, add a little blue threadlocker to the screw threads to prevent them from loosening over time.

  20. MacBook Neo Screen Replacement, Open the laptop: adım 20, 3 resimden 1. MacBook Neo Screen Replacement, Open the laptop: adım 20, 3 resimden 2. MacBook Neo Screen Replacement, Open the laptop: adım 20, 3 resimden 3.
    • Open the laptop all the way and gently place it keyboard side down on a table, so the screen hangs over the edge.

    • You can place a soft cloth under the keyboard to protect it.

  21. MacBook Neo Screen Replacement, Remove the hinge screws: adım 21, 3 resimden 1. MacBook Neo Screen Replacement, Remove the hinge screws: adım 21, 3 resimden 2. MacBook Neo Screen Replacement, Remove the hinge screws: adım 21, 3 resimden 3.
    • Keep a firm grip on the laptop, as it can easily fall off the table.

    • Support the screen with one hand and use your free hand to remove the four 6.2 mm–long Torx Plus 8IP screws securing the hinges.

  22. MacBook Neo Screen Replacement, Remove the screen: adım 22, 3 resimden 1. MacBook Neo Screen Replacement, Remove the screen: adım 22, 3 resimden 2. MacBook Neo Screen Replacement, Remove the screen: adım 22, 3 resimden 3.
    • Hold the screen with both hands and lift the hinges out of their recesses to remove it.

    • During reassembly, be careful not to scratch the new screen on the edge of the laptop frame. If the screen itself has any plastic liners, leave them in place until reassembly is complete.

Sonuç

Compare the new replacement part to the original part—you may need to remove plastic liners from the new part before you install it.

To reassemble the MacBook, follow these instructions in reverse order.

Take your e-waste to an R2 or e-Stewards certified recycler.

Repair didn’t go as planned? Try some basic troubleshooting, or ask our Answers community for help.

Nick Schultz

Üyelik tarihi: 03/24/24

47.409 İtibar

263 adet Kılavuz yazıldı

0Kılavuz Yorumları

Yorum Ekle

İstatistikleri Görüntüle:

Son 24 Saat: 31

Son 7 gün: 307

Son 30 gün: 766

Her zaman: 766