
Motorola Moto G 3rd Generation Battery Replacement
Giriş
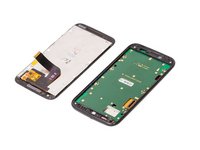
1. adıma gitThis guide will show you how to replace the battery of your Motorola Moto G 3rd Generation. Replacing this part requires disassembling much of the phone.
Before you begin, download the Rescue and Smart Assistant app to backup your device and diagnose whether your problem is software or hardware related.
If your battery is swollen, take appropriate precautions.
Neye ihtiyacın var
Parçalar

Aletler


Daha fazlasını göster…
-
-
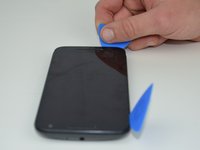
Use your fingernail to pry under the notch on the bottom of the phone and remove the back cover.
-
-
-
Evenly apply heat to the edges of the touchscreen to loosen the adhesive. Continue to Step 3 once the edge of the screen is warm to the touch.
I kept my phone on the radiator for 10min and loosened it enough to open (felt safer than a heat gun).
-
-
-
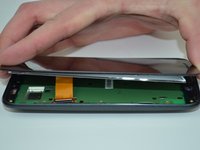
As the adhesive loosens, pry up an edge of the screen with a plastic opening tool or an opening pick. A suction cup may also be useful here.
-
Use an opening pick to hold that edge in place and continue this process around the entire screen, applying more heat as necessary.
What width of adhesive is appropriate to buy to replace the existing one? I can see 1mm, 2mm etc for sale
The width of the adhesive tape that goes around the rim is 2mm. But rather than buying generic 2mm tape, which won't seal well at the corners because it would be bent pretty sharply, it's best to get a precut adhesive that is made for this specific phone and that comes with the corners (and everything else) already pre-shaped: it's cut into a phone-shaped sheet, most of which you'll be discarding. Such sheets are available on ebay.
-
-
-
Bu adımda kullanılan alet:Tesa 61395 Tape$5.99
-
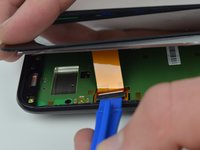
Use a plastic opening tool to flip up the lock on the display cable ZIF connector.
-
Pull the display cable from its socket on the motherboard.
This part was actually the trickiest of the whole (replacing battery) process. Putting it back together here is tough… well would have been better had I not left my glasses in work.
[English below]
Wer das Gerät während des Displaywechsels eingeschaltet lässt, sollte es dennoch einmal neustarten, wenn es fest verklebt wurde. Wie ich auf die harte Tour herausfand, kalibriert sich der Annäherungssensor erst bei einem Neustart neu und geht nach einem Wechsel (Display abgenommen = niedrigerer Wert) davon aus, dass das Handy dauerhaft in der Tasche/am Ohr ist.
Ein kurzer Neustart verschafft Abhilfe.
.
[English]
For those not powering off the device while changing the display (i.e. to test the functionality) I recommend to restart the device after the repair is done and the display is glued in.
As I found out the hard way, the proximity sensor recalibrates at the restart and without the display it sets lower values as a minimum (since there are no obstacles in the way). After the display change it will think that the phone is in your pocket or at your ear all the time.
A restart solves that problem.
I am using a Moto G3 phone as my backup phone and it’s screen is cracked but it is working fine. After watching your video I removed the screen carefully, bought a new digitized screen and fixed it. Now I am in a big trouble because the touch pad doesn't work. Even I couldn't switch off it. I complained the seller and he gave me another screen thinking the previous is having an issue. Unfortunately after fixing it the problem remains. How to solve the touch pad issue please?
I agree this is extremely tough, to take off or put on. Taking it off is hard enough ( the lever is tiny and opens up). Connecting it back up is tough because the position is so awkward.
-
-
-
Remove the ten 2.4 mm T4 screws from the sides of the motherboard.
-
Remove the four 4.5 mm T4 screws from the top and bottom of the motherboard.
Can you telll motherboard price and like plzzz
These are T5 screws
They were all T4 for me.
-
-
-
If adhesive residue is holding the motherboard in place, use a Jimmy to cut the adhesive between the motherboard and the back of the phone.
-
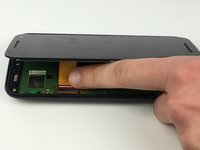
Carefully lift the right edge of the motherboard from the phone.
When taken battery out I took it out wrong and now the new battery plugging into old area is not possible is there a repair part where the battery connects to the logic board Mahalo.
-
-
-
Use a plastic opening tool to disconnect the battery wires from the motherboard.
troquei a bateria e o cellular não liga mais..
Replacing this battery connection is the single hardest connection I have done on any phone or laptop in my experience! The border walls break very easily and the connection itself breaks off the board very easily. I am still not sure how to slide the plug into place without breaking off a border wall.
Yup, this is where it ended for me. I appears some connectors broke of (I’d say 1/2 mm by 1/2mm small) which I have nor tools nor knowledge to repair. I did have to use some force to get break the connection but I think I was well within margins. (This was the first phone I tried to repair however)
-
-
-
Use a spudger to carefully pull the battery wire connector out from under the bridge.
-


To reassemble your device, follow these instructions in reverse order.
To reassemble your device, follow these instructions in reverse order.
İptal et: Bu kılavuzu tamamlamadım.
40 farklı kişi bu kılavuzu tamamladı.
Ekip

USF Tampa, Team 1-3, Nance Spring 2016 USF Tampa, Team 1-3, Nance Spring 2016 üyesi
USFT-NANCE-S16S1G3
4 Üyeler
21 adet Kılavuz yazıldı
23 Yorum
Thanks a lot, it has been very useful! .. Unfortunately my device is still not working ...
No audio sound and ring tone is not working of my Moto G3 set. pl help me what can i do
J. Sarkar
Same here, did you solve it?
Lost all sounds on mine too. But the battery replacement went very smooth.
I've extracted the battery and am awaiting a replacement. It holds a charge OK but has bulged to 10mm thick plus some gaseous inflation. This caused the motherboard to bulge in response and popped the screen out of the housing. I suspect that it was, before the "pop" made it obvous, the cause of the failure of the torch/flash. This is because the connection is just by contact pressure between back and motherboard and in the rough centre of the device where the bulge pressure would be most noticeable. So I am hoping for a double cure...
Hey Mike Coon, Have you found any solution of the problem you shared? If so, kindly share with me also as i am also having the same issue. Thanks.
The same problem here. The battery size a few little big then the original, the screen don’t close and the flash dont’ work. Buy another battery with a best size, solve the problem!
Stukdev -
Muy positivo el artículo. En mi caso no ha salido bien: los tornillos me han dado mucho problema para aflojarlos , incluso dos no he podido, pese a ello conseguí cambiar la batería, pero al estar la cabeza de los tornillo dañados, no he podido volver a montarlo en condiciones. El resultado ha sido que la batería no carga, el altavoz vibra y la pantalla se ha dañado. Me ha parecido que el cambio de batería es innecesariamente complicado, por lo que desaconsejo comprar este tipo de teléfono que no facilita la vida al usuario en una operación tan elemental como cambiar una batería.
Not worth the bother dump the phone and get a make that allows you to change the battery if needed. I have given up on Smart phones, that won’t even make a call in a weak signal area I now use a 15 year old Nokia 7110, new battery cost me £8. and it works where all my smart phones did not. A smart phone is not smart when it can’t even make or receive a call.
Soo, I changed my display and battery and after about 2 months I got ghost touches and I had the feeling that my battery was drained a lot quicker. Now I tried to plug in my charging cable and it turned off and won’t start. It doesn’t get past the booting animation. What could be the problem? Should I try and install my old battery again? It wasn’t broken or anything, just thought I could exchange it after 2 years of use while I’m at it :D
How to know service provider fixed original battery?
How to know service provider fixed the original battery
Do you remember the good old days when you just disconnected the old battery and plugged in a new one? If this is progress then Motorola you have excelled yourself and ruined Darwin’s Theory of evolution. What an absolute faff.
Where can I buy a the battery for my moto
Don’t forget to take out SD card beforehand (like I did!)
The original battery has a curved shape to fit the enclosure. The replacement that I ordered is flat. The problem is that the replacement doesn’t fit well so PCB is bent after assembly (risk of failure), also the screen doesn’t fit as good as originally. Bending battery manually is not a solution as it may cause fire or explosion.
What possible Clark of the circuitry is so heavily wired battery to bulge. No that the internal circuit of the battery is to blame for the fault. But wouldn't it take a surge in the motherboard because of a bad circuit because the rapid discharge needed for making the battery bulge short circuit itself.
What possible part of the circuitry is so heavily wired it makes the battery to bulge. I know that the internal short of the battery is to blame for the fault. But wouldn't it take a surge in the motherboard because of a bad circuit to cause it to fail ? Because the rapid discharge of a direct short of a component causing the shorted pathway needed for making the battery bulge short circuit itself.
To be sure of what I'm saying I am saying I know a short inside of the battery causes the bulges. But wouldn't an internal short in the motherboard causing a direct Sink of the electrical circuit perhaps be the drain needed to heat the battery internaly to the point of shorting out?
All of that amperage that's generated in the shorting process of a circuit causes a great amount of heat instantly
This repair is much, much more difficult than it appears. The LCD connection and the battery connection are borderline impossible. Everything else is simple or nearly simple. The glue is about a tenth as tough as Samsung phones.
Thomas Hayes - Yanıt