Ana içeriğe geç
Rival Mini Chopper MC-67BL Power Button Replacement

Rival Mini Chopper MC-67BL Power Button Replacement

David Otsu

David Otsu ve 5 diğer katkıda bulunanlar

En son July 31, 2014 tarihinde güncellendi

20 dakika
Orta

This guide will help you remove the power button.

Neye ihtiyacın var

iFixit bu bağlantılar üzerinden satın aldığınızda komisyon kazanır.
  1. Rival Mini Chopper MC-67BL Power Button Replacement, Turning Gears: adım 1, 2 resimden 1. Rival Mini Chopper MC-67BL Power Button Replacement, Turning Gears: adım 1, 2 resimden 2.
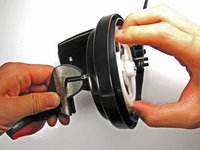
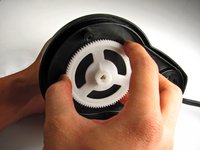
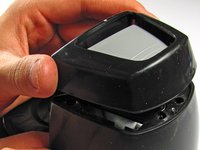
    • Twist the plastic lid counterclockwise to unlock it.

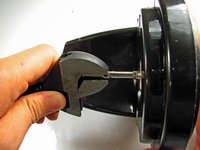
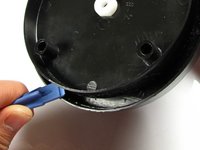
    • Lift the lid to remove it from the container.

  2. Rival Mini Chopper MC-67BL Power Button Replacement: adım 2, 1 resimden 1.
    • Carefully remove the blade from the container.

    • For reassembly, the teeth on the metal shaft line up with slots on the inside of the plastic hole.

  3. Rival Mini Chopper MC-67BL Power Button Replacement: adım 3, 1 resimden 1.
    • With your hand, twist the container counter-clockwise until it unlocks from the base. Remove the container by lifting it straight up.

  4. Rival Mini Chopper MC-67BL Power Button Replacement: adım 4, 1 resimden 1.
    • Use your fingers to pry out the two rubber feet from the bottom cover of the base.

    • The two feet furthest from the button tower contain screws. The other two feet do not.

  5. Rival Mini Chopper MC-67BL Power Button Replacement: adım 5, 2 resimden 1. Rival Mini Chopper MC-67BL Power Button Replacement: adım 5, 2 resimden 2.
    • Use the Phillips #2 screwdriver to unscrew the two 12.7-mm screws underneath the rubber feet.

    • Use the same screwdriver to unscrew the 15.88-mm screw from the back of the chopper.

  6. Rival Mini Chopper MC-67BL Power Button Replacement: adım 6, 1 resimden 1.
    • Firmly lift the bottom cover off of the base.

  7. Rival Mini Chopper MC-67BL Power Button Replacement: adım 7, 1 resimden 1.
    • Remove the smaller white gear by lifting it up with your hand.

  8. Rival Mini Chopper MC-67BL Power Button Replacement: adım 8, 3 resimden 1. Rival Mini Chopper MC-67BL Power Button Replacement: adım 8, 3 resimden 2. Rival Mini Chopper MC-67BL Power Button Replacement: adım 8, 3 resimden 3.
    • Use a pair of pliers or any other clamping tool to securely hold the blade-shaft that sits above the base.

    • Grab the gear with your other hand and turn CLOCKWISE. Unlike most screws, the gear is reverse-threaded to allow the blade to spin.

    • Continue turning the gear until completely removed from the blade-shaft.

  9. Rival Mini Chopper MC-67BL Power Button Replacement, Power Button: adım 9, 1 resimden 1.
    • Use your hand to firmly pull the blade-shaft from the base.

  10. Rival Mini Chopper MC-67BL Power Button Replacement: adım 10, 1 resimden 1.
    • Using Phillips #2 screwdriver, unscrew two 12.7-mm screws in the middle of the base.

  11. Rival Mini Chopper MC-67BL Power Button Replacement: adım 11, 1 resimden 1.
    • Unwind power cord from the base pegs.

  12. Rival Mini Chopper MC-67BL Power Button Replacement: adım 12, 2 resimden 1. Rival Mini Chopper MC-67BL Power Button Replacement: adım 12, 2 resimden 2.
    • Use the plastic opening tool to pry open the base from the main body.

    • These two plastic prongs are pressed fit into the base. It may take some effort to pry the base completely off.

    • Once freed, lift the base panel from the main body and set it aside.

  13. Rival Mini Chopper MC-67BL Power Button Replacement: adım 13, 2 resimden 1. Rival Mini Chopper MC-67BL Power Button Replacement: adım 13, 2 resimden 2.
    • Use a Phillips #2 screwdriver to remove the three 9.53-mm screws from inside the main body.

    • Next, turn the device upright and lift the upper casing from around the button gently.

  14. Rival Mini Chopper MC-67BL Power Button Replacement: adım 14, 1 resimden 1.
    • Remove the button by simply pulling it up.

    • Don't lose the spring under the button! Without it, the blender will not function.

Sonuç

To reassemble your device, follow these instructions in reverse order.

David Otsu

Üyelik tarihi: 10/16/13

109 İtibar

1 Kılavuz yazıldı

Ekip

Cal Poly, Team 4-29, Amido Fall 2013 Cal Poly, Team 4-29, Amido Fall 2013 üyesi

CPSU-AMIDO-F13S4G29

4 Üyeler

5 adet Kılavuz yazıldı

0 Yorum

Yorum Ekle

İstatistikleri Görüntüle:

Son 24 Saat: 0

Son 7 gün: 2

Son 30 gün: 8

Her zaman: 754