Ana içeriğe geç

Samsung Galaxy A20e Screen Replacement

Neye ihtiyacın var

  1. Samsung Galaxy A20e Screen Replacement, Remove the SIM tray: adım 1, 3 resimden 1. Samsung Galaxy A20e Screen Replacement, Remove the SIM tray: adım 1, 3 resimden 2. Samsung Galaxy A20e Screen Replacement, Remove the SIM tray: adım 1, 3 resimden 3.
    • Before starting repairs, take your Galaxy A20e off the charger and power it down.

    • Insert a SIM card eject tool, a SIM eject bit or a straightened paper clip into the hole on the SIM tray located on the left side of the phone.

    • Press your SIM card eject tool firmly into the hole in order to eject the SIM card tray.

    • Remove the SIM card tray.

    • When reinserting the cards, make sure to properly orient them in the tray.

  2. Samsung Galaxy A20e Screen Replacement, Unclip the plastic clips: adım 2, 2 resimden 1. Samsung Galaxy A20e Screen Replacement, Unclip the plastic clips: adım 2, 2 resimden 2.
    • The back cover is held in place by plastic clips.

    • Insert an opening pick between the screen and the back cover on the left edge next to the hole for the SIM-eject tool.

  3. Samsung Galaxy A20e Screen Replacement: adım 3, 3 resimden 1. Samsung Galaxy A20e Screen Replacement: adım 3, 3 resimden 2. Samsung Galaxy A20e Screen Replacement: adım 3, 3 resimden 3.
    • Slide the opening pick around the bottom left corner to unclip the plastic clips.

  4. Samsung Galaxy A20e Screen Replacement: adım 4, 2 resimden 1. Samsung Galaxy A20e Screen Replacement: adım 4, 2 resimden 2.
    • Slide the opening pick along the bottom edge to unclip the plastic clips.

  5. Samsung Galaxy A20e Screen Replacement: adım 5, 2 resimden 1. Samsung Galaxy A20e Screen Replacement: adım 5, 2 resimden 2.
    • Slide the opening pick along the right edge to the top right corner to unclip the plastic clips.

  6. Samsung Galaxy A20e Screen Replacement, Remove the back cover: adım 6, 2 resimden 1. Samsung Galaxy A20e Screen Replacement, Remove the back cover: adım 6, 2 resimden 2.
    • Separate the phone assembly from the back cover.

  7. Samsung Galaxy A20e Screen Replacement, Disconnect the fingerprint sensor: adım 7, 2 resimden 1. Samsung Galaxy A20e Screen Replacement, Disconnect the fingerprint sensor: adım 7, 2 resimden 2.
    • Use an opening pick to pry up and disconnect the fingerprint sensor.

  8. Samsung Galaxy A20e Screen Replacement, Loosen the fingerprint sensor: adım 8, 2 resimden 1. Samsung Galaxy A20e Screen Replacement, Loosen the fingerprint sensor: adım 8, 2 resimden 2.
    • Push against the left edge of the fingerprint sensor with an opening pick to slide the sensor to the right and separate it from the motherboard cover.

  9. Samsung Galaxy A20e Screen Replacement, Remove the fingerprint sensor: adım 9, 1 resimden 1.
    • Remove the fingerprint sensor.

  10. Samsung Galaxy A20e Screen Replacement, Unscrew the motherboard covers: adım 10, 1 resimden 1.
    • Use a Phillips screwdriver to remove the six 3.5 mm-long screws securing the motherboard covers.

  11. Samsung Galaxy A20e Screen Replacement, Unclip the upper motherboard cover: adım 11, 2 resimden 1. Samsung Galaxy A20e Screen Replacement, Unclip the upper motherboard cover: adım 11, 2 resimden 2.
    • Slide an opening pick under the upper motherboard cover.

    • Use the opening pick to unclip the plastic clips, which are holding the upper motherboard cover in its place.

  12. Samsung Galaxy A20e Screen Replacement, Remove the motherboard covers: adım 12, 2 resimden 1. Samsung Galaxy A20e Screen Replacement, Remove the motherboard covers: adım 12, 2 resimden 2.
    • Remove the upper motherboard cover.

    • Remove the lower motherboard cover.

  13. Samsung Galaxy A20e Screen Replacement, Disconnect the battery: adım 13, 2 resimden 1. Samsung Galaxy A20e Screen Replacement, Disconnect the battery: adım 13, 2 resimden 2.
    • Use an opening pick to disconnect the battery by prying the connector straight up from its socket.

  14. Samsung Galaxy A20e Screen Replacement, Disconnect the flex cables: adım 14, 2 resimden 1. Samsung Galaxy A20e Screen Replacement, Disconnect the flex cables: adım 14, 2 resimden 2.
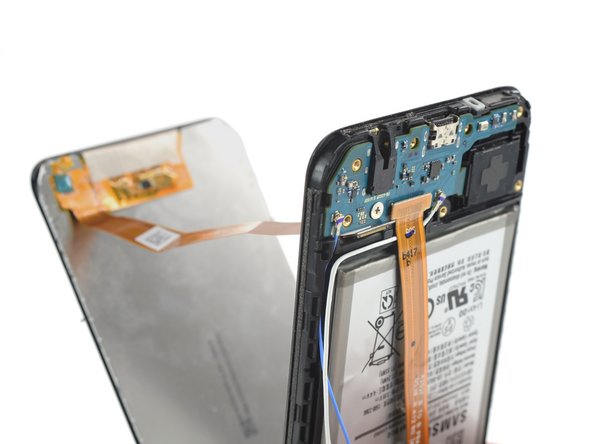
    • Use the opening pick to disconnect the interconnect and display flex cables by prying the connectors straight up from their sockets.

  15. Samsung Galaxy A20e Screen Replacement, Unscrew the daughterboard cover: adım 15, 1 resimden 1.
    • Use a Phillips screwdriver to remove the seven 3.5 mm-long screws securing the daughterboard cover.

  16. Samsung Galaxy A20e Screen Replacement, Remove the daughterboard cover: adım 16, 2 resimden 1. Samsung Galaxy A20e Screen Replacement, Remove the daughterboard cover: adım 16, 2 resimden 2.
    • Remove the daughterboard cover.

  17. Samsung Galaxy A20e Screen Replacement, Heat the display: adım 17, 1 resimden 1.
    • Apply a heated iOpener to the screen to loosen the adhesive underneath. Apply the iOpener for at least two minutes.

    • You may need to reheat and reapply the iOpener several times to get the phone warm enough to cut the adhesive. Follow the iOpener instructions to avoid overheating.

  18. Samsung Galaxy A20e Screen Replacement, Insert an opening pick: adım 18, 2 resimden 1. Samsung Galaxy A20e Screen Replacement, Insert an opening pick: adım 18, 2 resimden 2.
    • Once the screen is warm to the touch, apply a suction handle to the left edge of the phone.

    • If the phone's screen is cracked, the suction handle may not stick. Try lifting it with strong tape, or superglue the suction handle in place and allow it to cure so you can proceed.

    • Lift the screen with the suction handle to create a small gap between the screen and the frame.

    • Insert the tip of an opening pick into the gap between the screen and the midframe.

  19. Samsung Galaxy A20e Screen Replacement, Slice the adhesive: adım 19, 2 resimden 1. Samsung Galaxy A20e Screen Replacement, Slice the adhesive: adım 19, 2 resimden 2.
    • Slide the opening pick along the left edge to the top left corner to cut the adhesive.

    • Leave the pick in its place to prevent the adhesive from resealing.

  20. Samsung Galaxy A20e Screen Replacement: adım 20, 3 resimden 1. Samsung Galaxy A20e Screen Replacement: adım 20, 3 resimden 2. Samsung Galaxy A20e Screen Replacement: adım 20, 3 resimden 3.
    • Insert a second opening pick under the top left corner.

    • Slide it along the left edge to the bottom left corner to cut the adhesive.

    • Leave the picks in their place to prevent the adhesive from resealing.

  21. Samsung Galaxy A20e Screen Replacement: adım 21, 2 resimden 1. Samsung Galaxy A20e Screen Replacement: adım 21, 2 resimden 2.
    • Insert a third opening pick under the bottom left corner of the phone.

    • Slide it along the bottom edge to the bottom right corner.

    • Leave the pick there to prevent the adhesive from resealing.

  22. Samsung Galaxy A20e Screen Replacement: adım 22, 3 resimden 1. Samsung Galaxy A20e Screen Replacement: adım 22, 3 resimden 2. Samsung Galaxy A20e Screen Replacement: adım 22, 3 resimden 3.
    • Insert a fourth opening pick at the bottom right corner.

    • Slide the pick along the right edge to the top right corner and leave it in its place to prevent the adhesive from resealing.

  23. Samsung Galaxy A20e Screen Replacement: adım 23, 2 resimden 1. Samsung Galaxy A20e Screen Replacement: adım 23, 2 resimden 2.
    • Insert a fifth opening pick under the top right corner.

    • Slide it along the top edge of the phone to cut the remaining adhesive.

    • When you slice near the front facing camera, insert only the tip (3 mm) of the opening pick to avoid damaging or smearing the camera.

    • Do not remove the screen completely yet. The display cable is still threaded through the midframe.

  24. Samsung Galaxy A20e Screen Replacement, Separate the screen: adım 24, 2 resimden 1. Samsung Galaxy A20e Screen Replacement, Separate the screen: adım 24, 2 resimden 2.
    • Thread the display flex cable through the gap in the frame.

  25. Samsung Galaxy A20e Screen Replacement, Remove the screen: adım 25, 1 resimden 1.
    • Remove the screen.

    • Compare your new replacement part to the original part—you may need to transfer remaining components or remove adhesive backings from the new part before installing.

    • During reassembly, follow this guide if you are using a pre-cut adhesive card.

Sonuç

If possible, turn on your device and test your repair before installing new adhesive and resealing.

Compare your new replacement part to the original part—you may need to transfer remaining components or remove adhesive backings from the new part before installing.

To reassemble your device, follow these instructions in reverse order. Apply new adhesive where necessary after cleaning the relevant areas with isopropyl alcohol (>90%).

The best way to secure the new screen is to apply a sheet of custom-cut double-sided tape to the back of the screen.

Take your e-waste to an R2 or e-Stewards certified recycler.

Repair didn’t go as planned? Try some basic troubleshooting, or ask our Answers community for help.

16 farklı kişi bu kılavuzu tamamladı.

Adriana Zwink

Üyelik tarihi: 12/18/19

48.416 İtibar

167 adet Kılavuz yazıldı

Ekip

iFixit iFixit üyesi

Staff

135 Üyeler

17.182 adet Kılavuz yazıldı

Bir Yorum

Ik denk dat het iets duurder is met kapot scherm om al die benodigdheden te kopen en als iets mis gaat een reparatie van je hele telefoon dan hem even naar de reparateur te laten

fortnite melon2 - Yanıt

Yorum Ekle

İstatistikleri Görüntüle:

Son 24 Saat: 8

Son 7 gün: 48

Son 30 gün: 247

Her zaman: 14,331