
Samsung Galaxy Watch Active2 Battery Replacement

Giriş
1. adıma gitUse this guide to replace a worn-out or dead battery in your Samsung Galaxy Watch Active2.
If your battery is swollen, take appropriate precautions. For your safety, discharge your battery below 25% before disassembling your watch. This reduces the risk of a dangerous thermal event if the battery is accidentally damaged during the repair.
You might need replacement adhesive to reattach the battery when reassembling the device.
Neye ihtiyacın var
Parçalar


Aletler


Daha fazlasını göster…
-
-
Turn off the Galaxy Watch Active2 by pushing and holding the bottom button for approximately 3 seconds. You should feel a short vibration.
-
When the "Power off" symbol appears, tap the center of the screen to make it shut down. You should feel a longer vibration for confirmation.
-
-
-
Use a Tri-point Y00 screwdriver to remove the four 4 mm-long screws on the back of the watch.
-
-
-
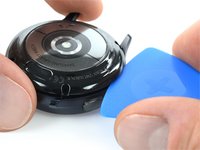
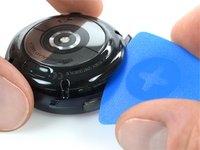
Use an opening pick and place it between the plastic back cover and the metal housing near the buttons.
-
Push the opening pick into the gap to separate the back cover from the housing.
-
-
-
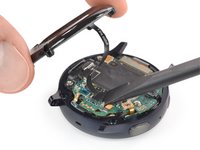
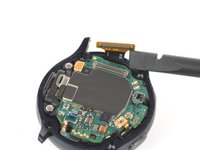
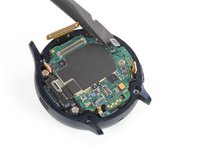
Carefully lift the back cover to access the sensor array connector.
-
Use a spudger to disconnect the sensor array from the motherboard.
-
-
-
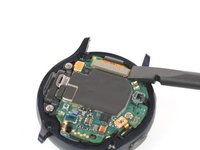
Use a spudger to disconnect the display assembly and the speaker.
-
-
-
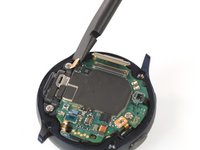
Use a spudger to disconnect the barometric sensor, the buttons, and the microphone.
-
-
-
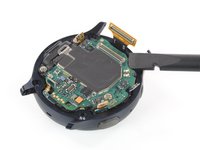
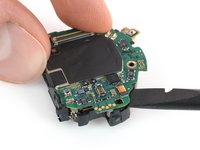
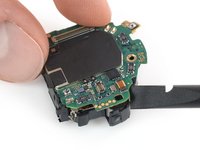
Place a spudger underneath the motherboard at the top right next to the display connector.
-
Slightly twist and lever the spudger to loosen the core assembly.
-
-
-
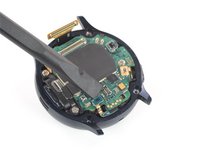
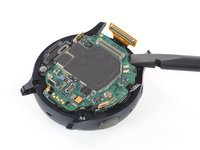
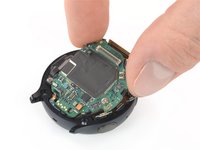
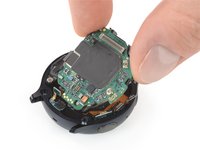
Grab the core assembly and carefully slide it out from under the cables.
-
Remove the core assembly.
-
-
-
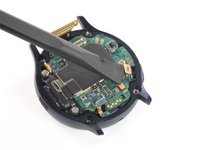
Use the tip of an opening pick to peel the top button off the plastic frame.
-
-
-
Use a Phillips screwdriver to remove the 4.4 mm-long screw holding the motherboard in place.
-
-
-
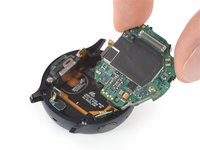
Place the flat end of a spudger between the motherboard and the plastic frame near the copper coil at the bottom right.
-
Twist the spudger to free the motherboard from the plastic tabs.
-
-
-
Slide the motherboard out from under the remaining plastic tabs to remove it.
-
-
-
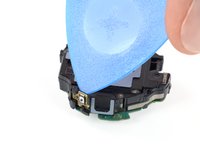
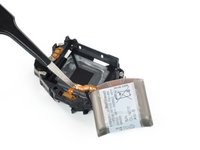
Insert the flat end of a spudger between the bottom of the battery and the core frame.
-
Use the spudger to lever up the battery.
-
-
Bu adımda kullanılan alet:Tweezers$4.99
-
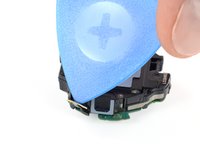
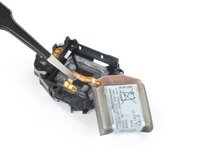
Use a pair of tweezers to grab the connector and slowly pull it off the core frame.
-
Remove the battery from the core assembly.
-


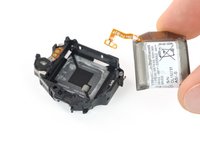
Secure the new battery with pre-cut adhesive or double-sided adhesive tape. Press the new battery firmly into place.
To reassemble your device, follow these instructions in reverse order.
For optimal performance, calibrate your newly installed battery: Charge it to 100% and keep charging it for at least 1 more hour. Then use your device until it shuts off due to low battery. Finally, charge it uninterrupted to 100%.
Take your e-waste to an R2 or e-Stewards certified recycler.
Repair didn’t go as planned? Try some basic troubleshooting, or ask our Answers community for help.
İptal et: Bu kılavuzu tamamlamadım.
32 farklı kişi bu kılavuzu tamamladı.

Ekip

Tobias Isakeit - Repairability Engineer Tobias Isakeit - Repairability Engineer üyesi
Business
1 Üye
1.131 adet Kılavuz yazıldı
18 Yorum
This is the SAME thing that is happening to me. Went to the beach, on the drive home it died, hasn’t charged since. I set it on the charger and it will say 0%, but never charge enough to power on. I took to best buy and they said I need to buy a new watch :(. Would also like to know if you think it is the battery or if the beach water could have fried the whole thing. I wouldn’t think it would since it occasionally will flash the 0% when try to charge it.
Exact same thing in two separate cases. That's it. 0% flashing sometimes and completely dead. And as it seems nobody but us is posting our sad stories. We need to look further and find something on YouTube or online… there must be something…
I have been looking online and it seems that the battery has lower charge than what is chargeable. And by going deeper it also seems that there is a way to recharge that same battery at least to the point we're it might start again.