Ana içeriğe geç

Steam Deck Left Thumbstick Replacement

Neye ihtiyacın var

  1. Steam Deck Left Thumbstick Replacement, Prepare your Steam Deck for disassembly: adım 1, 3 resimden 1. Steam Deck Left Thumbstick Replacement, Prepare your Steam Deck for disassembly: adım 1, 3 resimden 2. Steam Deck Left Thumbstick Replacement, Prepare your Steam Deck for disassembly: adım 1, 3 resimden 3.
    • Turn on your Steam Deck and allow the battery to discharge below 25% before starting your repairs, as a charged lithium-ion polymer battery can be dangerous if accidentally punctured.

    • As an extra precaution, Valve recommends putting your Steam Deck into battery storage mode within the BIOS before starting any internal repairs. Read how to do that here.

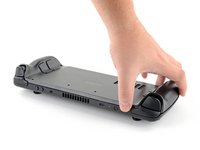
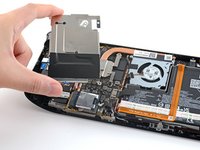
    • Power down your Steam Deck and unplug any cables.

    • If you have a microSD card installed, make sure to remove it before opening the Steam Deck. If you attempt to remove the back cover with it still installed, it could snap right in half.

    • During your repair, it can be helpful at times to lay the Steam Deck face-down into its case to protect the thumbsticks and prevent wobble.

  2. Steam Deck Left Thumbstick Replacement, Remove the back cover screws: adım 2, 1 resimden 1.
    Bu adımda kullanılan alet:
    FixMat
    $36.95
    Satın Al
    • Use a Phillips driver to remove the eight screws securing the back cover:

    • Four coarse thread 9.5 mm-long screws

    • Four fine thread 5.8 mm-long screws

    • Despite the standards, Phillips screwdrivers can vary in size and shape—two drivers labeled as the same size may fit differently in the same screw. Use the size that fits the snuggest into the screw head.

    • Throughout this repair, keep track of each screw and make sure it goes back exactly where it came from to avoid damaging your Steam Deck.

  3. Steam Deck Left Thumbstick Replacement, Unclip the back cover: adım 3, 2 resimden 1. Steam Deck Left Thumbstick Replacement, Unclip the back cover: adım 3, 2 resimden 2.
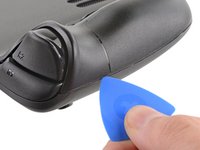
    • Insert an opening pick into the thin gap between the back cover and the front shell, along the edge of the right grip.

    • If you're having trouble inserting your pick at the grip seam, try starting at either the top or bottom long edges first, then slide the pick towards the grip.

    • Pry up on the back cover to release it from the locking clips.

  4. Steam Deck Left Thumbstick Replacement, Remove the back cover: adım 4, 3 resimden 1. Steam Deck Left Thumbstick Replacement, Remove the back cover: adım 4, 3 resimden 2. Steam Deck Left Thumbstick Replacement, Remove the back cover: adım 4, 3 resimden 3.
    • Once the clips are disconnected from one edge, the rest disconnect easily.

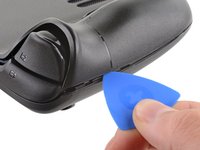
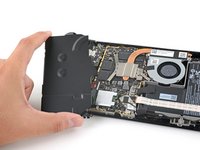
    • Grip the back cover at the opening you just created and pull it up and away from the device to unclip the long edges.

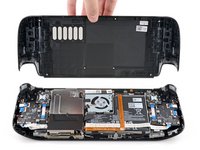
    • Remove the back cover.

  5. Steam Deck Left Thumbstick Replacement, Uncover the hidden shield screw: adım 5, 2 resimden 1. Steam Deck Left Thumbstick Replacement, Uncover the hidden shield screw: adım 5, 2 resimden 2.
    • If you have a refreshed Steam Deck version with the black motherboard cover, skip this step.

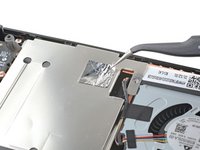
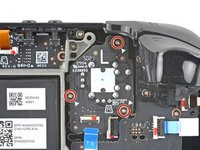
    • Use a pair of tweezers to remove the piece of foil tape covering the hidden screw on the board shield.

    • If possible, try not to rip or tear this tape so it can be reused. If necessary, you can fashion a replacement by cutting a piece of aluminum foil tape to fit.

  6. Steam Deck Left Thumbstick Replacement, Remove the shield screws: adım 6, 2 resimden 1. Steam Deck Left Thumbstick Replacement, Remove the shield screws: adım 6, 2 resimden 2.
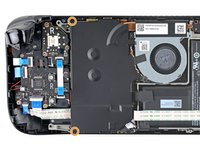
    • Use a Phillips driver to remove the three screws securing the board shield:

    • One 3.4 mm screw

    • Two 3.7 mm screws

    • Only the two 3.7 mm screws along the left edge are present in refreshed Steam Decks.

  7. Steam Deck Left Thumbstick Replacement, Remove the shield: adım 7, 3 resimden 1. Steam Deck Left Thumbstick Replacement, Remove the shield: adım 7, 3 resimden 2. Steam Deck Left Thumbstick Replacement, Remove the shield: adım 7, 3 resimden 3.
    • Remove the board shield.

    • Depending on the age of your Steam Deck, this shield may stick to the thermal pads underneath.

    • During reassembly, ensure that the fan cable lays on the side of the board shield and isn't pinched underneath.

  8. Steam Deck Left Thumbstick Replacement, Disconnect the battery: adım 8, 3 resimden 1. Steam Deck Left Thumbstick Replacement, Disconnect the battery: adım 8, 3 resimden 2. Steam Deck Left Thumbstick Replacement, Disconnect the battery: adım 8, 3 resimden 3.
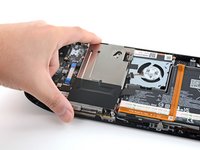
    • Grip the battery cable by its pull tab and pull it directly away from the motherboard to disconnect it.

    • Alternatively, use the flat end of a spudger or a clean fingernail to gently push the connector out of its socket, then disconnect it completely by hand.

  9. Steam Deck Left Thumbstick Replacement, Disconnect the left thumbstick cable: adım 9, 3 resimden 1. Steam Deck Left Thumbstick Replacement, Disconnect the left thumbstick cable: adım 9, 3 resimden 2. Steam Deck Left Thumbstick Replacement, Disconnect the left thumbstick cable: adım 9, 3 resimden 3.
    • The left thumbstick will be on your right-hand side when working on the Steam Deck, as it's laying upside down.

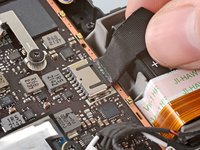
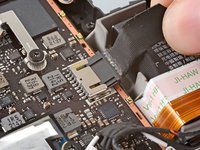
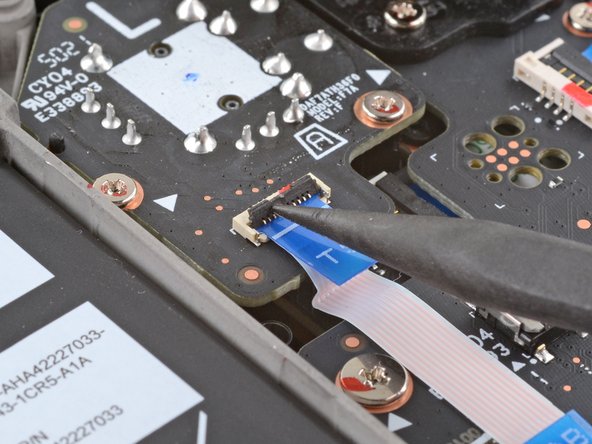
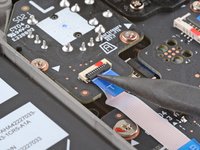
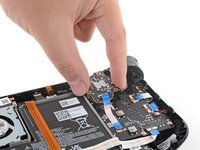
    • Use the pointed end of a spudger to lift up the small locking flap on the thumbstick cable's ZIF connector.

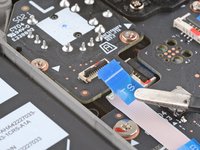
    • Use a pair of tweezers to slide the cable out of its connector.

    • Grip the cable by the blue pull tab, not by the cable itself.

  10. Steam Deck Left Thumbstick Replacement, Remove the thumbstick screws: adım 10, 2 resimden 1. Steam Deck Left Thumbstick Replacement, Remove the thumbstick screws: adım 10, 2 resimden 2.
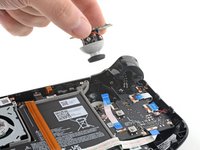
    • Use a Phillips driver to remove the three 5.2 mm screws securing the thumbstick.

    • During reassembly, you may need to hold the Steam Deck off of the work surface so it isn't resting on the new thumbstick while you tighten down the screws.

  11. Steam Deck Left Thumbstick Replacement, Remove the thumbstick: adım 11, 2 resimden 1. Steam Deck Left Thumbstick Replacement, Remove the thumbstick: adım 11, 2 resimden 2.
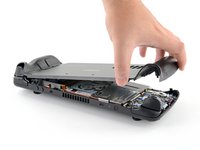
    • Remove the left thumbstick.

    • Replacement thumbsticks require calibration to work as expected. To calibrate new thumbsticks, follow this calibration guide.

    • Each Steam Deck ships with one of two different models of thumbsticks, Type A or Type B. Although nearly identical, capacitive touch capability relies on the correct type to be installed.

    • To identify which replacement thumbsticks you need, navigate to SettingsSystem and check the Steam Deck Controller ID.

    • If the Controller ID starts with "MEDA" that device needs Type A thumbsticks.

    • If the Controller ID starts with "MHDA" that device needs Type B thumbsticks.

Sonuç

To reassemble your device, follow these instructions in reverse order.

Take your e-waste to an R2 or e-Stewards certified recycler.

Repair didn’t go as planned? Try some basic troubleshooting, or ask our Steam Deck answers community for help.

24 farklı kişi bu kılavuzu tamamladı.

Carsten Frauenheim

Üyelik tarihi: 03/10/20

110.900 İtibar

338 adet Kılavuz yazıldı

Ekip

iFixit iFixit üyesi

Staff

136 Üyeler

16.560 adet Kılavuz yazıldı

7 Yorum

Requires a PH#00 not a #0

NoggleFrap - Yanıt

#0 worked best on the analog sticks for me. #1 for the external case screws. I've heard to always use the size with the snuggest fit in a screw to prevent striping the heads. Considering I only have these screws and no replacements. I'll opt to use the biggest bit that fits.

Guy_Manley -

You need to start offering the ribbon cables, as they are pretty fragile.

Remy Starshade - Yanıt

I feel like my steam deck was partially made anti-repair, there was a glue like seal blocking the soldering iron from reaching the solder pad on my left joystick specifically, and the screw hidden by the tape on the shield would not unscrew even though my iFixit screwdriver worker for all the others fine and now I'm pretty sure the head is stripped I even tried a super glue hack a few times and in each case the glue gave before the screw did. I was still able to just barely access the battery connector, but reconnecting it is more work than I'd want.

I wonder if anyone else is seeing odd stuff like this...

CreativityKing - Yanıt

Someone should ask valve why their sticks are so clicky. I’ve had multiple sticks all click in in the 6 and 8 positions but only on the left side. I’m tired of it so I’m gonna stop replacing it, after going through 5 sticks if you count my RMA for haptic issues, all left sticks have had this issue.

Payne Lindsey - Yanıt

Yorum Ekle

İstatistikleri Görüntüle:

Son 24 Saat: 51

Son 7 gün: 278

Son 30 gün: 1,353

Her zaman: 54,101