Ana içeriğe geç
iPhone 15 Screen Replacement

iPhone 15 Screen Replacement

Clay Eickemeyer

Clay Eickemeyer ve 3 diğer katkıda bulunanlar

En son February 25, 2025 tarihinde güncellendi

1 - 2 saat
Orta
Öne Çıkan Kılavuzlar

Use this guide to replace a broken or cracked screen in your iPhone 15.

Note: Since you can't disconnect the battery during this repair, be especially careful not to use metal prying tools or touch exposed contacts in your iPhone.

Note: Due to Apple's parts pairing restrictions, on iOS 17.6 and earlier, True Tone and auto brightness are disabled after a screen replacement, even when using an original Apple screen. On iOS 18 and newer, you can calibrate your new screen using Apple's Repair Assistant to restore functionality on genuine parts.

Neye ihtiyacın var

Tamir Seti

Bu kit, bu kılavuzu tamamlamak için gereken tüm parçaları ve araçları içerir.

  • iPhone 15 Screen
    iPhone 15 Screen

Parçalar

Aletler

Daha fazlasını göster…

iFixit bu bağlantılar üzerinden satın aldığınızda komisyon kazanır.
  1. iPhone 15 Screen Replacement, Prepare your phone for disassembly: adım 1, 2 resimden 1. iPhone 15 Screen Replacement, Prepare your phone for disassembly: adım 1, 2 resimden 2.
    • Allow your phone's battery to drain below 25%, as a charged lithium-ion battery is a potential safety hazard.

    • Unplug any cables from your phone.

    • Hold the power and either volume buttons and slide to power off your phone.

  2. iPhone 15 Screen Replacement, Tape over any cracks: adım 2, 2 resimden 1. iPhone 15 Screen Replacement, Tape over any cracks: adım 2, 2 resimden 2.
    • If your screen or back glass is badly cracked, lay overlapping strips of packing tape over the glass to protect yourself and make disassembly easier.

    • Make sure there's a smooth area near the bottom edge that's big enough for a suction cup to stick to.

  3. iPhone 15 Screen Replacement, Mark your opening picks: adım 3, 3 resimden 1. iPhone 15 Screen Replacement, Mark your opening picks: adım 3, 3 resimden 2. iPhone 15 Screen Replacement, Mark your opening picks: adım 3, 3 resimden 3.
    • If inserted too far, an opening pick can damage your device. Follow this step to mark your pick and prevent damage.

    • Measure 3 mm from the tip and mark the opening pick with a permanent marker.

    • You can also mark the other corners of the pick with different measurements.

    • Alternatively, tape a coin to a pick 3 mm from the tip.

    Got to step 2 and realized the fix kit doesn't include an opening pick! Looks like a guitar pick, and I have those lying around. Is that expected? Looks like the pick is used in many steps below. There's a little blue crowbar that isn't mentioned in the instructions. Perhaps that replaces the opening pick?

    Sloan Looney - Yanıt

    Hi! I can't see which guide you were using when writing this comment. Can you reply here with which guide and fix kit you used?

    Clay Eickemeyer -

    I see you posted this in Meta. I hope it's resolved soon! In the meantime, a guitar pick may work well enough for your repair.

    Clay Eickemeyer -

    what fix kit?

    Meow Purr -

    My fix kit didn't include an opening pick either

    WILLIAM HARRIS - Yanıt

    Make sure you check inside the black boxes after emptying them. My pick was stuck inside one of the boxes.

    AndyF - Yanıt

    My AliExpress refurbished screen came with a pick that has a coin-like circle that pops out, so no modification was necessary

    Gijs Leegwater - Yanıt

    the picture shows 3 cm but the description says 3 mm's. Which one is it?

    John Pena - Yanıt

    That is a misunderstanding. It is a ruler with a scale for cm, it shows 0.3 cm, i.e. 3 mm.

    VauWeh -

    Oh, come ON!

    Big Ed -

    It will ALWAYS be millimeters on a phone, but this step is ridiculous, skip it!

    Leif DeWolf -

    It's not an Ifixit KIT if it doesn't include everything. You'll need to order the opening pic separately. Or head to Walmart like myself and look for guitar pics. Hopefully, this will work just as well.

    Jaleeljb97@icloud.com - Yanıt

    No pick in mine as well. It’s really not clear that you have to order this separately when ordering an IPhone SE 202/2022 screen repair kit. Is this the case?

    Jackson Castiglione - Yanıt

    Frustrated, I ordered a compact package where everything was encapsulated. Useless suction tools could not separate the screen. If it is unable to decouple the screen, then why sucking suction tools you have provided.

    Shourob Datta - Yanıt

    For my kit the triangle pick was stuck inside the box with the screen not with the other tools maybe it's also there for you

    Henry Scheibehenne - Yanıt

    Y’all are getting far, FAR too detailed with some of this stuff…. Measuring and marking the pick that you won’t actually use to open the device?!? lol that’s kinda funny. Just heat it up, grab a spudger, and the back just pops right off! The iFixit tech need to stick to the KISS method more often, you know KEEP IT SIMPLE STUPID!!! Like l, for reals, I’ve been doing this stuff for YEARS and using iFixit guides regularly and this is just ridiculous at this point!

    Leif DeWolf - Yanıt

    Will the phone still work if the sensor assembly on the back of the screen is damaged?

    Mutshidzi Rambau - Yanıt

  4. iPhone 15 Screen Replacement, Remove the pentalobe screws: adım 4, 2 resimden 1. iPhone 15 Screen Replacement, Remove the pentalobe screws: adım 4, 2 resimden 2.
    • Use a P2 pentalobe driver to remove the two 7.7 mm-long screws on either side of the charging port.

  5. iPhone 15 Screen Replacement, Secure the back glass: adım 5, 3 resimden 1. iPhone 15 Screen Replacement, Secure the back glass: adım 5, 3 resimden 2. iPhone 15 Screen Replacement, Secure the back glass: adım 5, 3 resimden 3.
    Bu adımda kullanılan alet:
    Clampy - Anti-Clamp
    $24.95
    • The next four steps demonstrate the Anti-Clamp, a tool we designed to make the opening procedure easier. If you aren't using the Anti-Clamp, skip down four steps for an alternate method.

    • For complete instructions on how to use the Anti-Clamp, check out this guide.

    • The Anti-Clamp applies suction to both the screen and the back glass. To open the screen, you need to secure the back glass with tape. You can also check out the full instructions on how to use this tape.

    • Cut two strips of tape, apply them along the long edges of the phone, and fold them over the back glass to secure it.

  6. iPhone 15 Screen Replacement, Secure an Anti-Clamp: adım 6, 3 resimden 1. iPhone 15 Screen Replacement, Secure an Anti-Clamp: adım 6, 3 resimden 2. iPhone 15 Screen Replacement, Secure an Anti-Clamp: adım 6, 3 resimden 3.
    • Pull the Anti-Clamp's blue handle backward to unlock the arms.

    • With the screen facing up, slide the arms over the left edge of your phone, with one suction cup on the screen and the other on the back glass. Center the suction cups near the bottom edge.

    • Support your phone so it rests level while between the Anti-Clamp's arms—a small box works well.

    • Squeeze the cups together to create suction.

    • If you find that the surface of your iPhone is too slippery for the Anti-Clamp to hold onto, use tape to create a grippier surface.

  7. iPhone 15 Screen Replacement, Create a gap under the screen: adım 7, 3 resimden 1. iPhone 15 Screen Replacement, Create a gap under the screen: adım 7, 3 resimden 2. iPhone 15 Screen Replacement, Create a gap under the screen: adım 7, 3 resimden 3.
    • Pull the blue handle forward to lock the arms.

    • Turn the handle one full turn (360 degrees) or until the cups start to stretch.

    • As the cups stretch, make sure they stay vertically aligned with each other. If they tend to slip, remove the Anti-Clamp and apply tape for the cups to stick to.

    • If you don't have tape, you may use your hands to clean the suction cups and warm them up to help them stick.

  8. iPhone 15 Screen Replacement, Insert an opening pick: adım 8, 3 resimden 1. iPhone 15 Screen Replacement, Insert an opening pick: adım 8, 3 resimden 2. iPhone 15 Screen Replacement, Insert an opening pick: adım 8, 3 resimden 3.
    • Use a hair dryer or heat gun to heat the bottom edge of the screen until it's hot to the touch.

    • Be careful not to heat the phone hotter than this—the battery is susceptible to heat damage.

    • Wait up to a minute for the adhesive to separate and a gap to form between the screen and the frame.

    • If a gap doesn't appear after one minute, apply more heat and rotate the handle a quarter turn. Let the Anti-Clamp and time do the work for you.

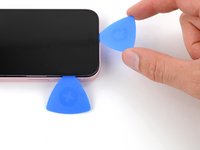
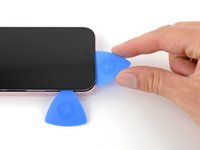
    • Insert an opening pick into the gap.

    • Remove the Anti-Clamp using the pull tabs on the suction cups.

    • Skip the next two steps.

  9. iPhone 15 Screen Replacement, Heat the bottom edge: adım 9, 1 resimden 1.
    • Use a hair dryer or heat gun to heat the bottom edge of the screen until it's hot to the touch.

    • Be careful not to heat the phone hotter than this—the battery is susceptible to heat damage.

  10. iPhone 15 Screen Replacement, Insert an opening pick: adım 10, 3 resimden 1. iPhone 15 Screen Replacement, Insert an opening pick: adım 10, 3 resimden 2. iPhone 15 Screen Replacement, Insert an opening pick: adım 10, 3 resimden 3.
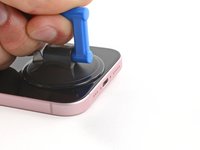
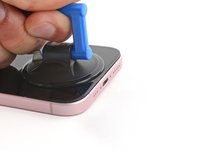
    • Apply a suction handle to the bottom edge of the screen.

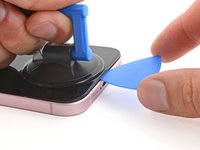
    • Pull up on the handle with a strong, steady force to create a gap between the screen and the frame.

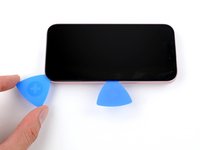
    • Insert the tip of an opening pick into the gap.

  11. iPhone 15 Screen Replacement, Screen information: adım 11, 1 resimden 1.
    • As you slice the adhesive securing the screen in the next steps, be careful of the following areas:

    • There are two delicate cables connecting the screen to the phone, one just above the mute switch, and the other about halfway between the volume down button and the bottom of the phone.

    • There are multiple spring contacts around the perimeter of the phone. Be extra careful not to insert your pick deeper than suggested in these locations to avoid bending the contacts.

  12. iPhone 15 Screen Replacement, Separate the bottom edge adhesive: adım 12, 3 resimden 1. iPhone 15 Screen Replacement, Separate the bottom edge adhesive: adım 12, 3 resimden 2. iPhone 15 Screen Replacement, Separate the bottom edge adhesive: adım 12, 3 resimden 3.
    • Don't insert your opening pick deeper than 3 mm along the bottom edge.

    • Slide your pick back and forth along the bottom edge to separate the adhesive.

    • Leave your pick inserted in the bottom right corner to prevent the adhesive from re-sealing.

  13. iPhone 15 Screen Replacement, Heat the right edge: adım 13, 1 resimden 1.
    • Heat the right edge of the screen until it's hot to the touch.

  14. iPhone 15 Screen Replacement, Position the opening pick: adım 14, 3 resimden 1. iPhone 15 Screen Replacement, Position the opening pick: adım 14, 3 resimden 2. iPhone 15 Screen Replacement, Position the opening pick: adım 14, 3 resimden 3.
    • Don't insert your pick deeper than 5 mm along the right edge.

    • Slide your pick around the bottom right corner of the screen and toward the power button until you feel a hard stop at a clip securing the screen.

    • Rotate your pick so the flat edge is under the screen.

  15. iPhone 15 Screen Replacement, Release the right clip: adım 15, 3 resimden 1. iPhone 15 Screen Replacement, Release the right clip: adım 15, 3 resimden 2. iPhone 15 Screen Replacement, Release the right clip: adım 15, 3 resimden 3.
    • Hold the pick with one hand and twist it to increase the gap between the screen and the frame and release the right clip.

    • Insert a second opening pick to the right of the first one.

  16. iPhone 15 Screen Replacement, Separate the right edge adhesive: adım 16, 3 resimden 1. iPhone 15 Screen Replacement, Separate the right edge adhesive: adım 16, 3 resimden 2. iPhone 15 Screen Replacement, Separate the right edge adhesive: adım 16, 3 resimden 3.
    • Slide the first pick back to the bottom right corner of the screen.

    • Slide the second pick to the top right corner of the screen to separate the adhesive.

    • Leave these picks inserted to prevent the adhesive from resealing.

  17. iPhone 15 Screen Replacement, Heat the top edge: adım 17, 1 resimden 1.
    • Heat the top edge of the screen until it's hot to the touch.

  18. iPhone 15 Screen Replacement, Separate the top right corner adhesive: adım 18, 3 resimden 1. iPhone 15 Screen Replacement, Separate the top right corner adhesive: adım 18, 3 resimden 2. iPhone 15 Screen Replacement, Separate the top right corner adhesive: adım 18, 3 resimden 3.
    • Don't insert your pick deeper than 3 mm along the top edge.

    • Insert a third opening pick in the top right corner, just above the previous pick.

    • Slide your pick around the top right corner and along the top edge until you feel it stop against the top left screen clip.

  19. iPhone 15 Screen Replacement, Release the top edge clips: adım 19, 3 resimden 1. iPhone 15 Screen Replacement, Release the top edge clips: adım 19, 3 resimden 2. iPhone 15 Screen Replacement, Release the top edge clips: adım 19, 3 resimden 3.
    • Rotate your pick so its flat edge is under the screen.

    • Twist your pick to release the top left screen clip.

    • Slide your pick to the top left corner.

  20. iPhone 15 Screen Replacement, Heat the left edge: adım 20, 1 resimden 1.
    • Heat the left edge of the screen until it's hot to the touch.

  21. iPhone 15 Screen Replacement, Separate the left edge adhesive: adım 21, 3 resimden 1. iPhone 15 Screen Replacement, Separate the left edge adhesive: adım 21, 3 resimden 2. iPhone 15 Screen Replacement, Separate the left edge adhesive: adım 21, 3 resimden 3.
    • Don't insert your pick deeper than 3 mm along the left edge to avoid the two cables connecting the screen to the phone.

    • Slide your pick around the top left corner of the screen and along the left edge to release the clips and separate the adhesive securing it.

  22. iPhone 15 Screen Replacement, Swing open the screen: adım 22, 3 resimden 1. iPhone 15 Screen Replacement, Swing open the screen: adım 22, 3 resimden 2. iPhone 15 Screen Replacement, Swing open the screen: adım 22, 3 resimden 3.
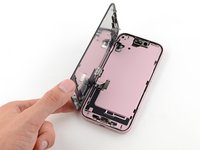
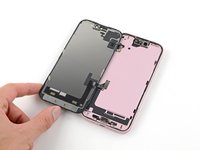
    • Gently swing open the screen over the left edge of the phone.

    • If the screen feels stuck, go back around the perimeter to check for missed sections of adhesive or stuck clips.

  23. iPhone 15 Screen Replacement, Unfasten the front sensor connector cover: adım 23, 1 resimden 1.
    • Use a tri-point Y000 driver to remove the 0.9 mm-long screw securing the front sensor connector cover.

  24. iPhone 15 Screen Replacement, Remove the cover: adım 24, 3 resimden 1. iPhone 15 Screen Replacement, Remove the cover: adım 24, 3 resimden 2. iPhone 15 Screen Replacement, Remove the cover: adım 24, 3 resimden 3.
    Bu adımda kullanılan alet:
    Tweezers
    $4.99
    • Use tweezers to lift the cover to a 90-degree angle.

    • Unhook the cover from its slot in the logic board.

    • Remove the cover.

    • During reassembly, insert the cover at a 90-degree angle to re-engage the hook before laying it flat against the press connector.

  25. iPhone 15 Screen Replacement, Disconnect the front sensor: adım 25, 2 resimden 1. iPhone 15 Screen Replacement, Disconnect the front sensor: adım 25, 2 resimden 2.
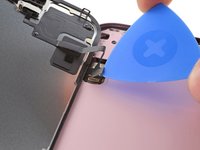
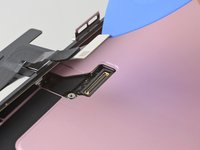
    • Use the tip of an opening pick to pry up and disconnect the front sensor press connector.

    • To reconnect a press connector, align it over its socket and gently press down on one side until it clicks into place, then press down on the other side.

  26. iPhone 15 Screen Replacement, Unfasten the screen connector cover: adım 26, 1 resimden 1.
    • Use your tri-point Y000 driver to remove the 0.9 mm screw securing the screen connector cover.

  27. iPhone 15 Screen Replacement, Remove the cover: adım 27, 2 resimden 1. iPhone 15 Screen Replacement, Remove the cover: adım 27, 2 resimden 2.
    • Use tweezers to lift the cover and unlatch it from its hook on the logic board.

    • Remove the cover.

  28. iPhone 15 Screen Replacement, Disconnect the screen: adım 28, 2 resimden 1. iPhone 15 Screen Replacement, Disconnect the screen: adım 28, 2 resimden 2.
    • Use the tip of an opening pick to pry up and disconnect the screen press connector.

  29. iPhone 15 Screen Replacement, Remove the screen: adım 29, 1 resimden 1.
    • Remove the screen.

    • During reassembly, use this guide to reapply adhesive and install your new screen.

    • Be careful not to damage any of the spring contacts as you clean the frame.

Sonuç

To reassemble your phone, follow this guide to reapply adhesive and install your screen.

After your repair, depending on the replacement part, you may be able to calibrate it using Apple's Repair Assistant, available as of iOS 18. Update your device, navigate to Settings General About Parts & Service History, tap Restart & Finish Repair, and follow the onscreen prompts.

Take your e-waste to an R2 or e-Stewards certified recycler.

Repair didn’t go as planned? Try some basic troubleshooting, or ask our Answers community for help.

8 farklı kişi bu kılavuzu tamamladı.

Clay Eickemeyer

Üyelik tarihi: 09/19/22

82.852 İtibar

455 adet Kılavuz yazıldı

Ekip

Guide Team Guide Team üyesi

Staff

9 Üyeler

11.642 adet Kılavuz yazıldı

6Kılavuz Yorumları

Is it safe to remove the screen of Iphone 15 or even 14 without disconnecting the battery? Thank you.

Laurentiu.P - Yanıt

Hi Laurentiu,

In the case of the iPhone 15 series and the iPhone 14 vanilla models, their design is intentional so that you may replace the screen without disconnecting the battery. To mitigate any ESD-related risks, don't use any metal prying tools, use ESD-safe tools, and discharge and shut down your device before opening it up. Read more about ESD here.

Good luck!

Clay Eickemeyer -

Ok, I got you, thank you very much. So it doesn't matter if we change the screen and battery is still unplugged, even if we use lcd or led screen, if we use the right tools.

Laurentiu.P - Yanıt

This may not be true for all devices, but Apple devices are quite robust. You should have no problem swapping a screen out on an iPhone 15. Just make sure that the press connectors are fully connected, since the insulating foam around the sockets may prevent them from laying flush!

Clay Eickemeyer -

Why is iPhone 15 Screen Replacement not sold in Canada?

SirDropsphonealot - Yanıt

Thank you very much for the instruction. Unfortunaly I broke two of the grounding clips (shown in step 11) while removing the remains of the seal. Can I buy them anywhere? Didn´t find anything. What would be the consequence if I re-assemble it with the two broken clips?

Dirk - Yanıt

Yorum Ekle

İstatistikleri Görüntüle:

Son 24 Saat: 77

Son 7 gün: 557

Son 30 gün: 2,694

Her zaman: 33,834