Giriş
Use this guide to remove or replace a faulty logic board in your iPhone 7 Plus.
It's important to note that each iPhone's logic board and Touch ID fingerprint sensor are paired at the factory, so replacing the logic board will disable Touch ID unless you also install a replacement home button that has been properly paired to your new logic board.
Neye ihtiyacın var
-
-
Power off your iPhone before beginning disassembly.
-
Remove the two 3.4 mm pentalobe screws at the bottom edge of the iPhone.
-
-
-
Measure 3 mm from the tip and mark the opening pick with a permanent marker.
Got to step 2 and realized the fix kit doesn't include an opening pick! Looks like a guitar pick, and I have those lying around. Is that expected? Looks like the pick is used in many steps below. There's a little blue crowbar that isn't mentioned in the instructions. Perhaps that replaces the opening pick?
Hi! I can't see which guide you were using when writing this comment. Can you reply here with which guide and fix kit you used?
I see you posted this in Meta. I hope it's resolved soon! In the meantime, a guitar pick may work well enough for your repair.
what fix kit?
My fix kit didn't include an opening pick either
My AliExpress refurbished screen came with a pick that has a coin-like circle that pops out, so no modification was necessary
-
-
-
Pull the blue handle backwards to unlock the Anti-Clamp's arms.
-
Slide the arms over either the left or right edge of your iPhone.
-
Position the suction cups near the bottom edge of the iPhone just above the home button—one on the front, and one on the back.
-
Squeeze the cups together to apply suction to the desired area.
-
-
-
Heat an iOpener and thread it through the arms of the Anti-Clamp.
-
Fold the iOpener so it lays on the bottom edge of the iPhone.
-
Wait one minute to give the adhesive a chance to release and present an opening gap.
-
Insert an opening pick into the gap.
-
Skip the next three steps.
-
-
-
Heating the lower edge of the iPhone will help soften the adhesive securing the display, making it easier to open.
-
Use a hairdryer or prepare an iOpener and apply it to the lower edge of the phone for about 90 seconds in order to soften up the adhesive underneath.
Hello,
What temperature is suitable for removing the front display ? I bought i-Fixit ProTech which is not include the heating "roller" . Thanks for help
Ich habe eine heiße Wärmflasche verwendet. Das hat gut funktioniert :-)
I used a heated tea kettle and a tea towel, it worked!
I put on the furnace vent for 10 minutes to get it warm to the touch but not hot.
I attached it to the after burner of my rocket ship and that worked.
I used a water-filled ziploc bag, heated it in microwave. fast, cheap, worked.
The most effective way to heat up the glue is to leave the phone in full sun - if it's available. In fact I would always wait for a sunny day to repair any glued together Apple device. The heat will be very even and the phone was probably designed to survive anything the sun can throw at it - although it can get very warm. (I'm in the UK) If you leave the phone turned on it will give a warning if it goes near the temperature limit.
I'm sorry but I tried both the hair dryer (for 3 minutes!) and the eye opener (also 3 minutes) and no luck. Not even a hint of loosening the adhesive holding down the display!! Do I send this kit back for a refund or what??!!
No luck, guys. 3 minutes of hair drying and 3 minutes heating up the iopener. What next?
Okay, a half hour later i finally got the screen loose, but not after super heating it for at leat 10 minutes with a hair drying and burning my hand trying to pry it open. Also, watch out for the power button because it inadvertently keeps switching the phone back on while you wrestle with it. More later . . .
. . . and now I need to buy a new phone!!! the cable broke as I was trying to unscrew one of the top screws, so thanks! I FIXed IT but Good!!!!
-
-
-
Apply a suction cup to the lower half of the front panel, just above the home button.
Even with using high heat from a blow dryer, I had to put the suction cup over the home button or the bottom edge wouldn’t lift at all. That waterproof adhesive is incredibly strong.
As others have said, this part really stinks, but it’ll work if you keep trying. Agree with multiple rounds of hair dryer on high (did about 60-90s each time), and with having to out the suction cup over the home button. You don’t need a big gap to pry it open - it’ll be slight …
Patience is the key here. Expletives and patience. Like previous comments say, putting the suction cup over the home button (I used packing tape to maintain the seal) will allow you to apply force to the proper location to separate the screen. Good luck!
Get a suction cup pliers. It’ll make this part fun
iSclack EVO opened the iPhone easily even without heating with no fear of accidentally over-opening it like with a simple suction cup.
If you don't have the anti-clamp device, to prevent the screen from tearing open when suctioning it, I suggest some layers of tape around it and the back of the phone (the tape has to be stretchy enough to just minimise the momentum when separating the screen), or some big rubberbands
-
-
-
Pull up on the suction cup with firm, constant pressure to create a slight gap between the screen and the frame.
-
Insert an opening pick into the gap.
Just completed a smashed screen replacement, this is probably the most time consuming part. Used packing tape to cover the screen to help create a suction surface (had to replace it a couple times because it pulls away after a purple good pulls ) Used consistent heat for about 5 minutes, then stuck a pick in the tiniest opening… and pry pry pry!
I failed at this step. No amount of heating, pulling, and rocking opened up enough of a gap to slip in even a knife let alone the blue plastic tool. That's with a phone that has an undamaged screen - just trying to replace the battery. Apple won this round :(
Be really careful here. I placed a sucker to the front and rear to help lever off the screen. However, the whole thing came away much easier than I anticipated and I ripped the front part completely away from the rear, tearing all three connector cables. New iPhone required.
Note that the opening pick they show here does not appear to come with the kit, which is a bummer! The plunger, the mini blue crowbar thing, these are too thick. I ended up using a really thin guitar pick.
Following careful methods can mostly preserve the seal and reusable. Won’t be as water tight but probably still pretty good.
Bottom edge is pull up with suction + separating tool. Use small precision scissor to cut any tape that gets overly stretched upon initial opening.
- For the 2 long edges, use an exacto knife to separate the seal from the screen. This keeps the tape on the chassis. Go slow along the long sides. Becareful to avoid scratching the paint on underside of the screen’s edge.
- Top corners have a thick sealed tape. Best to just use separating tool to twist it open.
In summary, top and bottom edge use separating tool. Side long edges can use exacto knife to gradually gently separate the seal from underside of the screen’s edge.
Intact screen, check. Tool kit, check. Hair dryer hot enough to make the phone too hot to touch, check. Following all instructions, check. Screen still in place and refusing to come off, check.
I heated, reheated, pulled and pulled. I simply could not get it off. Worked at it for an hour and a half, and I’m not a small guy. Yes it is hard to hold, but could get a grip. Just could not get it to budge. Off to the iPhone repair shop tomorrow. Anybody want to buy a repair kit and replacement battery?
After struggling for 30m, I looked up some alternate methods and found this helpful:
https://www.youtube.com/watch?v=25zAK5mG...
- I used a utility knife and pried up right under the home button
- the angle matters! I was trying to go too far down before going in. The top surface of the phone is rather thin, so you go in after barely getting under the chassis lip
- tilt utility knife left to right once you’ve got it under to work it in
- leave the utility knife in, and now add that pick
Pro-tip: don't be an idiot like me. Instead, remove the screen protector you have on the phone before applying the suction cups. Derp.
I struggled with a hair dryer at first and a singular suction cup. However, I tried putting packing tape on the spot where I put the suction job (even though my screen isn't cracked) and I was able to do it first try with ease. Definitely recommend packing tape.
Suction cup pliers. Dead easy
After successful screen replacement, returning to give my thanks here. Excellent tips from you all - if you’re using force, you’re doing it wrong. Heat, very very gentle exact-o knife barely down then fully under the screen below the home button … perfect. Slow and patient around the upper corners, and don’t forget to heat there as well! Thank you all!
The problems with this step are (1) not having three hands and (2) managing to hold the phone in a way that doesn't put reverse pressure somewhere else on the screen. Exacto knife was the best tip. It's a little dangerous. On a misstep you may scratch the screen or jab yourself, but it's what got me in.
I used a razor blade and plenty of heat, and it somehow worked like a charm at the cost of me cutting myself. Definitely be careful when doing this, I used the razor blade on the left side of the iphone then wedged in a small screwdriver and then used the pick to cut the rest of the material away.
-
-
-
Slide the opening pick up the left edge of the phone starting at the lower edge and moving towards the volume control buttons and silent switch, breaking up the adhesive holding the display in place.
-
Stop near the top left corner of the display.
-
-
I was trying to replace my battery, and accidentally cut one of the cords on my screen. I marked my pick, so i don't know how it happened.
-
-
Re-insert your tool at the lower right corner of the iPhone, and slide it around the corner and up the right side of the phone to separate the adhesive.
-
-
-
Slide an opening pick underneath the display around the top left corner and along the top edge of the phone to loosen the last of the adhesive.
I did end up using just a smidge of IFIXIT adhesive remover along the edge before opening and that seemed to really help
I have been using the pointed tweezers to pull the adhesive strands apart and out as the display comes off.
This bit was awkward as to get a good grip I kept inadvertently switching the %#*@ phone on!
-
-
-
Open the iPhone by swinging the display up from the left side, like the back cover of a book.
-
Lean the display against something to keep it propped up while you're working on the phone.
Nach RECHTS klappen - nicht nach links!
Als ich das Flachbandkabel auf der rechten Seite sah, hab ich mich auch gefragt, ob die das mit nach Links klappen ernst meinen, und das „Buch“ lieber auf japanische Art nach rechts aufgeklappt. Das sollte dringend in der Anleitung korrigiert werden!
“Up from the left” means lift up the left side.
Which is the same as folding to the right.
“Like the back cover of a book” explains it even more clearly.
Maybe it gets lost in translation?
Fold to THE RIGHT - not to the left!
When I saw the ribbon cable on the right side, I also wondered if they were serious about folding it to the left, and the "book" would rather be opened to the right in the Japanese way.This should be corrected urgently in the manual!
Hi Jim, the display opens from the left side, toward the right side. It should look like the back cover of a book. Hope this helps. Good luck with the repair!
DO NOT LAY THE TWO HALVES FLAT!!! There is a reason why the third photo shows the screen half leaning against a box! This really needs to be a warning in addition to the one about not separating the display.
If you're skipping the screen and taptic engine removal like I did, I suggest you tape the back of the phone to the table, and also tape the screen to the vertical object it lays on, so it stays still. That way you will avoid having to constantly readjust it because of the sliding of the housing of the phone when you're working on it. Be careful where you're putting the tape on the screen though, if you're doing it on the internal components.
-
-
-
-
Remove the following four tri-point Y000 screws securing the lower display cable bracket to the logic board:
-
Three 1.2 mm screws
-
One 2.6 mm screw
Is it really safe to lay the device fully open like a book? The cable leading to the LCD gets stretched across the sharp edge of the aluminum edge of the back cover.
Generally I'd say no, it's not safe. In reality I've seen a bit of variance in the cable length, and sometimes it'll be fine—but mostly I'd be prepared to prop the display up or hold it in place at a slight angle so it doesn't put too much stress on the cables. On prior iPhones it was easy to rubberband the display to a box or a can of soda, and something like that would probably work well here too. Use your own judgment.
You could stick the suction cup back on, near the right side of the phone, with the blue hook oriented in such a way that it becomes a stand for the screen. That way it won’t open much more than 90 degrees, and leaves both your hands free.
Mark -
The tri wing screws are so hard to remove. What's the trick?
I cannot remove one of the corner screws in this step and i have used the tweezers and the y000 tri tip and i am afraid that it is stripping it. is there a work around for this step?
@katmonday1 No workaround unfortunately. Make sure the driver tip is in good condition and fits the screw correctly. Seat it in the screw, hold the driver perfectly vertical, press down hard (and maintain it), and turn. It’ll come out. If it’s really stripped you’ll have to get more aggressive—try one or more of the techniques in this guide or get some help. Good luck!
A tip to remember which screw is which as the differences are pretty tiny: I used different colored sharpie fine-points and made a mark on the top of the screws before removing. I thought about having strips of tape that I stuck similar sizes to, but the coloring seemed to work more easily. I only did this for step 11 and it saved me down the road when trying to differentiate the 1.2 and the 1.3mm screws!
STOP! Before you remove Any screws, be sure to create several bins to hold the various sizes in… or mark them like Trey suggested. I failed to pay attention because I thought they were all the same… they are not. It is very hard to figure out the sizes if you remove them all and store them in a single location.
i had a piece of paper with the steps numbered that involved screws. I had double sided tape on the paper and the number of screws and thier position marked. This was so helpful in removing and then finding and installing the tiniest screws on earth. And i have TINY hands. I can’t imagine someone with large paws being able to accomplish any of this.
there is one screw thats 1.2 mm but its bigger than the others and will fit in no hole of the entire phone. i got it out bot now i have no idea where it has to go i tried every hole. can somebody help me?
what do i do if one of the screws dont want to come off
-
-
-
Remove the lower display cable bracket.
I am confused, please help. LOL the bracket, the very first one being removed. I see it has three screws the same size and one a different size? I've been trying to fix my daughter's phone and ordered a 0.6 mm Tri Wing screwdriver for iPhone 7 plus /Apple watch. It seems to fit the screws and it seems to be turning them although I can't see that well but they're not coming out. However when I used it on a smaller bracket with two screws they came right out so I'm thinking I don't have the right screwdriver I am at my Wit's End!! I have been working on this phone or attempting to for a while now. I cannot find a list anywhere of the exact size screwdrivers needed to Take apart an iPhone 7 plus. Any help would be greatly appreciated.
If your tri-wing screwdriver worked for other tri-point screws in the phone, then it should work for the screws you are struggling with! If it feels like the screws are spinning but not coming out, try to use tweezers to pull them out. I often struggle with tri-point screws, and need to apply some downward pressure to remove them. This can be risky though, as you do not want to strip the screw or damage components underneath the bracket. If you continue to struggle, you can give this driver and this bit a try.
Also be aware that the battery connector might stick to the bottom of the steel bracket. This part had me a bit puzzled at first. lol
Just gently pry the connector off the steel bracket to release it and be sure the connector isn’t allowed to accidentally reconnect to the board.
-
-
-
Use the point of a spudger to lift the battery connector out of its socket on the logic board.
on reassembly, make sure that the connector cable is back in place, along side the battery, and not up, or on top in any way.
I slipped a small piece of paper under the flap.
After this step it is worth jumping to step 36 and disconnecting the lighting connector assembly (indicated with the orange rectangle) and connecting the new cable to test it out. After attaching the new lightning connector assembly, reattach the battery, and try plugging it in to see if the new assembly works correctly. If it does, then power down the phone, disconnect the battery, and disconnect the new lightning connector assembly. Then continue. If it doesn’t work, this check will save you a couple of hours of work.
-
-
-
Use the flat end of a spudger or a fingernail to disconnect the two lower display connectors by prying them straight up from their sockets on the logic board.
What can happen if the battery is not disconnected before the two lower display connectors?
Hello, by my expierence and what i have learned iphone repair videos you can ‘blow up’ capacitors which one in logic board, screen is sensetive with voltages and etc….
When I removed the lower display cable bracket in step 12, the top connector stuck to the bracket and became disconnected.
My replacement screen wouldn't sit in the display connector properly, (wouldn't clip in both sides at same time) so I made sure it sat on one and it was lined up and got a thin piece of dense sponge and placed that over the connector, then proceeded to install the connector shield and screen works perfectly fine without a hitch. Very good tutorial just earnt me £25 lol
have the same issue, sometimes it doesn’t sit on the left side, other time not on the other, the difference is iphone not starting at all or looping with apple logo reboot…
ibisiki -
-
-
-
Remove the three tri-point Y000 screws securing the bracket over the front panel sensor assembly connector:
-
One 1.3 mm screw
-
Two 1.0 mm screws
-
Remove the bracket.
Posted a comment above on the first step. The screwdriver that I ordered Works taking out these two screens shown in the picture. However it does not work on the first bracket that needs to be removed. It seems that all screw sizes are somewhat different but I'm not finding a list showing different screwdriver sizes needed. Does this make sense? Could anybody please give me some advice on this thank you much.
What happens if you break “tear in half” the black tape stuff?
Unfortunately if you tear the black cable you will need to replace it !!!
Chris West the screwdriver that probably came with the kit was pentalobe to get the first two screws out to open the case. you need a .6mm Y tip driver for internal. its deceptively Phillips looking but is not it only has three blades in a Y, not 4 in a +
I called the y tip a triangle tip until I read these comments. Thanks for the correction
Hello is it if I put wrong screw can damage the board?
Care should be taken while removing the last 1.0mm screw, on the far right in the picture. This screw is screwed into another screw (or standoff) beneath the bracket. This standoff may come unscrewed and upon removing the bracket you may find the screw and standoff are still attached to the bracket. Do not lose this part if you decide to separate them , the standoff is not a normal phillips, and may require a special driver to reinstall. I used the phillips to start it back in, and relied on the screw to tighten it upon reassembly.
I know this is late bit a trick I use to put the standoffs in (had to do 2 cause someone lost the screws I was replacing) is to take the screw that goes in it srew them together loosely to give it a fake phillips head then gently screw both into the spot the standoff goes in. you can then take the phillips out (may need to put a spudger between the screw and standoff to keep the standoff down then use a tiny flathead to gently tighten the standoff down. its a few steps but makes life easier if you need to replace it quickly.
I was able to remove the first 1.0 mm three tri-point Y000 screw from the bracket but I cannot for the life of me get the other 1.0 mm screw undone or the one 1.3 mm screw undone. Any tips?
I tried pressing down a bit harder and I even put the first screw back in to see if it helped me loosen the other two but it did not work.
My screwdriver was doing the job up until this point, and I’m worried I’ll strip the screw if I keep trying.
Would appreciate any advice!
Dear IFixit: First, I want You to know I love your repair guides. I consider You to be the absolute best repair manuals available. But, hopefully as your friend I am going to point out once the bracked is removed a 2.0 mm Standoff screw should appear. It’s 1 of 2 screws holding the Antena Flex Cable in place. Rob
-
-
-
Disconnect the front panel sensor assembly connector from its socket on the logic board.
Make sure that the orientation of the cable when you attach is correct! See the picture for the correct orientation. If it gets installed 180 degrees out(i.e., the ribbon goes up instead of down, then the earphone, front camera, and Home button will be inoperative. Ask me how I know!?! Worked great when installed correctly!
Thanks Kevin. I would be stuck if I hadn't read your comment!?! Great input.
That's save my life!thanks god!
neg -
-
-
-
Remove the display assembly.
When removing the old adhesive from the edges, duct tape can be useful. Simply use small strips of duct tape and your spudger to press the tape’s adhesive side carefully into the edges of the phone’s display and slowly peel the duct tape away from the display. The duct tape should pick up the remaining adhesive and carry it away from the edges. use the tip of the spudger to gently scrape away any remaining dirt or film from the crease around the edge and repeat the action with a new strip of tape to pick up any dirt, adhesive or grime from the surface. This should save considerable time.
Thank you for including a link to the iPhone Display Adhesive Replacement guide, this was very helpful!
is it really necessary to remove the display? the screen connectors are delicate and I fear re-assembly errors. I changed the battery and did not remove any screen connectors. no problems.
Due to the fact that THIS is the repair guide for replacing the DISPLAY it IS necessary to remove the display connectors. There is another guide for changing the battery -- you might want to follow that one.
Hannes -
I did not remove the display and ended up ripping one of the lower display cable ribbons when I turned the phone to remove one of the connectors. Be careful. I had to get a new display and move the Touch ID button.
I think that moving the replacement of the seal lower in the chain of events would be more beneficial. I'm replacing the battery, and stretching the adhesive tabs that held the battery in at a low angle kept sticking themselves to the newly-installed adhesive seal.
In the end, I wound up having to just remove the section of the seal along the bottom of the case :-/
If I'd been looking at the bigger picture, I'd have wanted to put the seal on right before reattaching the screen cables.
This guide does not show you the removal process for the top camera assembly. My screen looks like the one pictured but my replacement doesn't have the top connector or any of the front facing camera components and since the ribbon for the connectors looks like its coming out from underneath the display I can't see how to swap it over to the new display.
-
-
-
Remove three Phillips screws securing the antenna component:
-
Two 1.3 mm screws
-
One 1.2 mm screw
It is not necessary to remove the logic board. remove the three standoff screws and the simcard holder and push back the sim ejector pin and you can lift the logic board up about 7mm. with isopropyl to loosen the adhesive, slide a spudger under the old charge port cable you can easily slide it out. Makes the job a lot easier and quicker.
Yep it works, Jack. Thank you.
Simon -
Thanks Jack,
Followed your advice and saves a fair bit of work.
To each it’s own, but it was much better for me once I went through the steps and took the logic board off. It’s not hard. Without taking the board off, I found that the logic board is just too rigid to easily lift it up by 7mm. Plus the old Lightning Port assembly is stuck on the case pretty strong and putting the new one in with the adhesive and lining it up correctly would be impossible for me without the logic board clear out of the way. My personal recommendation is to stick to the script on this iFixit process.
-
-
-
Remove the 1.3 mm Phillips screw securing the antenna component to the top edge of the rear case.
This screw is slightly larger than the other 1.3mm ones. Don't mix it up like me.
-
-
-
Remove the top left antenna component.
-
-
-
Insert a SIM card eject tool or a paperclip into the small hole in the SIM card tray.
-
Press firmly to eject the tray.
-
-
-
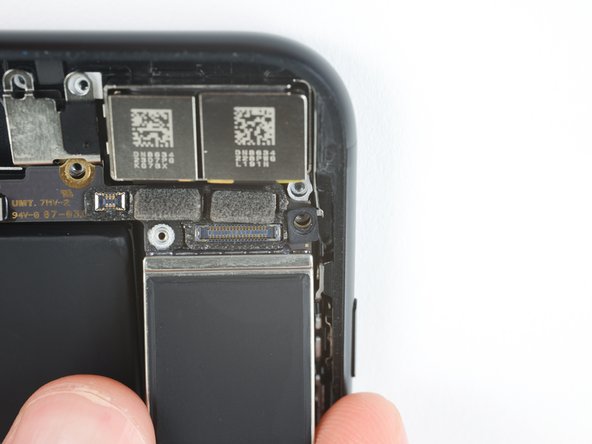
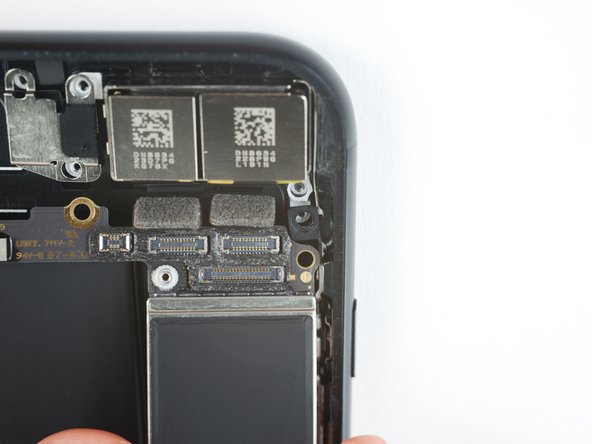
Use an iFixit opening tool or a fingernail to disconnect the dual camera cable connectors by prying them straight up from their sockets.
-
-
-
Remove the two screws securing the rear-facing camera bracket:
-
One 1.6 mm Phillips screw
-
One 2.2 mm standoff screw
Why is there a standoff screw here? No other screw goes into it so why not have a Phillips?
More to the point, why doesn’t the Ifixit tool kit for this job come with the bit required?
Second that, sitting here trying to figure out how to get it out.
iFixit kits do come with all the required bits, but sometimes specialty bits like this one are packed into a different part of the box. Unpack the entire kit and you should find it. In the unlikely event that it really is missing due to a packing error, contact customer support and they’ll send you the missing bit ASAP.
I strongly urge Ifixit to change this comment “In a pinch, a flathead screwdriver will do the job” - maybe ok for REMOVAL ONLY, but for REASSEMBLY - it is very dangerous - i used a flathead while fixing my daughters phone and they kept going crooked - easily causing me 1-2 hours of frustration and STRIPPING THE THREADS IN THE ALUMINUM BACK FRAME BODY !!!!
I had to hot glue a couple spots and skip several screws on reassembly to do the jankiest, most embarrasing repair job - BUY THE RIGHT SPECIAL TOOL FOR THE STANDOFF SCREWS OR YOU’LL REGRET IT!!!
There is no tool for this special screw. What gives?
My kit has the standoff bit, just wasn't in the tool tray, it was loose in the box with another bit.
I tried it with the flat blade instead of the standoff screwdriver and it worked, but I figure it added about 15 minutes of fumbling around and some risk of slipping and stripping. I have the iFixIt kit with like 80 bits so I just assumed it would be in there. Had I known before starting, I would have definitely gotten a standoff bit, just for the peace of mind.
-
-
-
Remove the 1.3 mm Phillips screw securing the antenna flex cable to the top edge of the iPhone's rear case.
-
Remove the remaining Phillips screw from the antenna flex cable.
Evan O is right! There is a 2.0 mm Standoff screw right below; and possibly slightly left, of the top 1.3 mm Phillips screw. It should actually show up in Step 15 as soon as the bracket is removed. Rob
-
-
-
Tilt the antenna flex cable up toward the top of the iPhone.
-
Slide the screw boss down and out of its recess.
-
Remove the antenna flex cable.
What is underneath the Antena flex Cable?
I’m still waiting for response. Someone had the nerve to ask me, ‘Which Antena flex Cable?’ with response.
IfixIt: I need You to clarify something I just descovered. I just received different iPhone 7 Plus and Antena flex cable came off and left Standoff screw still on logic board. Different iPhone 7 Plus actually has Standoff screw attached to cable in way it’s impossible to separate.
Rob
-
-
-
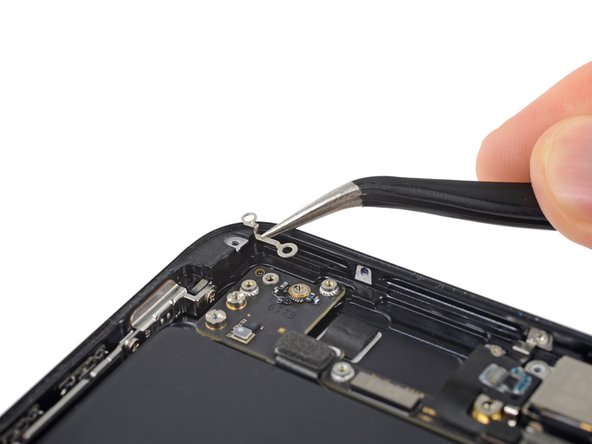
Use a thin pry tool or tweezers to carefully pry up and disconnect the two coaxial cable connectors from the logic board.
What purpose do these coax cables have?
Note… the top coax (nearest the battery connector) leads to the WiFi Diversity Antenna on the speaker assembly. The other coax is for the secondary cell antenna, part of the lightning assembly. Be sure to reassemble them to the right sockets!
Thanks so much for this helpful comment! I have just spent a few hours trying to find that information and here it is.
thalley -
Thank you so much, same as Thalley, more than 30 minutes that I’m searching for this info everywhere !!
Any tips on remembering which coax goes to which socket?
Thanks, I was almost certain but the OEM part came with longer coax, your post saved me time, and reasured me ;)
Ronald Stamper, is this the same for the 7?
%#*@, the ifixit's coaxial connector's quality is such a rubbish. needed a lucky chance to actually insert it into the slot
-
-
-
Remove the seven screws securing the logic board:
-
One 1.3 mm Phillips screw
-
Two 2.1 mm standoff screws
-
One 2.0 mm standoff screw with a large head
-
One 2.0 mm standoff screw with a small head
-
Two 2.2 mm standoff screws
I did not have the 2.0mm standoff screw (closest to the edge of the phone by the power button). The bracket over the front panel sensor assembly connector (Step 15) was screwed in to this spot.
I experienced the same.
BEWARE. THIS GUIDE IS WRONG. Whoever did this guide is obviously an amateur who doesn't know what they're doing. The standoffs are vastly different from each other in width and design. There is a SPECIFIC standoff for the top "yellow" circle which connects to the ground clip.
DO NOT REMOVE THESE SCREWS / STANDOFFS WITHOUT CAREFULLY DOCUMENTING EACH INDIVIDUAL LOCATION AND SCREW
FIX YOUR GUIDE!!!
Pablo is right, there IS a visible difference between the two yellow 2.0 mm standoff screws - make a note of which is which (label, drawing, etc.) when you’re at this step.
1) The fact iFixit marks tho DIFFERENT SCREWS as IDENTICAL i s a big shame. Really guys, DO go an extra mile and account screws thoroughly. Luckily other screws seem to be marked correctly
2) since iFixit was lazy to compose a build-up instruction:
better take care of connecting the ports BEFORE you screw tightly the board to the rest of the phone! This gives you some degree of freedom to move the board a bit to be able to click the ports in without destroying them -- its especially the case for the connection with the lightning board, where the chip might be misaligned by a fraction of a millimetre in the direction along the chip even if you placed the lightning chip perfectly in terms of those two pins mentioned below -- you just won't have enough length of the flat cable to align the port (because the flatness and shortness of the cable blocks the movement in the direction you need to align) and risk pressing flat the tiny contacts.
Hi all.
Thank you for leaving your comments! We have changed the guide accordingly to show two separate screws with larger and smaller screw heads. Going forward, you can always directly edit the guides if you have any improvements—we are a wiki after all!
-
-
-
Use the point of a spudger to carefully de-route the two coaxial cables from the small metal clip holding them to the logic board.
-


To reassemble your device, follow these instructions in reverse order.
To reassemble your device, follow these instructions in reverse order.
İptal et: Bu kılavuzu tamamlamadım.
102 farklı kişi bu kılavuzu tamamladı.


20 Yorum
Can we use iphone 7+ 32gb board to a iphone 7+ 128 GB
You can purchase motherboard from this website.
It's really tough to install Board component but this guideline really helpful..
organize your screws and look at the %#*@ guide
Is there a reason why I swapped the motherboard of a Verizon iPhone 7 plus onto a Sprint iPhone 7 plus but now boot ups take 5+ minutes and the phone displays “accessory may not be supported” when connected to a charger?
The reason might be because you haven’t connect finger print (home button) into the motherboard.
kabore -
did you ever find a fix to your problem?
I am trying to find the correct motherboard to purchase for my 256GB iPhone 7 Plus (with finger print ID). does anyone know where to get the correct one? Thanks!
Hi, I need the board for the iPhone 7+ 256GB with the fingertouch (which are paired).
Where did you get yours? can you help me? Did you buy yours?
Can you write directly to raul@miodo.com.ar
Thanks,
R
If the flash is not working on the iPhone 7 plus, from which I want to get the logic board out, will it work on the “new” iPhone where I want to put it in, or are these errors connected to the motherboard?
I have the board, showing red (water damage); however, the battery warms up. If charge, noting else. If need to replace the motherboard, will i lose all the data inside? I’ve also order battery and digitizer, hoping that will do. The top part just above the white dot which turns red (motherboard) near antenna, looks burnt. Help
Hi, I need the board for the iPhone 7+ 256GB with the fingertouch (which are paired).
Where did you get yours? can you help me?
Can you write directly to raul@miodo.com.ar
Thanks,
R
peut on mettre la carte mère d’un iphone 7 sur un 7 plus?
Very Helpful, thanks!
I found it is essential to have a magnetic board like the one iFixit sells in order to keep the screws all in order. If you mix them up, you’ll need an accurate digital caliper or a precise analog micrometer to measure the screws for length.
I found the instructions super helpful in completely drying out my iPhone 7Plus after it suffered from a dunking well along in its life. I had replaced the battery myself a year ago, and although I thought I had properly sealed it, it still leaked. I was able to get it dried out and back in order by following these instructions to remove the logic board and then do a heated dry with a blow dryer for five or so minutes on low while monitoring it carefully with my hand and an IR thermometer.
The recommendation of discharging the battery is completely unnecessary. Even a 25% charged battery can explode. Completely ridiculous suggestion.
pargoff - Yanıt
The risk of thermal runaway on these batteries decreases with the battery's SOC (state of charge). Below 50% charge the risk is fairly low, and at 25% charge the risk of a thermal event is near zero. If I recall correctly, the same suggestion appears in Apple's official (non-public) service manuals for the iPhone.
Jeff Suovanen -
@jeffsu Yes, that is correct. Apple does require all certified staff to discharge the battery below 25%. This is an industry standard for all LiION batteries. If you don’t want to do this, just make sure to not puncture the battery and disconnect it first thing.
iHelpU.Tech - Yanıt
Hang on a second here, doesn’t the Ifixit part I ordered come with the seals? The display assembly? It doesn’t. Now I have to wait another week?!
Vanessa Pinter - Yanıt
How do you turn off if the screen isn’t responding to touch?
adam - Yanıt
The replacement battery came with the seal—but how do you put it on???
lkollar - Yanıt
Instructions for replacing the seal are here: iPhone Display Adhesive Replacement
bester - Yanıt
I just found the instructions on how to install the seals AFTER I was completed and had to figure it out. Maybe, just maybe you should link this somewhere on the guild instead of buried in a comment. Just a thought.
Charles Meitin - Yanıt
Step 1 is: Read through all the steps and comments or the method prior to starting on this Step 1. There's a lot of much needed information and experience that you can learn from which will reduce the chance of struggling, wasting time or even breaking your device.
My favourites are:
Use a hot water bottle.
Label all screws you remove with their size and location on a piece of paper with double sided sticky tape.
Test the lightning assembly at step 13
There is a Standoff driver bit in the box, don't use a screwdriver.
etc...
Neil Eriksen - Yanıt
A tip for looking out for all those little screws. I used an ice block tray, for all the little screws etc. I numbered each with the step number, as in the instructions, but not all steps have bits to look out for. Where two different size screws are used I had a tray for each size and marked step a and step b. For this I coloured each tray sticker with the colour of the screw as shown in the instructions. All this worked a treat with no confusion or using the wrong part.
Herb
Herb Adler - Yanıt
The screw size for those with a screw set is P2.
Gareth Flandro - Yanıt