
Google Pixel 3a XL Battery Replacement

Giriş
1. adıma gitThis repair guide was authored by the iFixit staff and hasn’t been endorsed by Google. Learn more about our repair guides here.
Follow this guide to replace the battery in your Pixel 3a XL.
If your battery is swollen, take appropriate precautions. For your safety, discharge your battery below 25% before disassembling your phone. This reduces the risk of a dangerous thermal event if the battery is accidentally damaged during the repair.
The Pixel 3a XL’s display panel is fragile. If you plan to reuse your screen after this repair, be sure to pay special attention to the warnings in the opening procedure.
Neye ihtiyacın var
Tamir Seti
Bu kit, bu kılavuzu tamamlamak için gereken tüm parçaları ve araçları içerir.

Parçalar


Aletler


Daha fazlasını göster…
Videoya Genel Bakış
-
-
For reference, the backside of the screen is shown in this step.
-
Note the narrow clearance between the edge of the screen and the OLED panel under the glass. If you plan to re-use your screen, be sure to follow the instructions below closely.
-
Also note the two different seams between the body of the phone and the screen:
-
The screen seam: where the screen meets the rest of the phone. This is where the screen will separate, and where you should pry.
-
The midframe seam: where the midframe meets the body of the phone. This part is held down by screws. Do not pry at this seam.
-
-
-
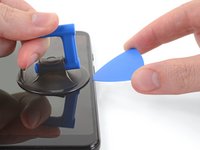
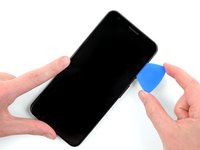
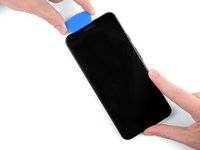
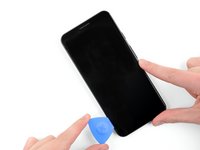
Place a suction cup on the right edge of the screen, just below the volume button.
My screen was SUPER shattered right in this spot — just below the volume button to the bottom right corner and with another shatter diagonal toward the bottom center. You can place the suction cup in a different location and start the prying, as long as you’re not trying to start it at the top or bottom edge. I started above the volume button but below the top edge.
-
-
-
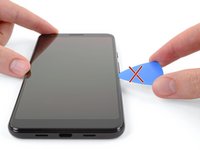
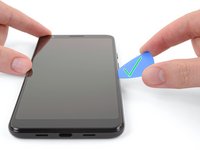
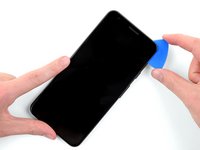
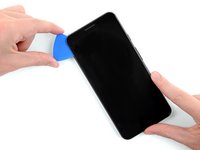
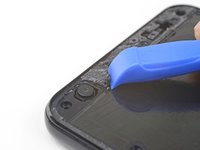
If you aren't careful, the plastic opening tool can damage the fragile OLED display panel underneath the glass.
-
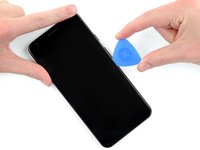
If you want to re-use your phone's screen, make sure you insert your pick at a downward angle, as shown in the second photo of this step.
-
This will ensure the opening pick slides under the OLED panel rather than between the glass and the panel, which will ruin the screen.
-
-
-
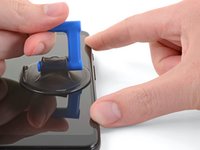
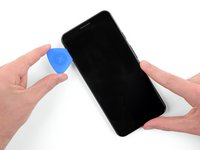
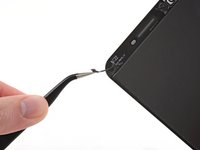
Pull up on the suction cup with a strong, steady force to create a gap between the screen and the phone.
-
Insert your opening pick into the gap.
-
Stop if you feel the tip of the pick hitting against something. The pick may be pressing against the edge of the OLED panel. Angle the pick downward and try again.
-
-
-
If you plan to reuse your screen, heat up the top edge of the phone with an iOpener, a heat gun, or a hair dryer to loosen the adhesive there before you begin slicing.
-
-
-
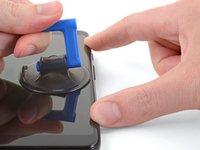
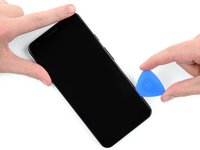
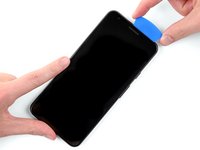
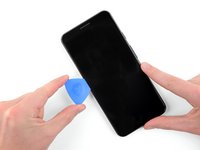
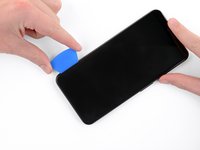
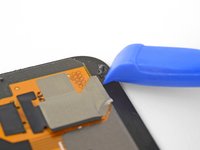
Carefully slide your opening pick around the upper-right-hand corner of the screen.
-
If you plan to reuse your screen, take special care in this step to either keep your pick deep in the phone under the OLED display (as shown in this step's photos), or only insert it 5 mm into the device to avoid coming into contact with the display under the glass.
-
-
-
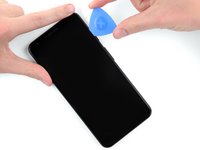
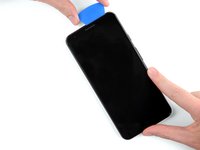
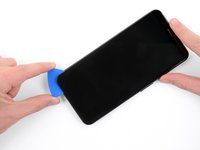
Continue to separate the adhesive along the top edge of the display.
For me, there were multiple cracks/shatters around the bottom edge and bottom right edge. It was a huge pain to get the screen off—I eventually pulled most of the screen off and then had a bunch of shattered pieces still stuck to the bottom edge that I had to take off with the tweezers. If you’ve got some really bad shattering around the TOP edge, you’ll have to be extremely careful here.
-
-
-
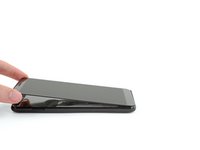
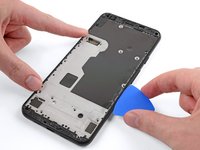
Slide your opening pick along the bottom edge of the phone to separate the last of the adhesive holding the screen in place.
-
If you plan to reuse your screen, take special care in this step to either keep your pick deep in the phone under the OLED display (as shown in this step's photos), or only insert it 5 mm into the device to avoid coming into contact with the display under the glass.
-
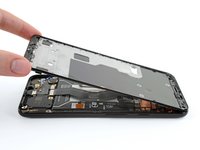
Don't try to remove the screen yet! It is still connected to the phone by a display cable.
-
-
-
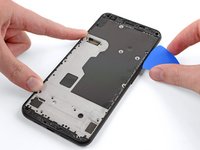
Remove the screen from the phone.
-
Compare your new replacement part to the original part. You may need to transfer remaining components such as the speaker grille and the camera bracket to the new part.
Keep your broken screen! Your replacement screen may be missing two pieces - the top speaker grill and the grey plastic camera surround. You’ll need to salvage these carefully from your old screen. Heat the glue to soften it before removing, if you’re lucky it will still be attached to the pieces and you can simply stick them onto the new screen.
Good point! I will add a note to point this out.
-
-
Bu adımda kullanılan alet:Tesa 61395 Tape$5.99
-
Use tweezers or an opening tool to remove all traces of adhesive from the phone frame. You can use high concentration isopropyl alcohol to help with the cleaning.
-
If you plan to re-use the screen, be sure to remove all adhesive residue from the screen. Be careful with metal tools to avoid scratching the screen.
-
Apply pre-cut adhesive or double-sided tape (such as Tesa tape) to re-attach the screen to the frame.
Maybe it’s because I didn’t heat my adhesive enough but it took me FOREVER to get it fully off. I was scraping with the flat side of the black spudger but it would have been better to use the blue scraper, which is in this kit but never mentioned. The kit also includes a single 70% isopropyl alcohol wipe but I needed at least 3. You can buy boxes of hundreds of the little pads at any drugstore—they’re good to have on hand for first aid kits, too. Be sure to get the adhesive off the narrow edges along the sides, I used the pointy end of the black spudger for that.
When you go to apply the pre-cut adhesive, it will be harder than correctly applying screen protectors. Although it’s awkward, align it from the top first without taking the backing off, make sure it’s flush all the way down. fix it in place at the top with your hand and then remove the backing. Hopefully that will help apply it evenly. I started from the bottom and it was a huge mistake. If you mess it up and try to peel it up, the narrow adhesive on the sides will stretch a lot and you’ll have to break it and then sort of carefully nudge it into place millimeter by millimeter. I had to do this and used the pointy black spudger end. Even so, I was able to get it relatively flat and the screen seems pretty flush with the body.
I did all thoses steps but didn’t glued the screen yet and it’s not working do I need to glue it to make it function or is there another problem?
Sealing your phone after a repair won’t interfere with its function. Good choice to test the phone before installing replacement adhesive, though! Sounds like it will need more troubleshooting. Head on over to our Answers community if you get stuck!
-
-
Bu adımda kullanılan alet:Magnetic Project Mat$19.95
-
Remove the following 4.3mm screws:
-
14 silver T3 Torx screws
-
2 black T3 Torx screws
In my phone the silver screw along the left edge between the black screw and the top-left corner took a T-4 bit.
You are correct! Thank you very much!
正解です!ありがとうございました!
-
-
-
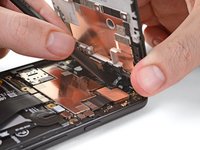
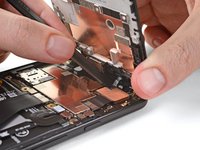
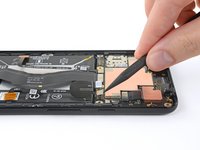
This takes a bit of patience and finesse. Once you have the connector aligned, you can also use a finger to gently press the connector onto the socket.
Should you not disconnect the battery first?
Hi Brian,
Good catch! In this situation, it is alright to keep the battery connected, as long as you do not use metal tools. We usually instruct users to disconnect the battery early on for two main reasons: to prevent accidental damage to the internals via electrical shorts, and to prevent damage to the display backlight circuitry for certain phones.
-
-
-
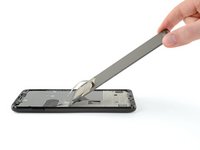
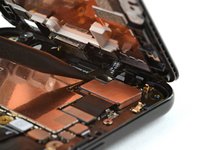
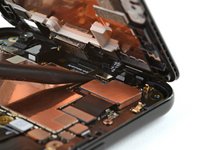
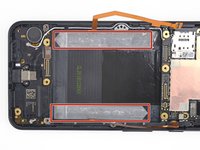
Use the pointy end of a spudger to lift up and disconnect the lower half of the thick board interconnect cable that runs over the battery.
-
-
-
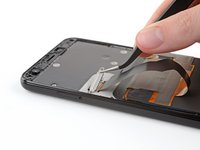
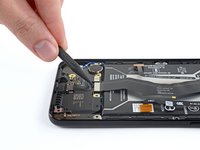
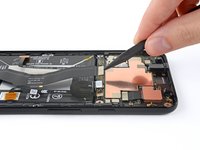
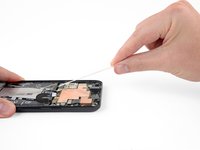
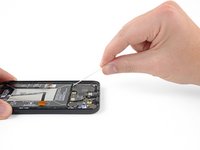
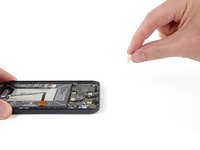
In the following steps, you'll pull out the two adhesive tabs underneath the battery. This special stretch-release adhesive loses its tack when stretched, allowing you to lift out the battery with ease.
-
Don't press down on the battery. Hold the phone firmly by its sides.
-
Keep the strips flat and unwrinkled as you pull.
-
Pull very slowly, giving the strip time to stretch and separate. It takes around 15-30 seconds of stretching to remove each strip.
-
Pull at a low angle so the strip doesn't snag along the bottom edge of the battery.
-
-
Bu adımda kullanılan alet:iFixit Adhesive Remover$19.99
-
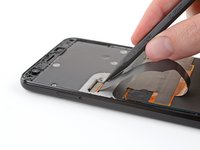
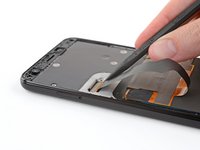
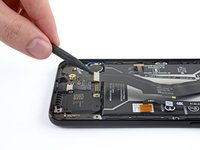
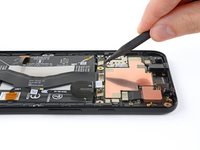
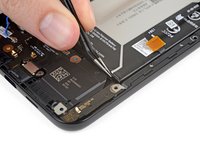
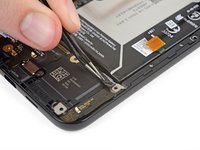
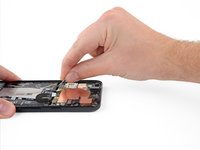
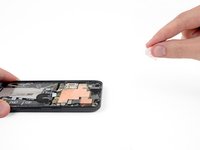
Repeat the previous two steps for the left adhesive strip with the pull tab at the upper-left edge of the battery.
-
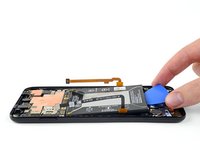
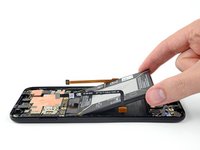
Prepare an iOpener or use a hair dryer to heat the rear case directly behind the battery. Once the case is just barely too hot to touch, use an opening pick or a spudger to carefully pry the battery out of the phone. Do not apply the iOpener or any other form of heat directly to the battery.
-
Apply some high-concentration isopropyl alcohol or adhesive remover along one edge of the battery and then tilt the phone so the liquid will run underneath the battery and weaken the adhesive. Wait a few minutes, then use an opening pick or a spudger to carefully pry the battery out of the phone.
-
-
Bu adımda kullanılan alet:Tesa 61395 Tape$5.99
-
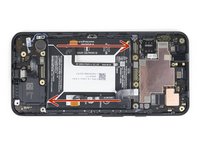
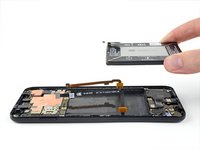
Lift up one edge of the battery with an opening pick and lift the battery out of the phone.
-
Remove any battery adhesive remaining on the phone.
-
Install replacement stretch-release adhesive or double-sided tape such as Tesa tape in the phone's battery cavity where the original adhesive was applied.
-
Gently set the battery in place. Temporarily connect the battery's connector to the motherboard to ensure that the battery is properly positioned.
-
Press the battery firmly in place with your fingers.
-
Disconnect the battery from the motherboard and resume re-assembly.
-


To reassemble your device, follow these instructions in reverse order.
For optimal performance, calibrate your newly-installed battery: Charge it to 100% and keep charging it for at least 2 more hours. Then use your device until it shuts off due to low battery. Finally, charge it uninterrupted to 100%.
Take your e-waste to an R2 or e-Stewards certified recycler.
Repair didn’t go as planned? Check out our Google Pixel 3a XL Answers community for troubleshooting help.
İptal et: Bu kılavuzu tamamlamadım.
10 farklı kişi bu kılavuzu tamamladı.

3Kılavuz Yorumları
Hi and thanks for these instructions. They worked great.
The bit required to get the screws out is Torx T4. not T3. T3 did it okay, until a wee bit more torque was required. Then, the screw sheared off bits of my new screwdriver and I was left flummoxed for a moment.
Could you please update that? Cheers! Al.
Honorable Albert Einstein,
Great callout! Due to variances in tolerances, sometimes a T3 Torx bit isn't the best fit in T3 Torx screws. Like you pointed out, sometimes a T4 bit will fit better—sounds like this is one of those cases. (It also happens in MacBooks!)
I just added a note in a couple of the steps that use T3s (like this one).
Thanks!
I just want to ditto the warnings when removing the screen, as this was my first phone repair and I ended up breaking the OLED panel by hitting the corner with an opening pick. Really do not insert the pick very far into the phone especially at the bottom of the screen. The bottom left and right corners have very little clearance to the display glass and electronics.
I found it very helpful to print a picture of the midframe and set the screws on that picture to remember where they go.
The note about the different seams is very helpful! Thank you for including this!
David - Yanıt