Ana içeriğe geç

Logitech MX Vertical Battery Replacement

Neye ihtiyacın var

  1. Logitech MX Vertical Battery Replacement, Turn off the mouse: adım 1, 1 resimden 1.
    • Before you begin, flip the mouse's power switch into the OFF position.

  2. Logitech MX Vertical Battery Replacement, Lay the mouse buttons-side down: adım 2, 1 resimden 1.
    • The mouse's unique shape prevents it from laying flat. If you need to, lay it button-side down onto a soft towel to prevent wobble.

  3. Logitech MX Vertical Battery Replacement, Heat the feet adhesive: adım 3, 2 resimden 1. Logitech MX Vertical Battery Replacement, Heat the feet adhesive: adım 3, 2 resimden 2.
    • If you're planning to reuse your existing mouse feet, note that the adhesive needs to be thoroughly heated for them to be cleanly removed.

    • Heat an iOpener and apply it to the feet on the mouse's underside for about two minutes.

    • Alternatively, a hair dryer or a heat gun may also be used, but be careful not to overheat the mouse.

  4. Logitech MX Vertical Battery Replacement, Remove the mouse feet: adım 4, 3 resimden 1. Logitech MX Vertical Battery Replacement, Remove the mouse feet: adım 4, 3 resimden 2. Logitech MX Vertical Battery Replacement, Remove the mouse feet: adım 4, 3 resimden 3.
    Bu adımda kullanılan alet:
    Tweezers
    $4.99
    Satın Al
    • Insert one arm of a pair of sharp tweezers underneath the end of one foot.

    • Grip the foot and begin to peel it away from the bottom of the mouse.

    • Peel slowly, making sure the foot and its adhesive are removed in one piece.

    • The foot should come away from the mouse without the need for much force. If it feels stuck, apply more heat and try again.

  5. Logitech MX Vertical Battery Replacement: adım 5, 3 resimden 1. Logitech MX Vertical Battery Replacement: adım 5, 3 resimden 2. Logitech MX Vertical Battery Replacement: adım 5, 3 resimden 3.
    • Use a pair of tweezers to peel the foot away from the mouse to completely remove it.

    • Place the foot adhesive-side up on a clean surface.

  6. Logitech MX Vertical Battery Replacement: adım 6, 3 resimden 1. Logitech MX Vertical Battery Replacement: adım 6, 3 resimden 2. Logitech MX Vertical Battery Replacement: adım 6, 3 resimden 3.
    • Insert a tweezer arm underneath the end of the second foot.

    • Peel the foot away from the mouse to completely remove it.

    • The foot should come away from the mouse without much force. If it feels stuck, apply more heat and try again.

    • Place the foot adhesive-side up on a clean surface.

    • During reassembly, remove any leftover adhesive before installing new feet.

  7. Logitech MX Vertical Battery Replacement, Remove the case screws: adım 7, 1 resimden 1.
    • Use a Phillips screwdriver to remove the five 6.5 mm recessed screws securing the two halves of the mouse casing together.

  8. Logitech MX Vertical Battery Replacement, Separate the two halves: adım 8, 3 resimden 1. Logitech MX Vertical Battery Replacement, Separate the two halves: adım 8, 3 resimden 2. Logitech MX Vertical Battery Replacement, Separate the two halves: adım 8, 3 resimden 3.
    • Don't try to completely remove the upper half, as both halves are connected with a fragile ribbon cable.

    • Lift the top half of the mouse away from the bottom half.

    • Lay the top half of the mouse, buttons down, onto your work surface.

    • Take care to not strain the ribbon cable connecting the two halves.

  9. Logitech MX Vertical Battery Replacement, Disconnect the battery: adım 9, 2 resimden 1. Logitech MX Vertical Battery Replacement, Disconnect the battery: adım 9, 2 resimden 2.
    Bu adımda kullanılan alet:
    Tweezers
    $4.99
    Satın Al
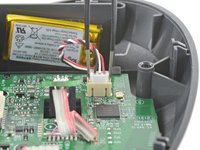
    • Use a pair of blunt tweezers to grip the edges of the battery cable connector, and pull up to disconnect it from the motherboard.

    • Always pull cables by their connectors and not the wires themselves.

  10. Logitech MX Vertical Battery Replacement, Remove the battery: adım 10, 2 resimden 1. Logitech MX Vertical Battery Replacement, Remove the battery: adım 10, 2 resimden 2.
    • Peel the battery away from its shelf.

    • The battery is secured with some light adhesive.

    • Remove the battery.

    • To install a replacement battery:

    • Remove any leftover adhesive from the battery shelf.

    • Apply double sided tape or pre-cut adhesive to secure the new battery.

Sonuç

To reassemble your device, follow the above steps in reverse order.

Take your e-waste to an R2 or e-Stewards certified recycler.

Repair didn’t go as planned? Check out our Answers community for troubleshooting help.

6 farklı kişi bu kılavuzu tamamladı.

Carsten Frauenheim

Üyelik tarihi: 03/10/20

115.255 İtibar

339 adet Kılavuz yazıldı

Ekip

iFixit iFixit üyesi

Staff

136 Üyeler

17.430 adet Kılavuz yazıldı

8 Yorum

¡Excelente guia! ¡Parece haber sido hecha por el fabricante! ¡Muchas gracias!

Erick Caliz Morales - Yanıt

Where can I purchase a known good new battery (OEM preferred)?

Frank - Yanıt

Is it actually important to replace with the same mAh value?
Or can I go with something bigger as long as the voltage is 3.7V, the connector is the same and the battery actually fits inside the mouse?

Gunnar Arneby - Yanıt

Looking for the same info as the other commenters, where can I find the replacement battery for sale and are the other ones you sell for similar logitech models good enough to replace for this one?

Dylan - Yanıt

You can find the replacment battery here: https://www.cutratebatteries.com

Just search AHB521630PJT-04

You're welcome!

Kilowatt - Yanıt

Yorum Ekle

İstatistikleri Görüntüle:

Son 24 Saat: 13

Son 7 gün: 147

Son 30 gün: 657

Her zaman: 17,294