Ana içeriğe geç

Motorola Moto X Pure Edition Battery Replacement

Neye ihtiyacın var

  1. Motorola Moto X Pure Edition Battery Replacement, SIM Tray: adım 1, 2 resimden 1. Motorola Moto X Pure Edition Battery Replacement, SIM Tray: adım 1, 2 resimden 2.
    • Insert a SIM card eject tool, bit, or a straightened paperclip into the small hole in the SIM card tray.

    • Press to eject the tray.

    • This may require a significant amount of force.

  2. Motorola Moto X Pure Edition Battery Replacement: adım 2, 1 resimden 1.
    • Remove the SIM card tray from the phone.

    • The SIM card will fall out of the tray easily.

    • When reinserting the SIM card, ensure that it is in the proper orientation relative to the tray.

  3. Motorola Moto X Pure Edition Battery Replacement, Opening Procedure: adım 3, 1 resimden 1.
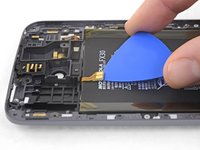
    • Prepare an iOpener and heat the back of the phone along its right edge for about five minutes. This will help soften the adhesive securing the back cover.

    • You may need to reheat and reapply the iOpener several times to get the phone warm enough. Follow the iOpener instructions to avoid overheating.

    • A hair dryer, heat gun, or hot plate may also be used, but be careful not to overheat the phone—the LCD display and internal battery are both susceptible to heat damage.

  4. Motorola Moto X Pure Edition Battery Replacement: adım 4, 3 resimden 1. Motorola Moto X Pure Edition Battery Replacement: adım 4, 3 resimden 2. Motorola Moto X Pure Edition Battery Replacement: adım 4, 3 resimden 3.
    • In the following steps, you'll be cutting through the adhesive securing the back cover.

    • The adhesive is laid out as seen in the first image, which shows the inside of the cover.

    • Avoid slicing in this area to avoid damaging delicate ribbon cables.

  5. Motorola Moto X Pure Edition Battery Replacement: adım 5, 3 resimden 1. Motorola Moto X Pure Edition Battery Replacement: adım 5, 3 resimden 2. Motorola Moto X Pure Edition Battery Replacement: adım 5, 3 resimden 3.
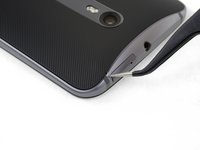
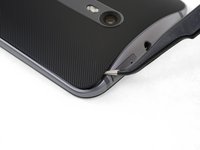
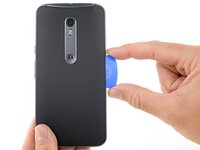
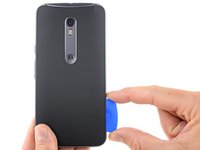
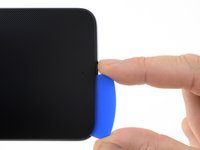
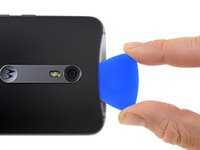
    • Hold a pair of pointed tweezers closed, and insert them into the small hole on the edge of the back cover near the SIM card slot.

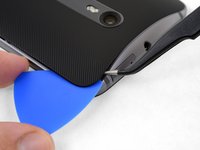
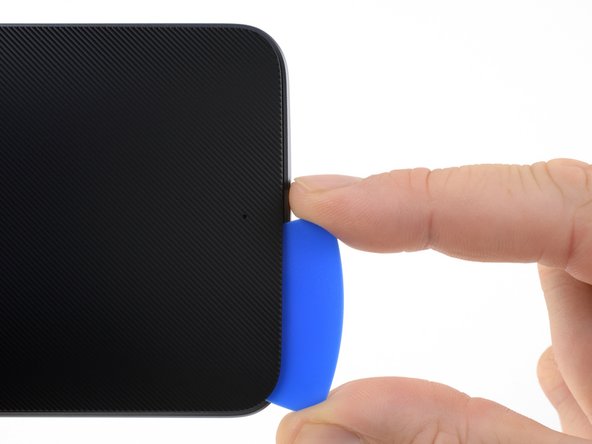
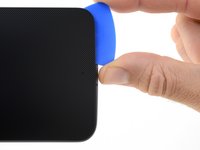
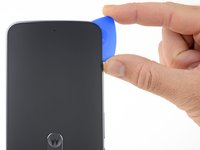
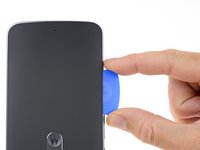
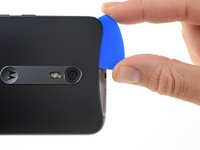
    • Use the tweezers to lift the cover up slightly, and slide an opening pick into the gap between the cover and the frame.

  6. Motorola Moto X Pure Edition Battery Replacement: adım 6, 3 resimden 1. Motorola Moto X Pure Edition Battery Replacement: adım 6, 3 resimden 2. Motorola Moto X Pure Edition Battery Replacement: adım 6, 3 resimden 3.
    • Slide the opening pick along the edge of the phone to slice through the back cover adhesive.

    • Try to insert the pick as far as you can underneath the cover, toward the center of the cover. There's thick adhesive on the middle of the cover that must be separated.

    • Leave the pick in place as you proceed to the next step. Leaving the pick inserted can help prevent the glue you just separated from re-adhering.

  7. Motorola Moto X Pure Edition Battery Replacement: adım 7, 1 resimden 1.
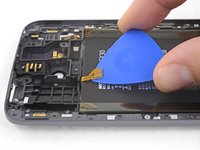
    • Prepare an iOpener and heat the back of the phone along its left edge for about five minutes. This will help soften the adhesive securing the rest of the back cover.

    • You may need to reheat and reapply the iOpener several times to get the phone warm enough. Follow the iOpener instructions to avoid overheating.

  8. Motorola Moto X Pure Edition Battery Replacement: adım 8, 2 resimden 1. Motorola Moto X Pure Edition Battery Replacement: adım 8, 2 resimden 2.
    • Slice through the adhesive along the bottom edge of the phone.

    • Re-heat the back cover as needed to prevent the glue from cooling and hardening.

  9. Motorola Moto X Pure Edition Battery Replacement: adım 9, 2 resimden 1. Motorola Moto X Pure Edition Battery Replacement: adım 9, 2 resimden 2.
    • Slice through the adhesive along the left side of the phone.

    • Try to insert the pick as far as you can underneath the cover, toward the center of the cover. There's thick adhesive on the middle of the cover that must be separated.

    • Stop cutting when you get to the edge of the volume buttons. Cutting past this point may damage the ribbon cables underneath the cover.

  10. Motorola Moto X Pure Edition Battery Replacement: adım 10, 3 resimden 1. Motorola Moto X Pure Edition Battery Replacement: adım 10, 3 resimden 2. Motorola Moto X Pure Edition Battery Replacement: adım 10, 3 resimden 3.
    • Slice through the adhesive along the top edge of the phone, pulling the pick out slightly to guide it around the rear-facing camera.

  11. Motorola Moto X Pure Edition Battery Replacement: adım 11, 3 resimden 1. Motorola Moto X Pure Edition Battery Replacement: adım 11, 3 resimden 2. Motorola Moto X Pure Edition Battery Replacement: adım 11, 3 resimden 3.
    Bu adımda kullanılan alet:
    Tesa 61395 Tape
    $5.99
    Satın Al
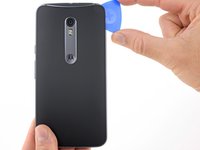
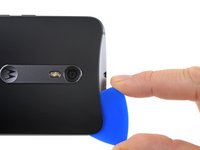
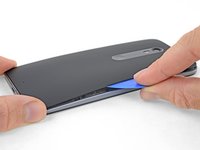
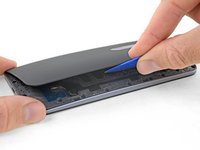
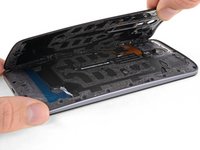
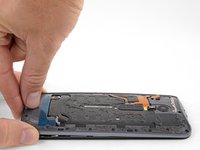
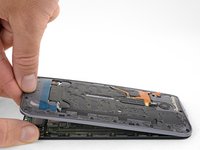
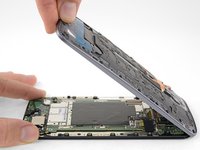
    • Carefully pry the cover away from the phone.

    • This may take a lot of force if the adhesive in the middle is still attached. As you lift the cover, you may need to use an opening pick to slice through any remaining adhesive.

    • To reinstall the back cover:

    • First use tweezers and a spudger to peel and scrape away any remaining adhesive from both the back cover and the phone's chassis.

    • Then, clean the adhesion areas with high concentration isopropyl alcohol (at least 90%) and a lint-free cloth. Swipe in one direction only, not back and forth. This will help prep the surface for the new adhesive.

    • Replacement adhesive comes in a pre-cut sheet to match the exact contours of the back cover. If that's not available, you can use a high-bond double-sided tape, such as Tesa 61395. Before installing the precut adhesive on the back cover, remove the metal insert. Install the adhesive, then replace the insert.

    • After installing the back cover, apply strong, steady pressure to your phone for several minutes to help the adhesive form a good bond.

    • If desired, you may reinstall the back cover without replacing the adhesive. Remove any large chunks of adhesive that might prevent the back cover from sitting down flush. After installation, heat the back cover and apply pressure to secure it.

  12. Motorola Moto X Pure Edition Battery Replacement: adım 12, 3 resimden 1. Motorola Moto X Pure Edition Battery Replacement: adım 12, 3 resimden 2. Motorola Moto X Pure Edition Battery Replacement: adım 12, 3 resimden 3.
    • Use the point of a spudger to pry up the rubber cover over the battery connector.

    • Remove the rubber cover.

  13. Motorola Moto X Pure Edition Battery Replacement: adım 13, 2 resimden 1. Motorola Moto X Pure Edition Battery Replacement: adım 13, 2 resimden 2.
    • Use the flat end of a spudger to pry the battery connector straight up and out of its socket.

    • Only pry the small tab on the end of the connector opposite the ribbon cable. Do not push against the connector too hard or you risk damaging the plug on the motherboard.

  14. Motorola Moto X Pure Edition Battery Replacement: adım 14, 2 resimden 1. Motorola Moto X Pure Edition Battery Replacement: adım 14, 2 resimden 2.
    • Use tweezers to lift away the rubber cover over the flash connector.

  15. Motorola Moto X Pure Edition Battery Replacement: adım 15, 2 resimden 1. Motorola Moto X Pure Edition Battery Replacement: adım 15, 2 resimden 2.
    • Use the tip of a spudger against the corner of the flash connector to pry the connecter straight up and out of its socket.

  16. Motorola Moto X Pure Edition Battery Replacement: adım 16, 1 resimden 1.
    • Use a T3 Torx driver to remove twenty 2.4 mm screws.

  17. Motorola Moto X Pure Edition Battery Replacement: adım 17, 2 resimden 1. Motorola Moto X Pure Edition Battery Replacement: adım 17, 2 resimden 2.
    • Use the point of a spudger to push the small clip securing the left side of the midframe toward the edge of the phone, releasing the clip.

  18. Motorola Moto X Pure Edition Battery Replacement: adım 18, 1 resimden 1.
    • Repeat the previous step to release the right side midframe clip.

  19. Motorola Moto X Pure Edition Battery Replacement: adım 19, 3 resimden 1. Motorola Moto X Pure Edition Battery Replacement: adım 19, 3 resimden 2. Motorola Moto X Pure Edition Battery Replacement: adım 19, 3 resimden 3.
    • Holding the display by the edges, gently lift the midframe away from the display.

    • Remove the midframe from the display.

  20. Motorola Moto X Pure Edition Battery Replacement, Battery: adım 20, 2 resimden 1. Motorola Moto X Pure Edition Battery Replacement, Battery: adım 20, 2 resimden 2.
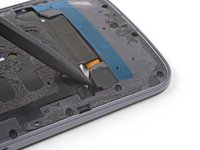
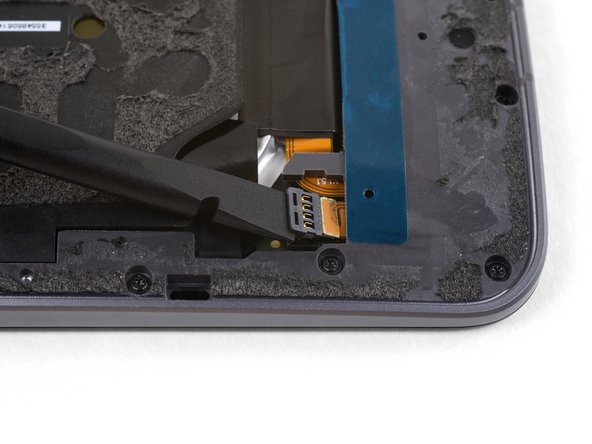
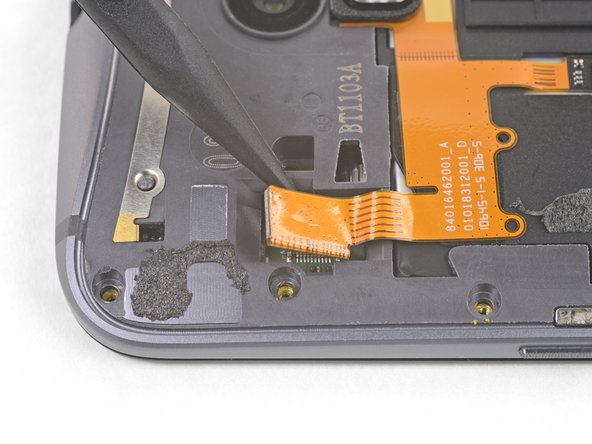
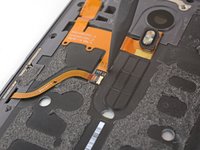
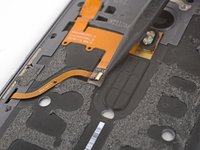
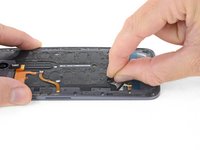
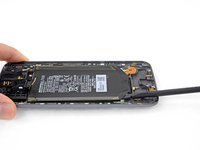
    • Gently slide the point of a spudger underneath the corner of the volume button connector board, which is adhered to the battery.

    • Lift the board slightly to separate it from the battery.

    • There is risk of puncturing the battery with the point of the spudger, or damaging the delicate ribbon cables attached to the board. Work carefully and don't apply any downward force against the battery.

  21. Motorola Moto X Pure Edition Battery Replacement: adım 21, 3 resimden 1. Motorola Moto X Pure Edition Battery Replacement: adım 21, 3 resimden 2. Motorola Moto X Pure Edition Battery Replacement: adım 21, 3 resimden 3.
    • Try to keep the adhesive strips flat and unwrinkled during this procedure; twisted or wrinkled strips will stick together and break instead of pulling out cleanly.

    • Additionally, do not press down on the battery as you pull the strips. Pressing on the battery creates pressure points that can snag and break the adhesive.

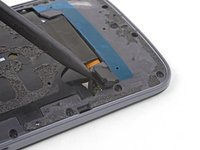
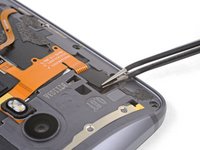
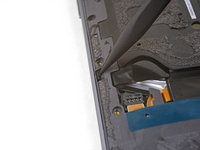
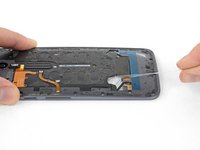
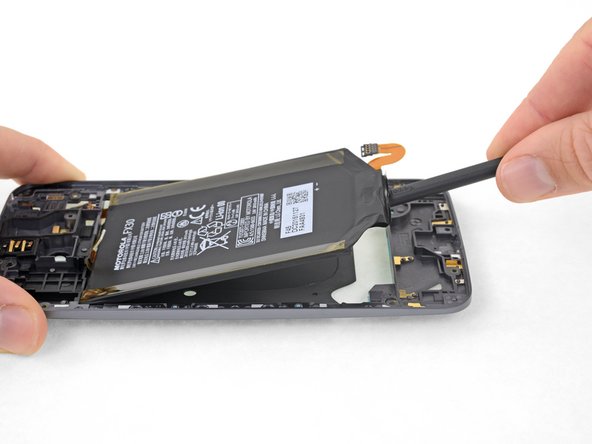
    • Grasp one of the battery adhesive tabs with your fingers and slowly pull it away from the battery, towards the bottom of the phone.

    • Pull steadily, maintaining constant tension on the strip until it slips out from between the battery and the midframe. For best results, pull the strip at as low an angle as possible, without snagging it on any other components.

    • The strip will stretch to many times its original length. Continue pulling and re-grab the strip near the battery if necessary.

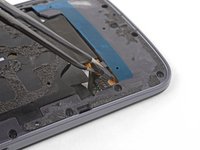
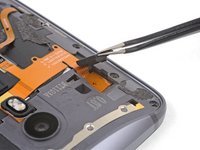
    • If the battery adhesive tabs break during the removal process, use your fingers or blunt tweezers to retrieve the remaining length of adhesive, and continue pulling.

    • If any of the adhesive strips break underneath the battery and cannot be retrieved, try to remove the remaining strip, and then proceed with the rest of the steps.

  22. Motorola Moto X Pure Edition Battery Replacement: adım 22, 1 resimden 1.
    • Repeat the previous step to remove the remaining adhesive strip.

  23. Motorola Moto X Pure Edition Battery Replacement: adım 23, 2 resimden 1. Motorola Moto X Pure Edition Battery Replacement: adım 23, 2 resimden 2.
    Bu adımda kullanılan alet:
    Tesa 61395 Tape
    $5.99
    Satın Al
    • Slide an opening pick under the NFC connector to remove it from the battery.

    • Note the position of the NFC connector, as it will need to be reinstalled in the same position on the replacement battery. If its existing adhesive is no longer sticky, you can remove that and use a high-bond double-sided tape, such as Tesa 61395.

  24. Motorola Moto X Pure Edition Battery Replacement: adım 24, 3 resimden 1. Motorola Moto X Pure Edition Battery Replacement: adım 24, 3 resimden 2. Motorola Moto X Pure Edition Battery Replacement: adım 24, 3 resimden 3.
    Bu adımda kullanılan alet:
    Tesa 61395 Tape
    $5.99
    Satın Al
    • Use the flat end of a spudger to lift the battery out of the midframe.

    • Check to make sure no ribbon cables remain stuck to the battery, and separate them carefully if needed.

    • If there is still adhesive holding the battery down, slowly pry the battery away from the midframe, taking care not to bend the battery.

    • The battery will separate more easily if you add a few drops of isopropyl alcohol along each side, to soften the adhesive beneath. High concentration (90% or greater) alcohol will not harm your phone's components.

    • Alternatively, you may apply heat to the midframe to soften the battery adhesive, but be very careful not to overheat the battery.

    • Don't deform or puncture the battery—it can catch fire and/or explode if damaged.

    • Never reinstall a damaged or deformed battery. Replace the battery.

    • Use a few strips of thin double-sided adhesive tape, such as Tesa 61395 or strips from a pre-cut adhesive card, to secure the replacement battery.

Sonuç

Carefully compare your new replacement part to the original part. Remove any adhesive backings before installing your new battery.

To reassemble your device, follow the above steps in reverse order.

After completing this guide, calibrate your newly-installed battery.

Take your e-waste to an R2 or e-Stewards certified recycler.

Repair didn’t go as planned? Check out our Answers community for troubleshooting help.

70 farklı kişi bu kılavuzu tamamladı.

Adam O'Camb

Üyelik tarihi: 04/11/15

195.355 İtibar

416 adet Kılavuz yazıldı

42 Yorum

Rayan thank you, although I am not yet ready to replace the battery (about a year to go) yet, I would like to know if there are better batteries than those that came with the unit from the manufacturer? An upgrade that holds a better charge on a daily basis? Marty

marty damskov - Yanıt

Do you have a link to buy a battery? I've been looking but I'm still not confident with me results. Preferably one that includes the necessary tools, but so long as it's definitely the correct battery. I need to replace my battery, NOW!

Chris DiMisa - Yanıt

Battery now available. Please see link on this page or here:Moto X Pure Edition Battery - Genuine

Jason Clark -

Has anyone bought a 3rd party battery for this phone? I got one from Germany brand name "vhbw", however it is not curved and so will not fit. It is quite soft and so am wondering if it is safe to bend such batteries? Not sure if I should risk it, though.

Alex Damien - Yanıt

Alex, I bent my new battery to make it fit. It seems to be working just fine.

Nicholas Price -

Yorum Ekle

İstatistikleri Görüntüle:

Son 24 Saat: 0

Son 7 gün: 4

Son 30 gün: 32

Her zaman: 55,750