
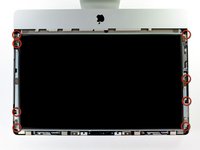
iMac Intel 21.5" EMC 2389 Hard Drive Replacement

Giriş
1. adıma gitUse this guide to replace or upgrade your hard drive.
This guide also includes steps to upgrade your iMac's hard drive with a SSD. It describes how to install the SSD's temperature sensor so that the Mac's fans will operate at the correct speed.
Before beginning any work on your iMac: Unplug the computer and press and hold the power button for ten seconds to discharge the power supply's capacitors.
Be very careful not to touch the capacitor leads or any exposed solder joints on the back of the power supply.
Neye ihtiyacın var
Tamir Seti
Bu kit, bu kılavuzu tamamlamak için gereken tüm parçaları ve araçları içerir.

Parçalar


Aletler


Daha fazlasını göster…
-
Bu adımda kullanılan alet:Heavy-Duty Suction Cups (Pair)$14.95
-
Stick a suction cup near each of the two top corners of the glass panel.
-
If your suction cups refuse to stick, try cleaning both the glass panel and the suction cup with a mild solvent.
-
-
-
Gently lift the glass panel perpendicular to the face of the LCD enough to clear the steel mounting pins attached along the underside of the top edge of the glass panel.
-
Pull the glass panel away from the lower edge of the iMac and carefully set it aside.
What's the best product to clean the face of the LCD?
Microfiber Cloth
Try your best not touch it in the first place
Brian -
Wearing Nitrile or regular surgical gloves helps prevent finger prints if you accidentally touch the glass.
I use a Swiffer duster from above at the last moment before I let the magnets grab the glass cover. This has worked so well the last dozen or so times I’ve replaced a glass cover since I never have access to a “clean room” and don’t wear a “bunny suit”.
Also, more dust will shed from your skin if you’ve just taken a shower, so I like to finish these repairs in the morning before a shower.
-
-
-
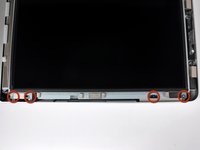
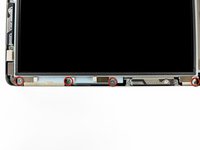
Remove the eight 8 mm T10 Torx screws securing the display to the outer case.
Replacing the screws , especially the two uppermost ones , is awkward due to the magnets attracting the screws off the Torx driver
I’ve just replaced the screws by making a little tube from paper and wrapping it round each screw to keep it contained. A cut-down straw would be perfect for job.
I second this but use a tube of cardboard instead, then its quite easy.
jeank75 -
-
-
-
Slightly lift the top edge of the display out of the outer case.
After sliding the display slightly towards the top edge, enough for the bottom edge to clear the retainers, an alternative is to raise the bottom edge out. Then unplug the LED backlight power cable (this step + 2), unplug the LCD thermal sensor cable (this step + 4), unplug the display data cable (this step + 3), and the display may be rotated over the top edge while leaving the vertical sync cable attached (this step + 1).
-
-
-
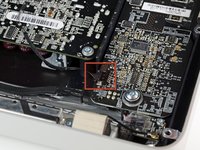
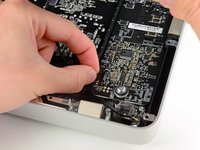
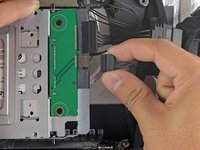
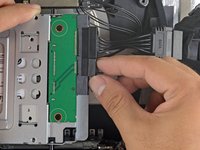
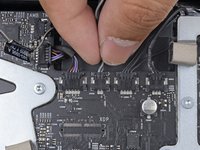
Pull the vertical sync cable connector out of its socket on the LED driver board near the top left corner of your iMac.
Do not try to pull the plug off the circuit board as it's soldered. Pull the cable sideways out of the socket.
Skipped step 5-10. I used two 5-6" chopsticks to prop up the display, this gave me more than enough room to complete the rest of the steps. I only had to disconnect the 3 cables are directly connected to the hard drive. Replacing the Seagate hard drive with another Seagate hard drive eliminated any cable issues. Now I have 2TB SSDH
I was also able to skip steps 5 thru 10, which meant no messing with any cables except for the two for the HD (steps 13+14). Used a credit card to start the removal of glass panel (step 2) - much easier than I imagined. After removing display screws (step 3) I simply had a friend hold up the display's bottom edge as far as the cables would allow (careful not to stress at connection to logic board) and this provided enough room to remove the HD bracket screws (step 11), detach the HD cables, and remove the HD. Was replacing a failed 1TB Seagate with a 3TB Seagate so no problems with compatibility when reattaching the HD cables and everything worked fine when I restored the OS and data to the new HD. No fan issues. I did take great care to not get fingerprints on the inside of the glass panel and to blow off any dust specks before reinstalling it. It was a bit tricky to get the new HD back in without letting the magnets get a hold of it, so thanks for the warning posted here about that!
On my mid 2010 Imac I found it was not necessary to disconnect any cables (except of course those attached to the drive). Simply angle the monitor away from the case to a safe distance without stressing any cables and secure with tape. With a stubby screw driver it was easy to access and remove the drive.
Skipped steps 6-10; did step 5 so could lift top of display higher, then propped up. A photo of whole interior here would help (hard disk is top center). Used pliers holding T10 bit at right angle to unscrew hard disk holder. SSD installed loose (macOS and fan control app already loaded).
-
-
-
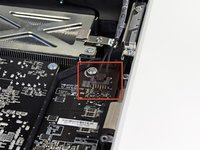
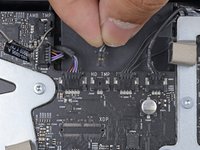
Rotate the display out of the outer case enough to disconnect the LED backlight power cable from the LED driver board.
First push down on the edge of the connector closest to bottom edge of the iMac. This unlatches the locking mechanism at the top edge of the connector. Then gently wiggle the connector away from its socket.
-
-
-
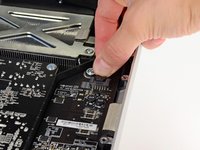
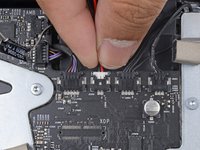
Pull the display data cable straight out of its socket on the logic board.
This cable is very short, I would remove it before any of the others. First time I did this, I didn't realize this and this cable just popped out of it's socket. Luckily, the board wasn't damaged.
i damaged my (step7) cable, and my iMac screen won't work, how to fix this?
I did the same thing. The pins are VERY easy to bend. I replaced it with a new cable from this company.
http://www.macpalace.com/922-9497-cable-...
Waiting for it to arrive.
Michael -
I wish this step was listed as a warning before lifting the monitor and as the first cable to undo. I broke it as it popped up and out, had to trash my Mac and I am stuck with a new hard drive.
I followed the directions to a T and everything worked going back together. That cable in step 7 is delicate so one must be very careful.
Same problem for me. I damaged this cable and am ordering one now.
This is a tough step so I would also suggest removing this cable first.
Yes, damaged mine too. It is better to take it out of the LCD and install it carefully on the logic board, then install it to the LCD.
asle -
Ok finally got the cable and was able to successfully finish the project.
That video cable is ROUGH to install.
The same thing happened for me. That cable was by far the shortest and a slight pull of the display up caused the connector to come free. Luckily it wasn't damaged by this. It was pretty unclear to me how that connector fit in as well. It slides in and out parallel to the surface of the mother board, up towards the top of the iMac to unplug and down towards the bottom to plug in. I agree, if I were to do this repair again that is the first interior cable I would disconnect. Maybe a closeup of the cable plugged in and unplugged to show exactly how it engages and disengages would be good as well.
It is fine to remove the cable from the logic board when when you remove the screen. But when when assembling back together I found it better to take the LVDS cable out of the LCD and install it carefully on the logic board. Then connect it to the top of the LCD. Also the connector to the LCD is much more solid and not so easy to bend.
This is by far the best way round to do this as trying to refit the cable to the logic board is a complete nightmare.
Russ -
I agree with asle, manipulating the display end of the cable would be easier - at least it cannot be any harder then manipulating the motherboard end.
Jerry -
well I did all t these steps and now the iMac won't turn on at all. I guess the big cable is not connected to the board as it used to... Mac is out of warranty so it's going out the door. RIP
this part is not complicated if you understand at first how the lock works.. remove the lock is easy, reassemble the cable and connect it is very problematic because the space to work is very tiny, but if you are carefully, it should be not a problem . try to see some videos from youtube first!
This totally blows.. If you want to do this correctly and not destroy your computer over this step, - OWC’s video will show you EXACTLy what to do with the display cable ..
Don’t raise the display more than 3-4 inches. Pull the tape off the back of the display and unhook the cable from the display, instead of trying to remove it from the motherboard. As soon as I raised the display, the cable snapped loose. Ordered a new cable from Amazon. Am waiting to see if works ok.
The worst thing about the whole tear-down procedure, was the display data ribbon cable in this step. As others have noted, It popped out of its socket on the mother board while disconnecting the lcd. I didn’t get a chance to see exactly how it connected on to the moboard . I damaged the dainty and minute ribbon end while trying to re-connect it to the wrong side of the receptacle. Duh! I feel so stupid. :(
I had to order a new ribbon cable ($14) . Luckily, i was able to plug new ribbon into the fragile moboard connector adequately, and then the lcd end, during re-assembly. This re-assembly step is made for a very small person with extremely small hands and big eyes (like someone out of Gulliver’s travels).
2010 iMac SSD kit from OWC. Their video does not adequately explain the difficulty of re-installing the display port ribbon cable into the logic board. The best procedure would be to follow asle (see prior comment 8/11/15). The problem is exasperated by the fact that the plug into the LCD is covered in tape.
Got VERY lucky with my SSD replacement. Just leaning the display back popped the cable off the logic board, and I had a very difficult time reinstalling the screen. It might be that the wire bail wasn’t secured in the first place, or the machine has been opened up prior to my obtaining it. I eventually used a parts box to rest the LCD high enough to reinstall the cable. Agree that this should be the first cable to be disconnected and last to be reconnected. Perhaps disconnecting it from the LCD should be considered as a first step?
-
-
-
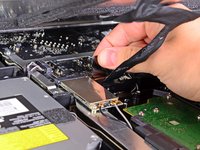
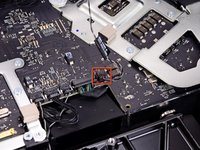
Disconnect the LCD thermal sensor cable connector from its socket on the logic board.
Be very careful - this connector very difficult to disconnect, and you have a high risk of pulling the cable pins out of the connect. If you have disconnected the 3 other cables, you can have a helper rotate the screen out of the way while you remove the hard drive.
I found this connector impossible to remove
I also found this extremely difficult to remove. Tiny cable with a death grip. I tried using two spudgers, my fingernails, and walking it out. In the end, I used two spudgers and pried it up, using leverage from the clip to the right.
Also, i recommend setting the iMac upright for this. I rested the screen on my chest while I dual wielded my spudgers.
eer ist zerbrochen! hoffe krieg ihn dann trotzdem wieder rein
This was connector was impossible to remove. Like a previous commenter, I did this with the machine upright and with the LCD Panel resting on my upper chest. Ultimately, the pins pulled out of the socket! Once they were out, it was relatively easy to remove the socket. I completed the drive replacement, (installed a 1 TB SSD) and then replaced the pins in the socket and reassembled the machine. One mental error I made was I couldn’t remember the correct orientation for the Black and White wires in the socket. In looking at the photos here on iFixIt, it looks like I reversed their orientation. However, the machine seems to be running fine. I installed macos High Sierra and migrated my data from my old HD and the machine has been running for two days now. I would hate to have to go back in and remove the socket and reverse the wire orientation. Anyone have advise on this?
In followup to my previous post, I launched TechTool Pro 9.6.1 and ran the Sensors Test. All Sensors tests were passed. These included:
LCD Proximity, LCD Thermal Compensation 2, LCD Proximity, Thermal Compensation. Machine seems to be running fine.
jmaher -
-
-
-
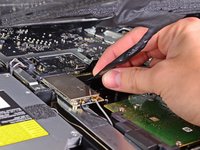
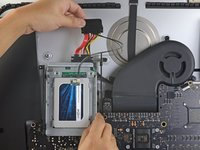
Pull the hard drive temperature sensor connector toward the top edge of the iMac to disconnect it from its socket on the logic board.
I don't think this is necessary, I'd just leave it since you're removing the other end from the drive.
Want to add a comment on this w/reference to HDD & thermal sensor. HDD used: WD1002FAEX - 1TB WD Black. Temperature sensor on this model iMac has a little tab/plastic protrusion, Apple HDD actually has specific opening for it. With this HDD/any after market WD HDD you should use small electrical wire cutters, and just cut off the offending piece of plastic from the iMac sensor. Insert it as specified, closest to SATA/PCB board, take a picture first before taking it out, and it works like a champ!
Sure enough, I had the same problem of the temperature sensor not fitting because of the plastic protrusion on the Apple connector. Instead of using a wire cutter to remove the protrusion, I filed it with a metal file (careful to place a rag cloth underneath, where all the filing dust would drop). It fit wonderfully after that.
I am getting ready to swap out my wife's drive for an SSD. Since there are no moving parts do i need to be concerned with the temperature sensor?
I picked up a 240GB PNY CS1200 Series drive. Its smaller than the original but she doesnt use that much anyways.
-
-
-
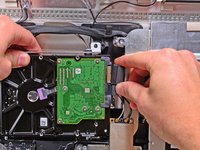
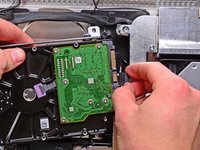
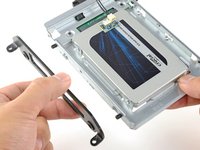
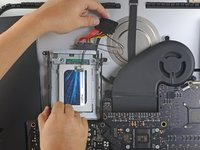
Slightly rotate the hard drive out of the outer case and lift it up off its mounting pins toward the top edge of the iMac.
Instead of trying to not hit the Airport card, spend 10 seconds to unscrew the one screw, pull it out of the socket and set it aside.
WATCH IT! When pulling out the hard drive or putting in the new one, stay clear of the strong magnets that hold the glass pane in place. I was so focused on following those steps closely, and when I had the HDD clear I kind of relaxed a bit too much and – "CLONK" – the magnet pulled the HDD and ruined it.
I have fitted a barracuda tb sata hdd ,i have partitioned the drive in d/utility .I have made a bootable us. stick containing os x and it says mac osx cannot be installed to your computer , even though itis displYed as verified in disk utility .......Plese help me !!!!!!
-
-
-
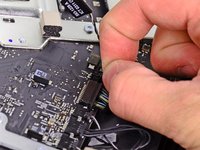
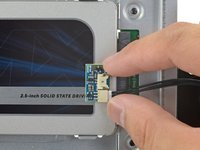
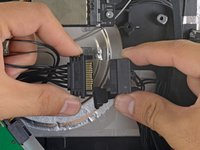
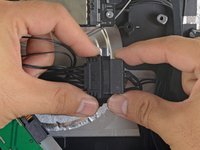
Disconnect the SATA data cable and SATA power connector from their respective sockets by pulling each connector away from the hard drive.
Computer doesn’t see the new hard drive. Mid year 2010 iMac, #2389. Removed Seagate Barracuda 7200 500 gig drive. Installed Toshiba 7200, 1tb drive. Computer starts, screen lights but I get a ?. So I started in recovery mode but it doesn’t see a hard drive to load to. I have an external backup and it dies see that drive. Tried reinstalling the os over the internet but when it looks for a hard drive it doesn’t see one. The fan is running…starts off slowly but as timne goes by it gradyally speeds up.
Any help is apprecioated
-
-
-
Disconnect the hard drive thermal sensor cable from the hard drive.
I am swapping the original drive for another Western Digital one but the plug in on the new drive is not cut out for the key. Can I use this drive. Maybe trim the key off?
You can, if you are certain the socket is correct for the cable.
-
-
-
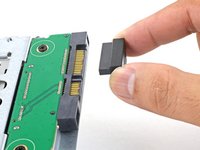
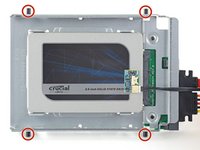
Line up the SSD connectors with the metal enclosure's sockets.
-
Press the drive against the enclosure sockets until the SSD is firmly seated.
-
-
-
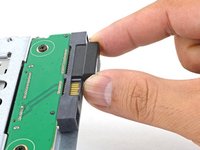
Plug the included sensor-enabled SATA power cable into the enclosure's port.
Can anyone point me to purchasable parts for steps 19 +20: The “sensor-enabled SATA power cable” and “temperature sensor board”? It’s essentially the parts found below listed as “SSD Temperature Sensor compatible with iMac Intel 21.5" and 27" Late 2009-Mid 2010”, but I don’t want to spend $230…
iMac Intel 21.5" and 27" (Late 2009-Mid 2010) SSD Upgrade Kit
Check Amazon. $30 as of 11-1-2023.
-
-
-
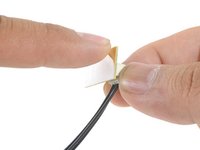
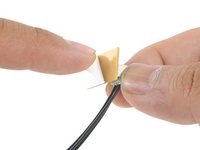
Peel the white liner off the back of the small temperature sensor board in order to expose the adhesive.
-
Adhere the temperature sensor board to an exposed, metal surface of the SSD, close to the SATA connector.
-
Fold the excess temperature sensor wires so that they are out of the way while you install the enclosure.
Somewhere along the way, someone else replaced the HD with an SSD on my iMac, but they did not bother to install the temp sensor and just left the temp connector cable dangling, which causes the HD fan to spin full speed. Can the sensors be bought separately?
-
-
-
Find the connector on the motherboard labeled HD TMP or HDD TEMP.
-
If the previous temperature cable is still connected to the board here, disconnect and remove it. You will no longer need it.
-
Connect the temperature sensor's two-wire red-black cable to the motherboard plug labeled HD TMP or HDD TEMP.
-
Route the excess wire so it does not interfere with any other components.
-


To reassemble your device, follow these instructions in reverse order.
To reassemble your device, follow these instructions in reverse order.
İptal et: Bu kılavuzu tamamlamadım.
252 farklı kişi bu kılavuzu tamamladı.

44 Yorum
I went through all the steps and now when I attempt to boot, I hear the apple chime, but I get nothing on screen.
I thought this might have to do with a loose cord, but when I reattached the suspect cord (the display data cable) it did not resolve the problem.
Anyone have any ideas as to what could be causing the display to malfunction?
I had this problem as well, caused by a small cable coming from the display. It is a Sync Cable with a small 2 Pin Molex connector, and it popped up and got hidden when I removed the display, which caused me to forget to re-attach it during reassembly.
capone99 -
Question for capone99: where did this cable come from? Was it one of the five specified for unplugging in this guide? Or are you saying it came loose by itself during installation?
Did anyone ever solve this? Having the same issue.
In step 14, the Apple connector for the hard drive has a locking mechanise that doesn't fit most replacement hard drives. I got an identical hard drive that doesn't have a provision for the connector. A little bit of shaving or filing of the plastic connector did the trick.
I replaced my hard drive Samsung 1TB. I put a Seagate Barracuda 1TB instead.
I had the problem of thermal sensor that was not adapted to Seagate. I cut it in half cutter, I connect and everything works perfectly.
And, finally, additional tool which was super awesome: FLASHLIGHT. Small, flashlight is awesome when just examining the internals prior to removal/especially if you have a way to prop up the LCD panel, since it will cover the main board, and you need some idea as to where what is.
This was a great guide and worked perfectly for me. Replaced my non-working 500GB for 1TB new drive. After the installing got an error "folder with question mark". Took it to the apple store had them install a new OS X for free and it is working great now......
Hi Tim , did you resolve the issue .I used internet recovery n it still fails
What I did was:
- Substitute the broken internal hdd with a new one (WD to Segate)
- Change the disk bay to an SSD
Problems I haced:
1) thermal sensor between wd and segate. My fix was to open up the plastic piece that connects to the HDD and separate the cables. Then I taped each cable with isolating material and connected the cables to the bins by hand (praying they would not pop out before I was finished). Actually I noticed that the tape was filling the space in the cavity, making the cables stay in place: fans not spinning crazy.
2) The SSD adapter I bought was a little bit weird and would not fit in the black plastic case of the CD drive. My fix: polish irregularities away from the plastic support. In the end it worked and the drive is now attached
3) Screen connection cable. This one was THE WORST. The cable is really, really delicate and by trying to connect it back after I was finished I broke it in three different ways. Here I suggest PATIENCE and delicacy! I still got it to work though :)
Christian, for the thermal sensor, how did you know which bins / cables to put together? what was the number / configuration of pins on your new drive? any insight you might have here would be appreciated
geemac -
Excellent guide. Managed to swop out my hdd for a ssd using this guide. The ribbon cable in step 7 is one of the more difficult steps to deal with. Be careful not to break the socket.
Excellent guide. Managed to swop out my hdd with a ssd using this guide. The cable in step 7 has to be carefully dealt with though.
1/5
I'll always choose the DIY option as I don't like paying for labour. This time (with virtually zero experience of taking anything apart, never mind my precious iMac) I wondered if I'd bitten off more than I could chew. I spent a good bit of time watching videos and reading walk through guides before attempting a HDD - SSD replacement. This guide was one of the best and I feel I owe an account of my experience to anyone thinking of doing this.
Removing the glass was as easy as I expected it to be. I used 'the straw' method (mentioned in the comments here) to remove the screws, avoiding magnet attacks. When in the straw, you can quickly whip out the screws using the magnetic tip of your screwdriver. 2-3 were claimed when screws or straws slipped although it was easy to get them back with tweezers.
2/5
After peeking under the LCD I was alarmed to see how short the vertical sync cable was in mine (4-5 cm from top to bottom). It turned out to be quite a long cable but I had to prize some of it away from some adhesive/adhesive tape towards the bottom.
The LED backlight power cable was very stiff to remove. I had to be careful not to force it even when pressing quite hard to unlock (might have been me?).
Next up, the dreaded display data cable. No problems disconnecting this although it would later give me a big headache.
I found the LCD sensor very fiddly. I have pretty small hands yet, fingers/finger nails seem inadequate for such a small cable and socket. Of all the cables I removed this was the one I expected to have damaged. I pulled on the cable through frustration as I couldn't get a hold of the plastic plug.
3/5
Display and HD temp sensor came out without any bother.
My dead HD also came out without too much trouble although the SATA and thermal sensor cables were quite stiff.
I should mention (at this point) that I had decided to replace my old HHD with an SSD.
I therefore decided to completely remove the thermal sensor cable with a view to using 'fan control' software after replacement. At first, I assumed that the drive would be facing upwards and consequently put the sponge from my old HD on the outside of the 2.5 - 3.5 mounting bracket I'd bought. This also lead to me putting the upper mounting bracket on the wrong side when in actual fact, the mounting bracket would fix back in with the new SSD hanging upside down and sponge on the drive itself (not that this matters. It will ultimately be on it's side when fitted anyway).
With new bracket in place, the SATA cables were a little bit short of where the plugs were. The plugs needed forcing in to line with the sockets. Some slight manipulation required here.
4/5
Complications arose when connecting back up (the part that isn't in any guides).
Once again, the LCD sensor cable was tricky fuelling concern of possible damage.
The display data cable cost me a good chunk of afternoon. Without the iMac being upright on it's stand (OWC method of process) it's so difficult to see where this wafer thin cable should connect. I tried moving various props to hold the LCD at a different height and angle as well as moving an LED spotlight about (red hot). The Airport card also obstructs any clear view of both plug and socket. On top of that there's the locking tab to get back in place without touching the logic board.
Some time later, I was fairly (but not 100%) sure that it was locked in place.
After plugging in the other cables, keeping the screen and glass dust free was also quite challenging.
5/5
So to the moment of truth. Booting up in recovery mode.
I heard the start up chime but the screen remained black. Back on the Internet to check diagnostics (noticing comments at the top of this thread). On further inspection after taking my Mac apart a 2nd time (in a fraction of time it took originally) I noticed that my nemesis (the display data cable) had either come out on reassembly, disassembly or had not been plugged in correctly in the first place. Several slow mo web videos later I finally nailed it.
I'm currently running a 'Time Machine' backup (6 hours with the fan running at full tilt) but am hopefully on track.
Will report back if there are issues. No news will be good news.
I found when replacing hard drive the most difficult task is to replug the Display data cable back into the logic board. There is just so little room to work, I damaged the data cable plug contacts and the display would not work. For me work around was to order replacement data cable and install first on logic board before trying to mount and connect other display cables. And installing data cable to Display socket last. This end is larger and more robust up near the top edge of the Display giving one much more room to work.
I successfully completed this repair. Went from 500GB Seagate to 1TB WD Blue.
Problems I had are limited to the thermal connector would not fit the hard drive I bought. I'm pretty sure the pins on my new drive are for an 8-pin thermal instead of a 4-pin, and I just left it unplugged. The fans spin at full speed now, but that's hardly a deal-breaker.
I am about to replace my original HD with 4TB Seagate SHDD. My goal was to clone my SHDD before installing. When connecting my SHDD to USB port, my SHDD cannot be found via DiskUtility. The cabling is correct since alternative HD (low density) can be found. Any suggestions? I am using Yosemite (10.10.5).
I ran into the cable temp sensor issue when I replaced a Western Digital (8-pin connector) with a Seagate SSHD (4-pin connector). To resolve it I purchased the OWC temp sensor kit for 2009-2010 iMacs. Unfortunately it did not work with the sensor installed on top of the spindle. The problem is that there is not of clearance and it ends up touching the back on the display and when the screws are reinstalled the computer will not turn on.
OWC's product almost works as described, but is not the best solution. I recommend opening your iMac up to see what type of drive you have and getting the official temp sensor adapter cable from and Apple part supplier (on eBay too). They are around $20 and there is one for each drive manufacturer. The easiest solution is to buy a drive from the same manufacturer and it most likely will have the same sensor plug. I know that some mods can be made to the cable end to get it to fit, but I don't see how the 8-pin plug could be modified to be put into a 4-pin jack.
Replaced the 500GB hard drive to a 2TB hard drive, was gonna put a SSD in optical bay as well but ordered a mSATA drive instead of SATA by accident. Overall was pretty easy but very painful trying to reconnect the Display cord. All in all... I've worked on my now 4th apple computer... and 4th computer of all time... and if I can do it you can do it, Make sure your new HARD Drive is the same brand as the one that comes with macbook. I just had to sand down the connection for thermal sensor a little but otherwise it fits without hassle.
A year after 'war and peace' (above) and all is well. SSD works a dream. Have been using 'Fan Control' from day 1 with no issues to date.
I did this around 3 years ago. There's a problem when connecting the new hard drive with the hard drive cable. I'm using a 500GB WD Blue and there seems to be a "tooth" on the iMac connector that won't fit the WD Blue. The only solution was to file off that small plastic tooth. I also didn't need suction cups to remove the glass panel. I accidentally discovered another way, when I was running my finger nail around the seams, it popped up. I wouldn't suggest it though.
As much as I appreciate IFixIt guides this one falls short of their usual high standard.
There are several omissions that can lead to a failed repair.
I wanted to say much more but it would not fit on this page, so briefly:
Failed to mention importance of opening system to determine original brand of drive installed (Seagate, Western Digital, Samsung).
Failed to mention need to get same brand so that thermal sensor could be attached to new drive.
Failed to mention without thermal sensor attached fan will continuously run at full speed very loudly.
Failed to mention need to trim off polarization tab from thermal sensor connector on Western Digital drives.
Failed to mention need to trim 8 pin thermal sensor block on Western Digital drives down to 6 pins so that sensor can be flipped yet keep thermal sensor wires connected to the second set of pins closest to the SATA connector.
Failed to mention that lifting the LCD slowly as cables can be glued in place and need to be freed up or risk damaging.
And more...
I replaced my 2011 iMac WD HD with a WD, it might be a different model…..I used OWC for the process, they didn't say anything about the thermal sensor except to use their harness, which I could not fit.
And when I took the old HD out, I did not see the cable above they are showing at all? any ideas? Fans seem to be running a bit more……also I did not have the little foam for the back-side, will that hurt anything?
My TechTool Pro says all is well.
BTW-if you get the blinking folder, go online and get the tools to format disc and install your OS. (Disk Repair)
the guys at apple couldn't tell tell me that and I spent several hours looking at a blinking folder!
My iMac …mid year 2010, 2389. I had a failed Seagate Barracuda, 7200.12 , 500 Gbyte. I installed a Toshiba 1TB 7200 drive. Now the computer starts (chime sounds) and I get a ? . I plugged in my backup Seagate and the computer see it but restoring with time machine fails. I started the computer in Internet recovery mode and it attempts to load the OS but when I get to the window where it asks what drive to load it to, it doesn’t see a hard drive. Regarding the fan, it seems to work correctly as far as I can tell. It starts off running slowly and as the machine runs longer the fan speeds up.
So can someone tell me what to do to get the computer to “see” the new drive? ( I selected this drive from the iFixit suggested list of drives.)
Thanks:
Paul
Hi, I know I’m 3 years late, but you need to go into Disk Utility in Mac, and then format the drive that you putted in where the Optical Drive is, and then it should detect it, and therefore, you can use it for more storage.
Okay, so I got it running. The trick in my case was to start it with the “Option” key method. Put the external drive with the backup, or a thumb drive with the image into the USB port and start the machine while holding the option key and proceed from there. Walked through the steps to partition and mount the drive and then load it with the operating system. Takes a while but worked a treat. Then after the operating system was happy I used Time Machine to get everything from the old drive transferred to the new drive. Also down loaded “Macs Fan Control” to calm the furious fan.
Hope this helps someone
Regards
Paul Theriault
As the computer restarts, hold down the Command (⌘) – Option (⌥) – R combination immediately upon hearing the startup chime.
Hold the keys until the animated globe appears on the screen. “Starting Internet Recovery,” the message reads. ”This may take a while.”
A Wi-Fi menu appears. Internet Recovery needs an Internet connection to load the recovery tools from Apple’s servers. Click the menu to display the available Wi-Fi networks, and then select one to connect to.
Tip: If you’re connected to the Internet using Ethernet, you don’t have to connect to a Wi-Fi network during Internet Recovery.
If this isn’t an open Wi-Fi network, you’ll be asked to type in your password. Press Enter on the keyboard or click the checkmark symbol to continue.
After your Mac has connected to the Wi-Fi network, it’ll download a recovery system image from Apple’s servers and start from it, giving you access to the recovery tools.
This may take anywhere from a couple of minutes to up to an hour, or longer.
Choose the option Install OS X
Swapping out the hard disk was ok. What happened after this:
imac‘s display stayed dark although Mac was working and booting up (fans running normally and hard disk working i could heat that) had no choice to shut down the hard way, i.e. holding power button
I suspected the displayport cable wasn’t properly in its socket and it wasn’t. Fixed that.
But then: imac won’t turn on. Tried SMC and NVRAM resets. First fans came back and then chime. But still the display is dark. Chimes comes but This time hard disk seems to do nothing at all.
Why my iMac wasn’t turning on I found out the next morning by pure luck: when it’s running and I’m tilting it back it shuts down as if something inside isn’t working only if Mac’s in a particular angle.
So question: anything I missed here or something defective?
Alright, fixed it. Got me a new internal Displayport cable. Somehow i‘ve must have broken it.
Mid-2010 with stock iMac WD Caviar Blue 500 GB HDD failed after 9 years. I replaced it with a 1TB SSD using nothing more than Electrical Tape and a 15 cent transistor.
Reading the full set of instructions first was useful in discovering that the LCD panel has short cable lengths - A flashlight, and a plastic knife were majorly useful tools. The knife helped with gently removing or pushing the pins as required.
The HDD was easily removed. I kept the metal bar which held the original HDD and used Electrical Tape to mechanically fasten the SSD to the bar.
Using the 2N3904 transistor I pushed the Emitter pin into the grey wire pin of the thermal sensor cable and both Base + Collector pins into the black wire pin. (Original solution by Alexandre on iFixit).
I tested the setup by powering up the computer connected to an external display. Everything worked as expected.
Closed the computer back up, cleaned the LCD with crumpled newspaper (it works really well) and booted from a secondary SSD in the DVD slot.
Awesome!!
The thermal sensor cable shown is incorrect. My original HD has an 8-pin connector, where the HD recommended by iFixIt has only 4 pins. Not sure how I’m gonna fix this issue.
Se non collego il sensore di temperatura cosa sucecde?
La ventola girerà sempre alla massima velocità. È possibile risolvere il problema controllando la velocità della ventola utilizzando il software.
The fan will spin at full speed all the time. You can fix the problem by controlling the fan speed using software.
I tried turning on my iMac and the screen is blank with fans running at full speed, which I understand to be an issue with the thermal sensor.
However, I have made sure that all the cables are firmly attached before attempting to run the iMac.
Does anyone have an idea as to which other factors could be the source of this issue?
P.S. I only took it apart as the iMac randomly shut down one day and couldn’t be switched on, my assumption is that it overheated and did that to protect itself.
Very easy to lift the glass out. Don't jerk too hard.
kctipton - Yanıt
Another comment on DATA & LCD Temp. Sensor cables: I had to remove the vertical sync, and the backlight cable, however, if you have an assistant or/can carefully rotate the screen clockwise/and then have it held up about 5" to 6" at a slight angle, you do not need to remove LCD data cable or LCD thermal cable, however - IMPORTANT: you must have a second pair of hands/or way to securely prop up the LCD. Also, don't rotate too much, since then you will pull out LCD data cable, and it renders the whole exercise moot, or can damage the cable or connector.
MaximBorzov - Yanıt
You don't need suction cups. The screen, held by magnets, can simply be pried off using a very thin blade such as a screw driver and fingers.
Deepsurvival - Yanıt
That's a bad idea. using a metal tool to pry off glass is likely to end with an expensive broken front glass.
Suction cups are common. Find a couple and do it the safe way. I use some cheap ones that came with iPhone repair kit.
max damage -
No need for suction cups, I just stuck my nails (short like guys usually have) between the top part of the screen and body, and it came off easily. I've never done it before, so it seems to be very easy.
Nikolas Lintulaakso - Yanıt
Nails worked for me too
Rob Dale - Yanıt
Just completed the replacement of the optical drive with an SSD using an OWC Data Doubler kit. Attempted to remove the optical drive without disconnecting any cables but found it a bit fiddly to orient the screen for good access. I bit the bullet and disconnected them and found the process less daunting than I imagined. Reconnecting them was similarly straightforward if you're careful.
Tip: you can skip the step for removing the optical drive thermal sensor connector from the motherboard. Still need to remove the sensor from the optical drive but you can leave that hanging and reattach it to the SSD later.
osienna - Yanıt
I use Garmin GPS suction cup. Work very well
jc3Dcx - Yanıt
I’ve just successfully installed a 1TB SSD in place of my optical drive thanks to the information here- thank you to everyone who has contributed!
3 comments- the procedure described here seems to vary between HD replacement and dual HD/optical drive replacement. This can be confusing at times.
Expect there to be minor differences between the layout described and what you find when you open up your iMac. There are also, surprisingly, differences between the HD enclosure description, and the article provided by ifixit.
I was able to replace the DVD/HD enclosure single-handedly without fully removing the LCD, or deconnecting any of the cables (steps 5-11). It’s a bit cramped, and fiddly, but I was not happy removing any of the cables despite watching videos, etc., since they all seemed to involve applying more force than I was comfortable with. A more detailed description of how to release them might have helped, but even here, there may be minor variations even within the 2389 model.
Good luck!
ivan birks - Yanıt
I did it several times with one suction cup at the end of a kitchen brush. Once with the blade of a swiss army knive, also ok. And i’m pretty sure it works with fingernails too
Tai - Yanıt
Fingernails are all you need to free the glass from its magnetic hold. If you don’t have them, slip something thin and plastic, like a spudger, at a top corner.
Max Powers - Yanıt
Minha dúvida é a seguinte: após o técnico trocar o HD do meu iMac de 21,5 polegadas, a câmera parou de funcionar. Seria por causa da troca do HD? Tem solução?
Claudio - Yanıt
Creio que o cabo da camera não foi plugado ou deu mau contato… ou até danificado.
glecyo@gmail.com
glecyo medeiros -
I can’t get my glass to budge. I’m replacing a cracked one and now it’s about to shatter.
jamboxmitchell - Yanıt
I know that I'm replying really late but I advise to use clear tape over any cracks so the cracks don't get bigger
Jace Holmes -
Check for chips in the glass BEFORE you do this step. If there is a chip when you pull up with the suction cups you will wind up with a jagged mess. If you do have a chip I would advise covering the screen near the chip with clear tape of some kind before lifting out. Mine shattered right at the chip and the resulting glass dust cloud got all over. My solution was buying a new glass screen.
BCam - Yanıt