Giriş
For an easier repair, use our fix kit and follow this shorter guide to replace your iPhone’s entire screen.
For more advanced fixers, this guide will help you replace only the iPhone 7 Plus LCD and digitizer assembly (a.k.a. the bare “front panel”). This requires you to transfer several components from your original screen to the new one before installing it—including the front-facing camera, earpiece speaker, LCD shield plate, and home/Touch ID sensor assembly.
For all screen/display repairs, it's important to carefully transfer the original home/Touch ID sensor onto the new display in order for it to function. The solid state home button is paired to its original logic board by Apple, so replacing it will render it unusable.
Neye ihtiyacın var
-
-
Power off your iPhone before beginning disassembly.
-
Remove the two 3.4 mm pentalobe screws at the bottom edge of the iPhone (using a P2 screw bit, if you have a set of bits).
 FixBot'a Sor
-
-
-
Measure 3 mm from the tip and mark the opening pick with a permanent marker.
-
-
-
If your display glass is cracked, keep further breakage contained and prevent bodily harm during your repair by taping over the glass.
-
Lay overlapping strips of clear packing tape over the iPhone's display until the whole face is covered.
-
If the broken glass makes it difficult to get a suction cup to stick in the next few steps, try folding a strong piece of tape (such as duct tape) into a handle and lifting the display with that instead.
-
-
Bu adımda kullanılan alet:Clampy - Anti-Clamp$24.95
-
Pull the blue handle backwards to unlock the Anti-Clamp's arms.
-
Slide the arms over either the left or right edge of your iPhone.
-
Position the suction cups near the bottom edge of the iPhone just above the home button—one on the front, and one on the back.
-
Squeeze the cups together to apply suction to the desired area.
-
-
-
Pull the blue handle forwards to lock the arms.
-
Turn the handle clockwise 360 degrees or until the cups start to stretch.
-
Make sure the suction cups remain aligned with each other. If they begin to slip out of alignment, loosen the suction cups slightly and realign the arms.
-
-
-
Heat an iOpener and thread it through the arms of the Anti-Clamp.
-
Fold the iOpener so it lays on the bottom edge of the iPhone.
-
Wait one minute to give the adhesive a chance to release and present an opening gap.
-
Insert an opening pick into the gap.
-
Skip the next three steps.
-
-
-
Heating the lower edge of the iPhone will help soften the adhesive securing the display, making it easier to open.
-
Use a hairdryer or prepare an iOpener and apply it to the lower edge of the phone for about 90 seconds in order to soften up the adhesive underneath.
-
-
-
Apply a suction cup to the lower half of the front panel, just above the home button.
-
-
-
Pull up on the suction cup with firm, constant pressure to create a slight gap between the screen and the frame.
-
Insert an opening pick into the gap.
-
-
-
Slide the opening pick up the left edge of the phone starting at the lower edge and moving towards the volume control buttons and silent switch, breaking up the adhesive holding the display in place.
-
Stop near the top left corner of the display.
-
-
-
Re-insert your tool at the lower right corner of the iPhone, and slide it around the corner and up the right side of the phone to separate the adhesive.
-
-
-
Gently pull up on the suction cup to lift up the bottom edge of the display.
-
Pull on the small nub on the suction cup to remove it from the front panel.
-
-
-
Slide an opening pick underneath the display around the top left corner and along the top edge of the phone to loosen the last of the adhesive.
-
-
-
Slide the display assembly slightly down (away from the top edge of the phone) to disengage the clips holding it to the rear case.
-
-
-
Open the iPhone by swinging the display up from the left side, like the back cover of a book.
-
Lean the display against something to keep it propped up while you're working on the phone.
-
-
-
-
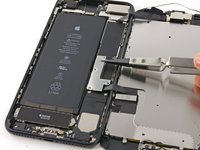
Remove the following four tri-point Y000 screws securing the lower display cable bracket to the logic board:
-
Three 1.2 mm screws
-
One 2.6 mm screw
-
-
-
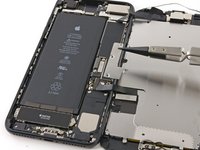
Use the point of a spudger to lift the battery connector out of its socket on the logic board.
-
-
-
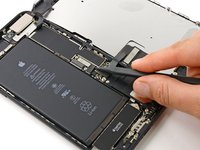
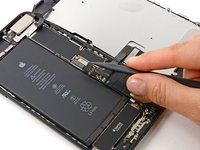
Use the flat end of a spudger or a fingernail to disconnect the two lower display connectors by prying them straight up from their sockets on the logic board.
-
-
-
Remove the three tri-point Y000 screws securing the bracket over the front panel sensor assembly connector:
-
One 1.3 mm screw
-
Two 1.0 mm screws
-
Remove the bracket.
-
-
-
Disconnect the front panel sensor assembly connector from its socket on the logic board.
-
-
-
Remove the five Phillips screws securing the earpiece speaker bracket:
-
Two 1.8 mm screws
-
One 2.3 mm screw
-
One 2.4 mm screw
-
One 2.8 mm screw
-
-
-
Use the flat end of a spudger to lift the front-facing camera from its housing.
-
Gently bend the camera ribbon cable to the side to clear the way to the earpiece speaker underneath.
-
-
-
Gently fold the camera and attached ribbon cable toward the bottom of the iPhone to allow access to the components underneath.
-
-
-
Slide a spudger under the ambient light sensor flex cable, and lift the sensor out of its housing.
-
-
-
Slide the tip of a spudger underneath the proximity sensor flex cable, and lift the sensor out of its housing.
-
-
-
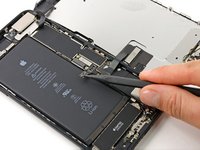
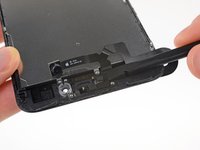
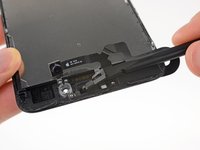
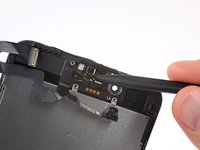
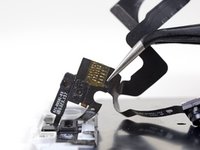
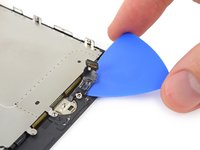
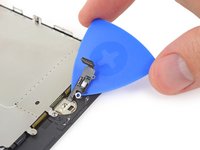
Insert the sharp edge of an iFixit opening tool underneath the camera assembly's flex cable, on the opposite side from the front-facing camera.
-
Pry up to separate the edge of the flex cable from the back of the display.
-
-
-
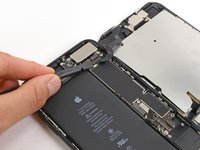
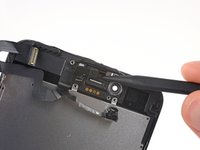
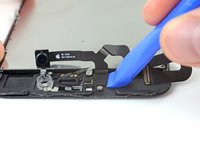
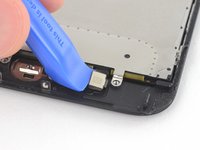
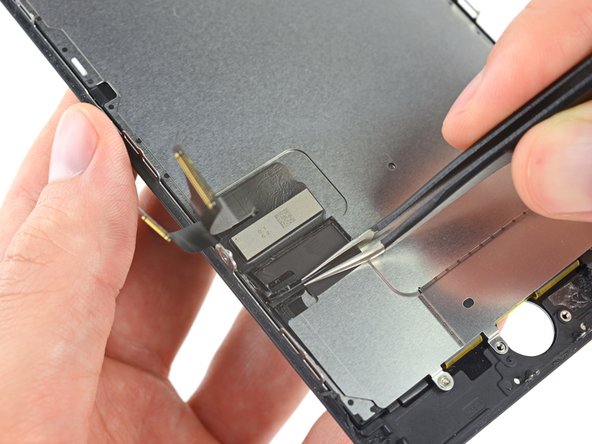
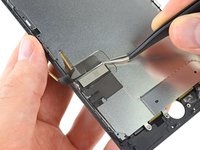
Insert the point of a spudger underneath the same portion of the flex cable that you separated in the previous step.
-
Continue separating the remainder of the flex cable, pushing the spudger toward the row of circular gold earpiece speaker contacts.
-
-
-
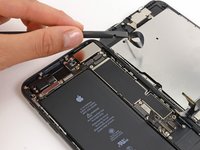
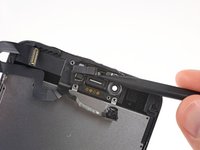
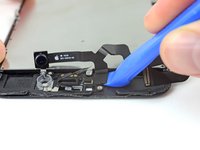
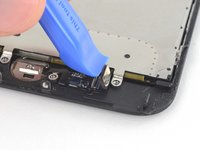
Continue using your spudger to carefully separate the last of the flex cable from the back of the display.
-
-
-
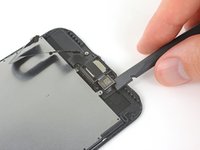
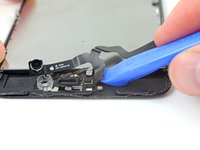
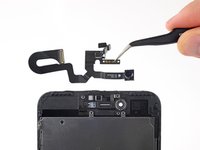
Remove the front camera and sensor cable assembly.
-
A piece of black double-sided insulating tape lies between the display and three rows of copper contacts on the back of the camera/sensor cable. It may remain stuck to the display, or it may come off with the cable.
-
-
-
Remove the four Y000 screws securing the bracket over the home/Touch ID sensor:
-
One 1.1 mm screw
-
Three 1.3 mm screws
-
-
-
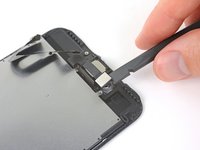
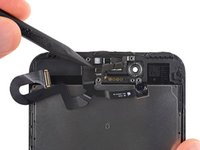
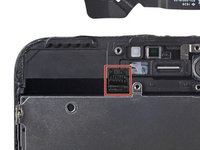
Pry under the left edge of the home button cable connector to disconnect it from its socket.
-
-
-
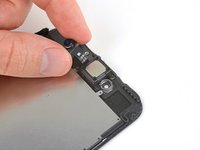
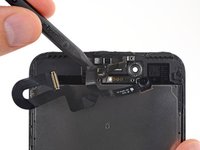
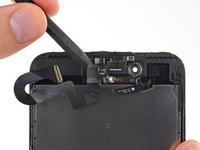
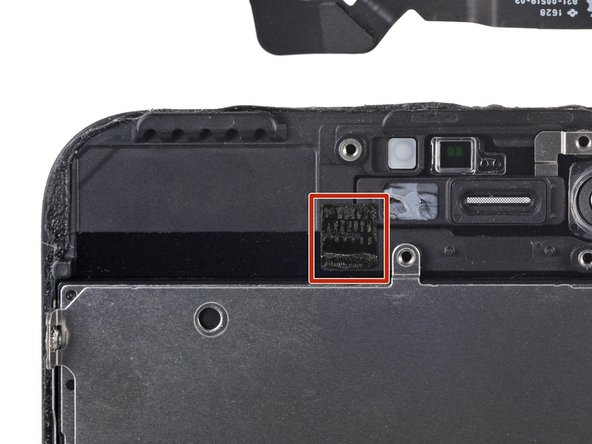
Carefully pry up the underlying connector and move it out of the way of the home/Touch ID cable.
-
If the connector doesn't pry up easily, use a hair dryer or iOpener to heat and soften the adhesive securing the connector, and then try again.
-
-
-
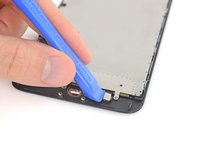
Flip the display assembly over. Use a hairdryer or prepare an iOpener and apply it to the lower edge of the display for about 90 seconds in order to soften up the adhesive underneath.
-
-
-
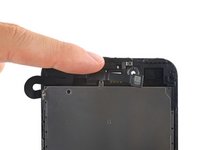
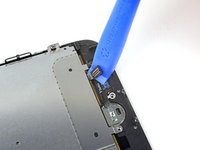
Use an opening pick to gently separate the adhesive holding the home/Touch ID sensor cable to the back side of the display panel.
-
-
-
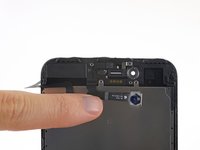
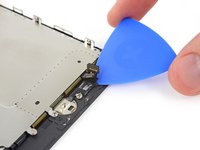
Remove the home/Touch ID sensor assembly by lifting it through the front side of the display.
-
-
-
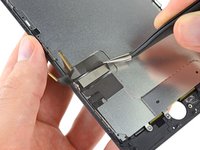
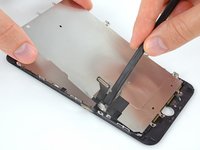
Peel back the upper, rectangular portion of the LCD shield plate sticker to separate it from the flex cable underneath.
-
-
-
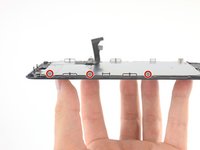
Use a Y000 driver to remove three 1.1 mm screws from one side of the display EMI shield.
-
-
-
Use a Y000 driver to remove two more 1.1 mm screws from the other side of the EMI shield.
-
-
-
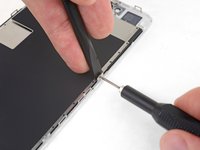
Remove the 1.8 mm Phillips screw securing the EMI shield near the bottom of the display.
-
-
-
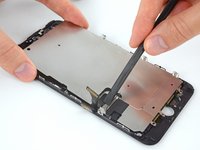
Lift the LCD shield plate while pressing down on the flex cable it surrounds.
-
Feed the flex cable through the cutout in the LCD shield plate, being careful not to snag it.
-


Compare your new replacement part to the original part—you may need to transfer remaining components or remove adhesive backings from the new part before installing.
To reassemble your device, follow the above steps in reverse order.
Take your e-waste to an R2 or e-Stewards certified recycler.
Repair didn’t go as planned? Try some basic troubleshooting, or search our Answers forum for help.
İptal et: Bu kılavuzu tamamlamadım.
199 farklı kişi bu kılavuzu tamamladı.


19Kılavuz Yorumları
Step 14 Pic# 3 the second cable damaged , what can i do ?!
If you damaged only the cable and nothing else, replacing the display should solve the problem—it will come with new cables attached.
Has anyone else had trouble getting the Y000 screws out from the bracket over the home/Touch ID sensor? All other Y000 came out no problem. These are fighting me. The driver seems to be spinning in place as if too big. Follow up question. If I strip these screws, any idea how to get them out then?
In my situation the Y screw behind the Home/Fingerprint Button seems to be GLUED ON by design to prevent inexperienced non-certified Apple replacers to remove it. So what I did was left it on to prevent stripping the screw and breaking the button. I just CAREFULLY BENT the metal bracket AT AN ANGLE so that I can maneuver the whole assembly into the hole of the screen and remove it.