Giriş
Use this guide to replace the logic board in a Late 2020 MacBook Air (M1).
Note that Touch ID will not function after replacing the logic board. The MacBook’s original Touch ID sensor is uniquely paired to the logic board at the factory—and without Apple’s proprietary calibration process, even a genuine replacement logic board from another MacBook Air won’t work.
If you replace the logic board, you must install a paired Touch ID sensor to retain Touch ID functionality.
Neye ihtiyacın var
-
Bu adımda kullanılan alet:Magnetic Project Mat$19.95
-
If your MacBook is running Big Sur v11.1 or later, disabling Auto Boot may not work. You can proceed normally, but make sure to disconnect the battery as soon as you're inside.
-
Use a P5 driver to remove the following screws:
-
Two 7.9 mm screws
-
Two 7.3 mm screws
-
Six 2.6 mm screws
-
-
-
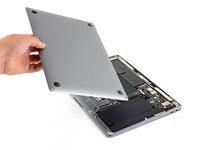
Wedge your fingers between the display and the lower case and pull upward to pop off the lower case.
-
Remove the lower case.
-
Set it in place and press firmly to engage the two hidden clips underneath. You should feel and hear them snap into place.
-
-
-
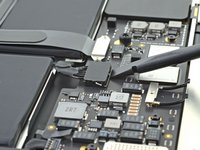
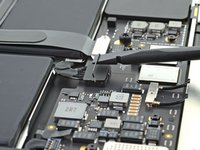
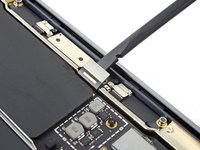
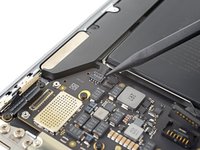
Use the flat end of a spudger to pry up and unlatch the metal locking arm on the battery connector.
-
Lift straight up on the metal locking arm to pull the battery connector out of its socket on the logic board.
-
If necessary, push the rear, wire side of the connector into place first, then rock the front of the connector into place.
If having difficulty in flipping the bar up, place the machine vertical and not that there is a small “locking nib” that the bar has to clear. You may have to give the bar honest persuasion to clear the nib.
The bar can lock backwards making it very hard to even see let alone move. Great care is needed to shift it. I had to use two thumbnails, one on each side, then once flipped forward it takes more push than I expected to clip it in place. Ensure the plug is fully seated first !
As others commented, it can be hard to click the battery connector back into place. First make sure the bar is not underneath the connector. Then, turning the computer so the connector pins are facing you (LCD hinge end closer to you) can also make it easier to position the connector on top and then click it into place.
Some replacement batteries have a retainer bar that differs from OEM batteries. I had to swap the retainer bar to properly secure it under the "locking nib" to ensure it didn't release on its own (before it could freely swing).
-
-
-
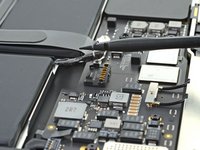
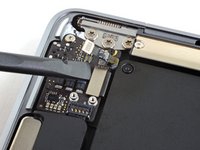
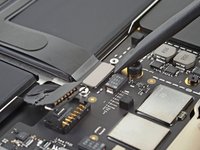
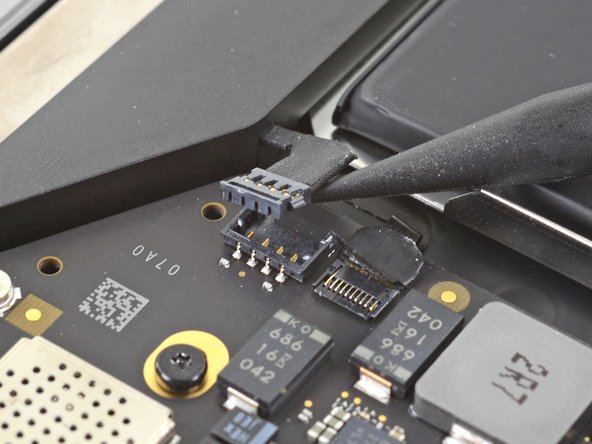
Use a T3 Torx driver to remove the three 1.4 mm screws securing the audio board connector cover.
-
-
-
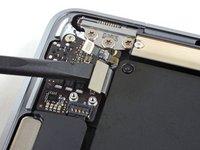
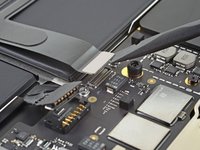
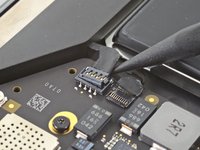
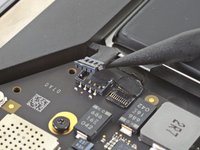
Use the flat end of a spudger to pry the audio board connector straight up to disconnect it from the board.
There is the smaller connector that’s not being mentioned. It’s the closest one to the hinges.It’s also part of the smaller audio board.
Lamajr, that small connector is for the Touch ID button and disconnecting it isn't necessary for removing the logic board only. If you're removing the audio board itself, steps for disconnecting that small cable can be found here. Happy fixing!
-
-
-
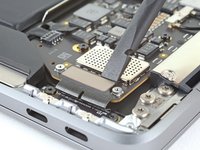
Use a T3 Torx driver to remove the two 1.4 mm screws securing the USB-C connector cover.
-
-
-
-
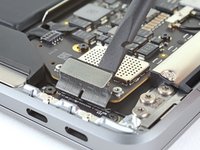
Use a T3 Torx driver to remove the 1.4 mm screw securing the antenna cable cover.
-
-
-
Use a T3 Torx driver to remove the two 1.4 mm screws securing the trackpad cable cover.
-
-
-
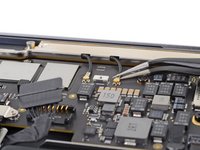
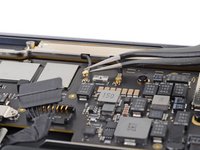
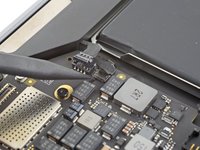
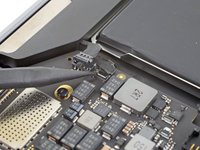
Slide the pointed end of a spudger underneath the left speaker cable and pry straight up to disconnect it from the logic board.
Note that the perspective has shifted here and we're looking from the opposite direction than the rest of the guide.
-
-
-
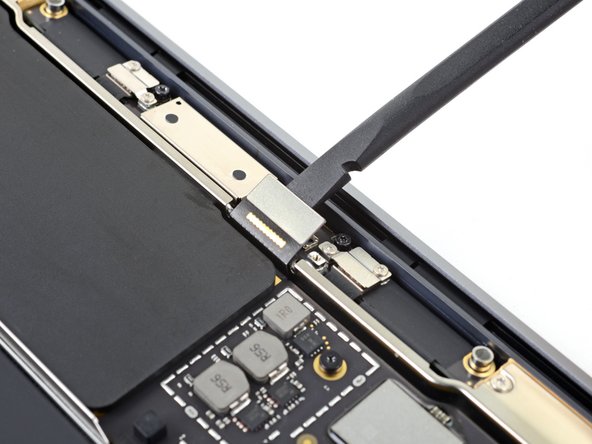
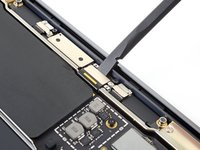
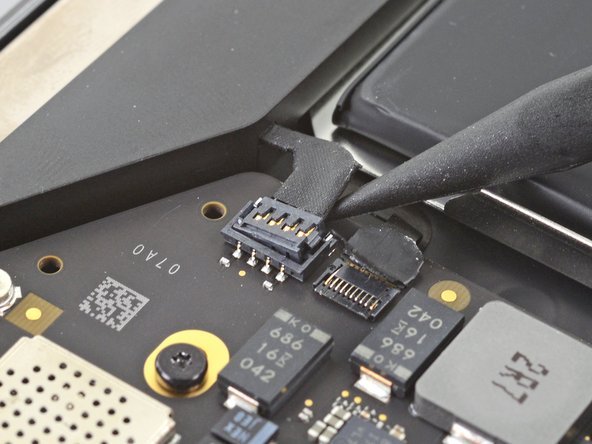
Use a pair of tweezers to peel back any tape covering the microphone cable connector.
-
Use the pointed end of a spudger to lift up the small locking flap on the microphone cable's ZIF connector.
-
Slide the microphone cable out of its connector.
-
-
-
Use a T5 Torx driver to remove the six screws securing the logic board to the upper case:
-
Three 3.5 mm screws
-
One 6.0 mm cushioned screw
-
Two 3.4 mm screws
-
-
-
Battery cable
-
Audio board cable
-
USB-C board cable
-
Antenna bar cables
-
Display cable
-
Trackpad cable
-
Left speaker and microphone cables
I’m having an issue getting the last logic board screw out. Any tips?
Which one did you get to last? What kind of issue are you having?
I’m trying to reassemble but having a hard time reconnecting the microphone and trackpad cables. What should I do?
The trackpad cable is pretty straightforward, you just have to make sure it's aligned properly and press it down into the connector. The mic cable is a bit trickier if you've not dealt with this type of socket. The cable goes underneath the connector and the you have to pull it in as far as it will go. It's best to take a good look before you pull it out to see how far it needs to go into the connector (I believe this is a type of ZIF [zero insertion force} but it can take a decent amount of force at times, enough to break that little strip of plastic they give you to pull it into place).
Looking for the wifi component?
It's part of the logic board, there's no replaceable component (sadly).
-


Compare your new replacement part to the original part—you may need to transfer remaining components or remove adhesive backings from the new part before installing.
To reassemble your device, follow the above steps in reverse order.
Once you've completed your repair, your laptop may not power back on until connected to power.
Take your e-waste to an R2 or e-Stewards certified recycler.
Repair didn’t go as planned? Check out our Answers community for troubleshooting help.
İptal et: Bu kılavuzu tamamlamadım.
38 farklı kişi bu kılavuzu tamamladı.


16Kılavuz Yorumları
Thank you
How do we access the data on a board that is not working due to corrosion ? We have been informed that the SSD is integrated in the board so until same is working we cannot access the data.
There used to be a data port on the board that needs a very special piece of equipment to access. You'd need to send it to data recovery, open your wallet very wide, and keep your fingers crossed. It looks like that port no longer exists? Your data is probably gone, but Apple saved you a lot of money on recovery services!
Looking for the WiFi component?
The WiFi card on this laptop is built into the logic board.
Aydan -
alguien sabe si existe un adaptador para este tipo placa logica a sdd para?
A strange question
Would you start a MacBook Air WITHOUT a battery, powering the board directly as if it were a desktop? 🤔
Does anyone know what voltage the battery cables provide?
Thank you.
It should power on without the battery connected. The voltage should be 20v.
Kann man wo die einzelnen Bauteile (ICs.,,) des Logic Boards kaufen?
Ich möchte mein Logic Board reparieren statt tauschen.
Is it possible to buy somewhere the parts of the logic board? I would like to repair my logic board, instead of replacing it.
I do not recommend trying to do that, as it requires micro-soldering, and not even many experienced micro-solderers would not do this. Just get a new logic board, it's much unless you want to risk destroying the whole board, and then paying even more for a new one. In the end, that costs more money.
ok si je ne change pas id touche celui-ci ne fonctionne pas ... mais il sert de bouton d,allumage aussi , celui-ci fonctionne t'il comme on/off
Bonjour @gedfr Oui, les fonctions "basiques" du bouton restent. Veuillez cependant toujours vérifier auprès du vendeur de la pièce quelles sont les fonctions garanties.
Se puede reemplazar el ssd por uno de mayor capacidad? tengo 256 por defecto y quiero llevarla a 1Tb o 1Tb gracias!
Hey, after opening it with this tutorial to replace the thermal paste, it will not turn on.... I tried without battery and only the original power brick and cable, then only with battery, then with both, but nothing works. As if it does not have ANY power now. Any suggestions? The type-c did not make "snap" when connecting unlike the other lego style connectors tho. Could it be the issue?
lol after realining the type-c connector and it finally made the "snap" sound. After that I connected the battery, the type-c power brick and now it works! I thought I bent some pins or something ...
gpimic -
Thank you so much, you saved my MacBook! These tutorials are really well explained!
ESD safe mat, plugged into ground, with a wrist strap, also grounded, are the best best to protect the logic board.
Robin Ray - Yanıt
Re-Assembly Tip: Before putting the screws back in, snap the lower case on and test to make sure the MacBook powers up. When I first re-assembled, I became very nervous I did something wrong because it would not power on. It turns out I just needed to plug the laptop into a power source for it to power up (despite having a good charge before disassembly). It was the perfect way to test the new USB-C ports!
Austin - Yanıt
Big points to this one, especially for mentioning needing to plug the laptop in. The bottom case needs to be screwed in and laptop needs to be plugged in before it will boot.
Bayden Yazalina -
Wiha 4PL driver for these screws.
Greg Worrel - Yanıt
Printing out all the images from this Ifixit guide prior to starting and using duct tape help me keep track of screws.
raju midjdeya - Yanıt
This Guide has a high chance of not working if an aftermarket display is used as MAC serialization was introduced post ~2023. Likely you will need an original MAC screen replacement and to serialize the display for it to work.
Tron Computers - Yanıt