
Poco X3 Pro Battery Replacement

Giriş
1. adıma gitUse this guide to remove or replace the battery on your Xiaomi Poco X3 Pro.
If your battery is swollen, take appropriate precautions.
For your safety, discharge your battery below 25% before disassembling your phone. This reduces the risk of a dangerous thermal event if the battery is accidentally damaged during the repair.
You’ll need replacement adhesive to reattach components when reassembling the device.
Neye ihtiyacın var
Parçalar


Aletler


Daha fazlasını göster…
-
-
Prepare an iOpener and apply it to the back cover for at least two minutes to loosen the adhesive underneath.
-
-
-
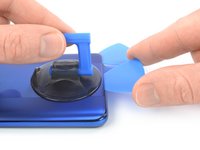
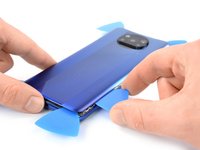
Secure a suction handle to the bottom edge of the back cover, as close to the edge as possible.
-
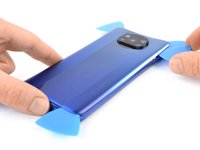
Lift the back cover with the suction handle to create a small gap between the back cover and the frame.
-
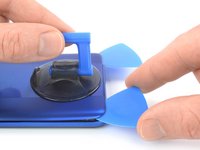
Insert an opening pick into the gap you created.
-
Slide the opening pick to the bottom right corner to slice the adhesive.
-
Leave the opening pick in place to prevent the adhesive from resealing.
-
-
-
Insert a second opening pick at the bottom edge of your phone.
-
Slide the opening pick to the bottom left corner to slice the adhesive.
-
Leave the opening pick in place to prevent the adhesive from resealing.
-
-
-
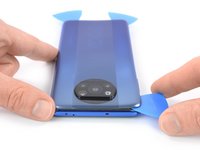
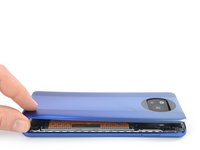
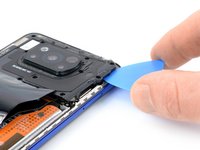
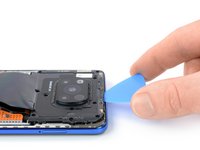
Insert a third opening pick at the bottom left corner of your phone.
-
Slide the opening pick along the left edge of your phone to slice the adhesive.
-
Leave the opening pick in the top left corner to prevent the adhesive from resealing.
The position of the fingerprint scanner flex cable is slightly underneath the power button, very close to the edge of the phone, be careful not to slice or otherwise damage it while removing the adhesive. The good news is that if you do slice it, your power button will still function, and it is relatively easy to replace.
-
-
-
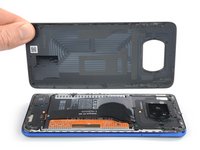
Use a Phillips screwdriver of the correct size to remove the eleven 3.9 mm-long screws securing the motherboard cover.
-
-
-
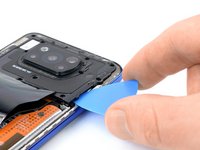
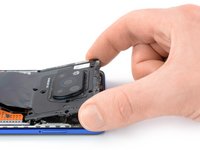
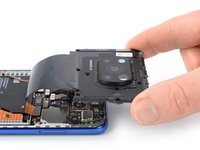
Insert the tip of an opening pick underneath the bottom right edge of the motherboard cover.
-
Slide the opening pick along the right edge of the motherboard cover to unhinge the plastic clips and pry it up.
-
Insert the opening pick underneath the top edge of the motherboard cover and pry it up.
-
-
-
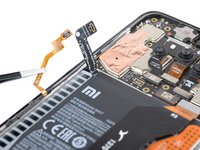
Use a spudger to disconnect the battery cable by prying the connector straight up from its socket.
-
-
Bu adımda kullanılan alet:Tweezers$4.99
-
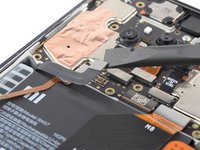
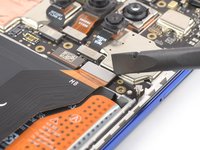
Use a spudger to disconnect the power and volume button flex cable by prying the connector straight up from its socket.
-
Use a pair of tweezers or your fingers to carefully fold the power and volume button flex cable to the side in order to get free access to the battery.
-
-
-
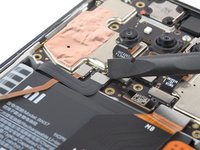
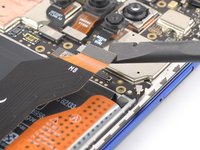
Use a spudger to disconnect the interconnect cable by prying the connector straight up from its socket.
-
Fold the interconnect flex cable towards the charging port in order to get access to the battery pull tabs.
-
-
-
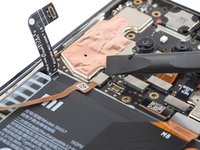
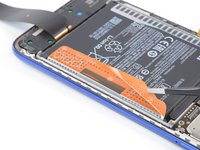
Use a pair of blunt nose tweezers or a clean fingernail to peel the orange adhesive strip labelled with an A off the battery.
-
Use a pair of blunt nose tweezers or a clean fingernail to peel the orange adhesive strip labelled with a B off the battery.
-
-
-
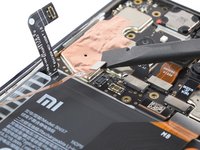
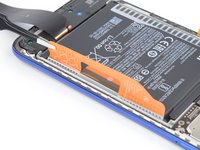
Grab both pull–tab ends labelled with an A and pull up on the orange adhesive strip to lift the battery out of its recess and swing it up to an upright position.
-
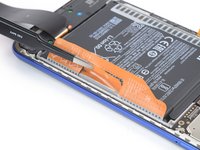
Peel the battery off the remaining adhesive.
-
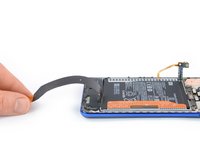
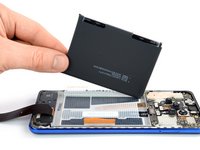
Remove the battery.
Me deparei que a versão do poço x3 pro indiana ultiliza bateria bn61 de 6000mha e a do poço x3 pro versão global ultiliza bateria bn57 de 5160 mha no caso eu poderia colocar a bateria b 61 com mais mha da versão indiana na do lugar da bn57 de 5160mha para fazer que meu poço versão global dure mais isso seria possível?
-


If possible, turn on your device and test your repair before installing new adhesive and resealing.
For optimal performance, calibrate your newly installed battery after completing this guide.
Secure the new battery with pre-cut adhesive or double-sided adhesive tape. In order to position it correctly, apply the new adhesive into the device at the places where the old adhesive was located, not directly onto the battery. Press the new battery firmly into place.
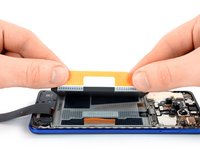
Compare your new replacement part to the original part—you may need to transfer remaining components or remove adhesive backings from the new part before installing.
To reassemble your device, follow these instructions in reverse order. Apply new adhesive where necessary after cleaning the relevant areas with isopropyl alcohol (>90%).
Take your e-waste to an R2 or e-Stewards certified recycler.
Repair didn’t go as planned? Try some basic troubleshooting, or ask our Answers community for help.
If possible, turn on your device and test your repair before installing new adhesive and resealing.
For optimal performance, calibrate your newly installed battery after completing this guide.
Secure the new battery with pre-cut adhesive or double-sided adhesive tape. In order to position it correctly, apply the new adhesive into the device at the places where the old adhesive was located, not directly onto the battery. Press the new battery firmly into place.
Compare your new replacement part to the original part—you may need to transfer remaining components or remove adhesive backings from the new part before installing.
To reassemble your device, follow these instructions in reverse order. Apply new adhesive where necessary after cleaning the relevant areas with isopropyl alcohol (>90%).
Take your e-waste to an R2 or e-Stewards certified recycler.
Repair didn’t go as planned? Try some basic troubleshooting, or ask our Answers community for help.
İptal et: Bu kılavuzu tamamlamadım.
40 farklı kişi bu kılavuzu tamamladı.


10Kılavuz Yorumları
Big thanks!! 🍻🍻💪💪
Big thanks excellent tutorial 🙂
ماذا عن الجو بارد جدا انا حقا محتار من هاتف كهذا
Hello, do you lose fast charging with the battery replacement?
No, not if the replacement battery is the original model (BN57). Do note that this guide links to the incorrect battery model (BM57) which will neither fit nor function with Poco X3 Pro
Thanks Excellent educational site that helps you do the repair yourself.
I don't know whose part this mistake is on, but I just realized that the battery this article links to does not fit Pocophone X3 Pro. Sadly, I realized this after ordering the battery and opening my phone up. Someone please address this.
The correct battery model for Pocophone X3 Pro is BN57 whereas this guide links to BM57, the battery for Redmi Note 10 Pro. This battery does not have the same cable arrangement and will not fit inside Poco X3 Pro, how the heck has this gone unnoticed for nearly a whole year (how long this guide has been up)?
I'm gonna do it bros. Wish me luck. Bought it last time during kung flu!
Qual a temperatura ideal que devo aplicar na tampa traseira para a remoção da cola posso aplicar 70 graus de temperatura?
dicaslegais sobre tec - Yanıt