
Google Pixel 5 Battery Replacement

Giriş
1. adıma gitThis repair guide was authored by the iFixit staff and hasn’t been endorsed by Google. Learn more about our repair guides here.
Follow this guide to remove and replace the battery on a Google Pixel 5.
For your safety, discharge your battery below 25% before disassembling your phone. This reduces the risk of a dangerous thermal event if the battery is accidentally damaged during the repair. If your battery is swollen, take appropriate precautions.
The rear cameras were removed in the photos, but it is not a necessary step to take when removing the battery.
Neye ihtiyacın var
Tamir Seti
Bu kit, bu kılavuzu tamamlamak için gereken tüm parçaları ve araçları içerir.

Parçalar


Aletler


Daha fazlasını göster…
-
-
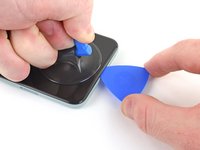
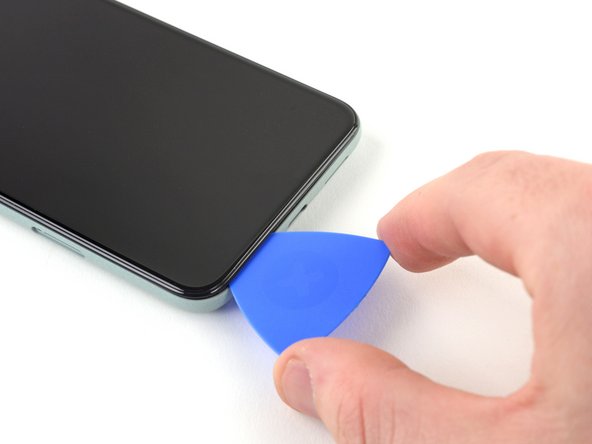
Heat an iOpener and apply it to the bottom edge of the screen for one minute.
-
-
-
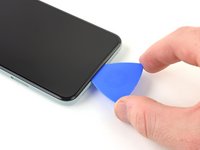
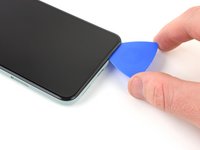
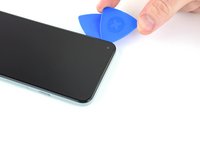
Screen seam: This seam separates the screen from the rest of the phone. Do not pry at this seam.
-
Bezel seam: This is where the plastic bezel designed to protect the screen meets the frame. It's held in place by plastic clips. This is where you should pry.
Please remove the image of the pick in the bottom of the phone in Step 2. This led me to place a pick there BEFORE step 5 which damaged my digitizer. Now I have to replace the entire screen as a result.
Alternatively, add the image from step 5 with the suction cup in place, or just draw an arrow digitally to the seam you're referring to in step 2. Or call "Step 2" "Important Note" instead of a step.
Wow, I'm glad I read this first. I too assumed this step was about inserting the pick, but wasn't sure because it wasn't clearly written that way.
Agreed with the "important note" idea, along with combining this with step 5 where the context is actually relevant.
Just made this same mistake and the photo is still there... there goes another $180...
-
-
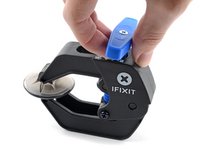
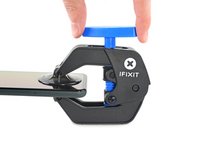
Bu adımda kullanılan alet:Clampy - Anti-Clamp$24.95
-
Pull the blue handle towards the hinge to disengage opening mode.
-
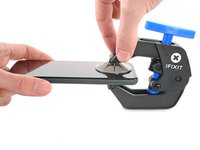
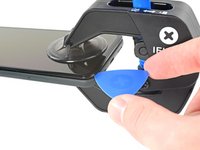
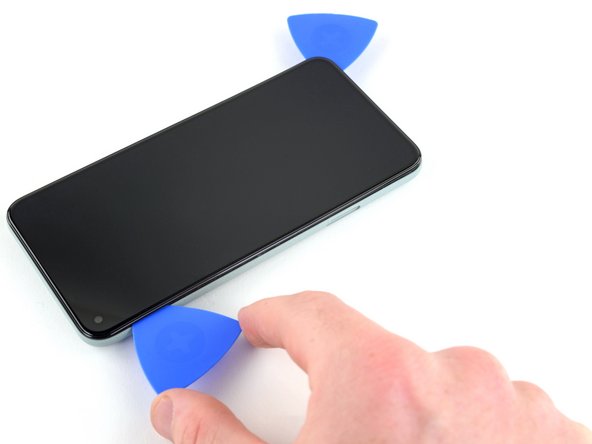
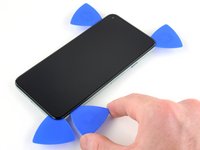
Position the suction cups near the bottom edge of the screen—one on the front, and one on the back.
-
Push down on the cups to apply suction to the desired area.
-
-
-
Push the blue handle away from the hinge to engage opening mode.
-
Turn the handle clockwise until you see the cups start to stretch.
-
Wait one minute to give the adhesive a chance to release and present an opening gap.
-
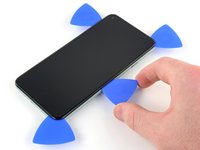
Insert an opening pick under the screen and its bezel frame when the Anti-Clamp creates a large enough gap.
-
Skip the next step.
-
-
-
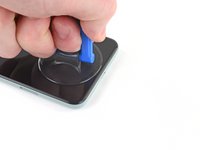
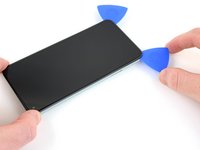
Apply a suction cup to the screen, as close to the heated edge as possible.
-
Pull up on the suction cup with strong, steady force to create a gap.
-
Insert the opening pick into the gap.
"Insert the opening pick into the gap." NOT the gap under the glass, the second gap... If not you will probably break your screen, at least I did. Especially important if your pixel 5 shipped with the screen gap :(
-
-
-
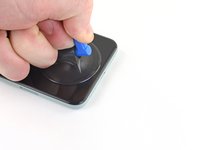
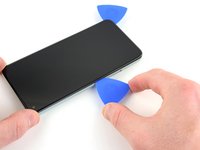
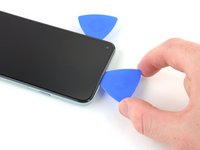
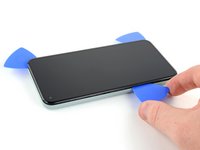
Slide the opening pick back and forth along the bottom of the screen to slice the adhesive.
-
Leave the pick inserted in the bottom right corner to prevent the adhesive from re-sealing.
-
-
-
Apply a heated iOpener to the left edge of the screen for one minute.
-
-
-
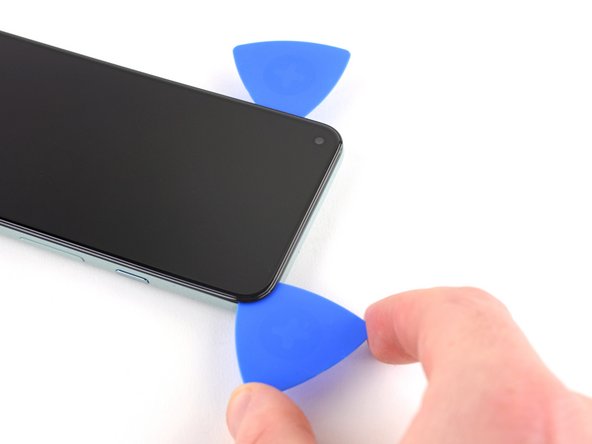
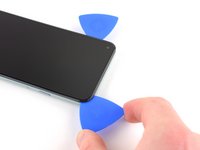
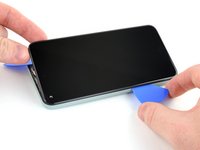
Insert another opening pick into the bottom left corner of the screen.
-
Slide the opening pick around the left corner.
-
Continue to slide the pick up towards the front camera to slice the adhesive on the left edge of the screen.
-
Leave the pick inserted to prevent the adhesive from re-sealing.
I suggest placing an orientation sticker on the screen so you don't lose track of where that delicate ribbon cable is. I gently bent one, immediately after doing a successful one, resulting in a costly screen replacement. It's important to know that it's incredibly delicate.
I bent one of the picks at the end up 90 degrees with the tweezers to a depth of 3/16" and it worked beautifully. Left it on that side to remember where it was important.
-
-
-
-
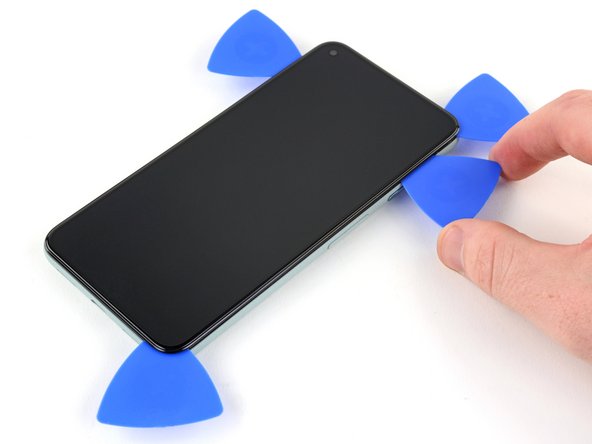
Use the opening pick from the top left corner to lift up the left edge of the screen a few millimeters. This will keep the clips from snapping back down into the case.
-
Lift up on the right side of the screen and open up the phone like a book.
-
-
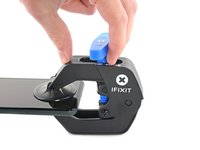
Bu adımda kullanılan alet:Tweezers$4.99
-
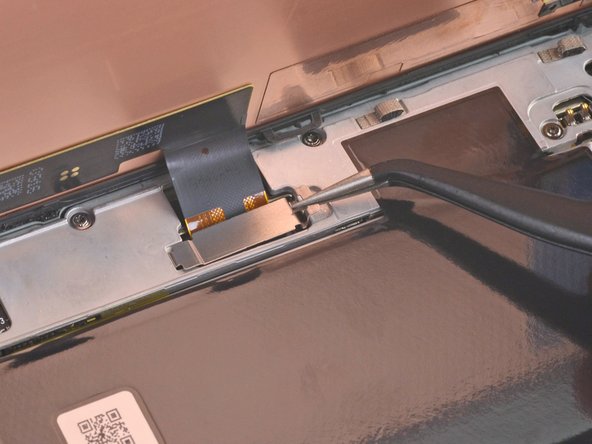
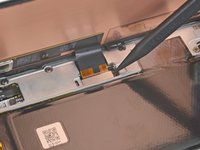
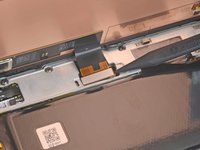
Use tweezers to grip the screen connector cover securing the screen flex cable.
-
Push the clip in towards the connector to unlatch it.
I found it easier to use the spudger here rather than the tweezers (which have sharp ends that could damage something if you happen to slip).
some 5a models will have a screw instead of clip , here's a photo https://imgur.com/a/9dZG5pQ
You commented on the guide for the Pixel 5, not the 5a: Google Pixel 5a
Pixel -
I just fought with this part using the tweezers for several attempts, and then with the spudger it came right out when I applied force towards the center of the left edge.
-
-
-
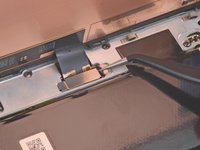
Use the tip of the spudger to pry up and disconnect the screen flex cable.
The curved ends of the blue iFixit Opening Tool helped me reseat the connector when installing the new screen.
So hard to get this thing reseated to test the screen, even before putting the adheasive round the phone edge to finish the job. What made it particularly hard was that the flex cable on mine seemed very short compared to video's i've seen online.
Reattaching this press connector was the worst! By the time I had done all the steps below and then in reverse, I was ready to be DONE. Be careful, patient and gentle.
I too wanted to test my screen before the final adhesives and when I finally got the connection done and tested my screen, I HATED that I had to undo the connection to attached the adhesive.
If using the Pixel 5 display adhesive that comes in the battery repair kit, there are actually two sets of blue protective covers. One that helps align the adhesive to the frame. Once that is removed, there is a very thin blue cover on the adhesive itself - that does split in two pieces. So, all this said, I could have attached the adhesive before testing the screen and would have been able to leave the adhesive strip with the blue protective cover in place if I needed to make any adjustments before sealing the screen to the frame.
So I was reassembling everything after changing the battery.
Now my only step left is to reconnect the display. However by doing so and trying to turn it on the screen doesn't work... I feel the haptics, but the display is no longer responsive. Please help.
-
-
-
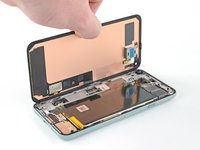
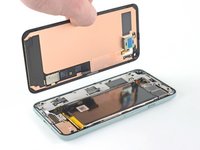
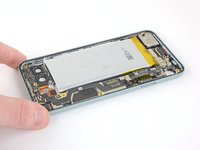
When handling your screen, grip it by its edges.
-
When placing the screen on your work area, make sure nothing is touching the bottom of the screen. Consider placing it on a soft, lint-free cloth.
-
-
-
Remove the screen.
Where from we can buy the screen. Thanks
the screen does not fit
After reconnecting the screen, is it necessary to remove a screen protector (if installed) for the a proper screen calibration?
Yes. Remove the screen protector when installing the screen.
Remaining adhesive - very little actually pulled up in strips, most had to be gently scraped up. The 90% alcohol was a must to help soften the adhesive that remained. I did not get all of it off.
The custom cut adhesive guide was very helpful. I did use the iOpener to heat up the edges after I installed the screen to help create the best seal. I believe this also helped deal with the old adhesive I hadn't been able to remove and allowed for a secure, tight fit of my screen to the frame.
-
-
Bu adımda kullanılan alet:Tweezers$4.99
-
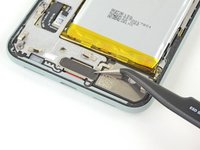
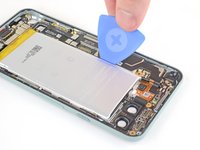
Use tweezers to lift up the graphite tape until you are able to grip it with your fingers.
-
Peel off the graphite tape.
On reassembly, I missed the graphite tape installation. Will this be an issue?
I believe graphite tape is used for heat dissipation to help keep the phone cool and not overheat so I would say it's an important component. If you can reinstall then do as heat will affect the operation of the device and impact the battery and internal components.
Luckily the kit came with graphite tape replacement as I accidentally tore through mine when using the sharp tweezers. Here I recommend using the crocodile tweezers as these aren't as sharp and have a bigger surface area to grip.
If you're dumb like me you won't find the crocodile tweezers until you look under the tools tray. I slid my tray out of its box right onto the work surface, so I never noticed the tweezers underneath.
-
-
-
Use tweezers to peel off the graphite pad covering the charging plate cover.
I found the sharp tweezers accidentally cut through the graphite tape and graphite pad. Use the crododile tweezers instead of the pointed ones to avoid ripping the tape.
To clarify what lupa said: the kit does in fact come with a new graphite pad for the charging plate cover. It took me a while to find it, finally found it underneath my parts tray on the table somehow so it may slide around inside the shipping box.
I forgot to put back the graphite thermal pad when reassembling it. Now it is all glued back together and it is working like a charm. Should I worry? 🤔
-
-
Bu adımda kullanılan alet:Magnetic Project Mat$19.95
-
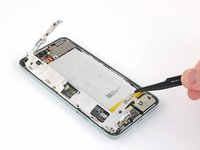
Use a T3 Torx driver to remove the two 4.6 mm-long screws securing the charging plate cover to the midframe.
-
-
-
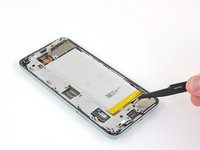
Use tweezers to lift up the right side of the midframe.
-
Remove the midframe.
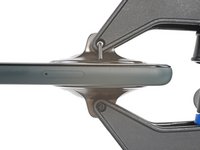
Removing the midframe may cause a metal-foam spacer above the light sensor to pop out. After placing in the midframe on re-assembly, you can use the tweezers to squeeze the spacer back in between the midframe and the metal divider near the top of the phone.
There is a picture of this spacer at https://www.ifixit.com/Guide/Google+Pixe.... To replace it, first replace the midframe. Then, before screwing the midframe back down, use the tweezers to pinch the space together, compressing the foam in the middle, and slide it into place.
FYI My model Pixel 5 SKU: GA01316-UK does not have a spacer.
I was very careful and looking specifically for this when removing the screen however it is just an empty cavity with nothing there. I guess it differs based on different PIxel 5 models?
-
-
-
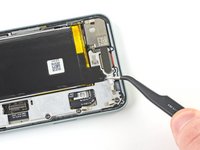
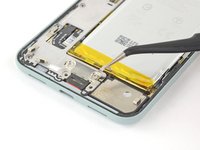
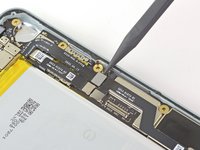
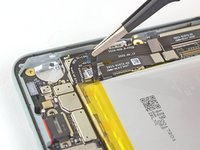
Use the pointed end of the spudger to pry the battery connector straight up and disconnect it from the motherboard.
-
-
Bu adımda kullanılan alet:Tweezers$4.99
-
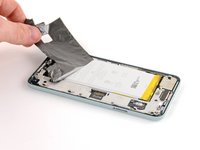
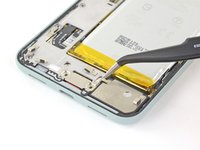
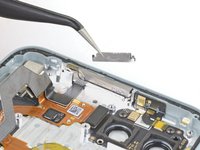
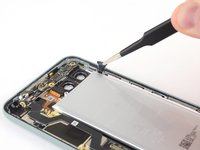
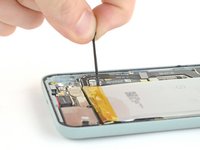
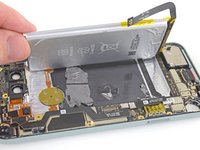
Use blunt nose tweezers to grip the black adhesive pull tab located on the top right edge of the battery. Lift the pull tab with the tweezers until you are able to grip it with your fingers.
-
Pull on the pull tab with a slow, steady force at a shallow angle to prevent the pull tab from snapping in the middle.
-
If the pull tab breaks prematurely, use tweezers to retrieve the remaining length of adhesive and continue pulling.
I found what helped the best, was after grabbing the tab wrapping it around the tip of the spudger, and rolling slowly away, holding it as close as possible to where the tab was. Before I did that since you're pulling so much at once it easily snapped in half. Luckily I could grab a tiny bit of the strip. After wrapping it around the spudger, it no longer broke. The whole strip came off in one piece. Both pieces are complete horizontal pieces and are along the entire width of the battery, from the side you're pulling to the other side of the battery. There's quite a bit there especially since it stretches during this process. You'll feel it suddenly basically give away. ******
It is very much like the adhesive strips you use to hang items on the wall. When you're removing the hook, you pull at a low angle on that tab and it stretches until it comes off clean. Pull too high and you peel paint. A similar process here, keep it low and roll it slowly on the spudger. It will come away cleanly.
Pull very slowly. Once there is enough out to grip with fingers use your fingers . The tweezers concentrated the load in a small contact area with hard edges. more likely to start a tear. Easier to control pull as well. As the tab comes out keep regripping closer to the battery. That takes the load off the part of tab that has already been stretched thin and weakened.
As expected the pull tabs snapped.
This tab also snapped on me. I was pulling up not out. I agree that pulling almost parallel to the work surface is best. Slow and steady.
Snapped on me too. Worth saying that
1. It's not worth going all out for a "Shallow" angle if the tape will get caught on any other fixings on the phone. Keep it shallow within reason
2. Take your time! Pull slowly - when you've pulled a little bit, hold and regrab the tape closer to the battery with your other hand and pull slowly again. Keep doing this rather than doing one long continuous pullIt is worth getting this right, using the slow-wrap-around-the-spudger approach, because if you get the whole strip out in this step and step 24, the battery lifts right out in step 27. Go veeery slowly, roll around the spudger tip so that the adhesive rolls under the spudger instead of over (to keep the shallow angle), and keep as parallel to the work surface as possible without rubbing hard on the edge of the phone. You'll hear squeaking sounds and that's OK. If you see the tape getting narrow it may be about to snap -- roll the spudger up close and pull gently to keep going.
-
-
-
Use the same process to remove the pull tab located at the bottom left edge of the battery.
Same. At first I thought it was a different compenent alltogether however that didn't help as it snapped when pulling anyway!
Both tabs are hard to find. The first one snapped, this one I made sure to grip as close to the battery after I successfully pulled a small piece and by not pulling up but pulling away from the battery toward the edge of the frame. Because the tape stretches so much, I probably stretched and then grabbed the tape close to the battery 5 or 6 times. It eventually came off without breaking.
Same comment as on step 23: if you get this right, step 27 is free.
-
-
-
If any of the adhesive strips broke off underneath the battery and could not be retrieved, apply a few drops of high concentration (over 90%) isopropyl alcohol into the opening of the affected tab.
This is a frustrating step since I bought the kit thinking I had everything I needed. I don't keep 90% isopropyl alcohol on hand (71% is effective as a disinfectant, where as 90% is not).
For those who also do not have 90% on hand, I was able to just gently lift the battery out without the alcohol and the graphite under the battery remained in perfect condition and did not tear at all.
Agree. The fix kit supplies only 70% IPA so I had to buy some on Amazon. The pulltabs snapped in the previous step and the dropper provided in the kit is rather "imprecise". Kept prying at the edges got it off for me but so far this is the hardest step as it's hard to know how much force to remove the battery and risk damaging another component.
-
-
-
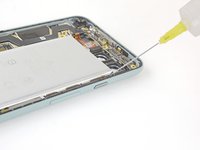
Tilt the phone so that the alcohol flows towards the remaining adhesive.
-
Wait one minute for the adhesive to soften, then proceed to the next step.
If you're like me, I ended up having a random piece fall out of the phone that I had no idea where it went. After searching I gave up and left it out. However, after looking at the second photo in this step, the one with it tilted fully towards the camera, I found it. Between the index and thumb in the photo, directly in the center of the phone is a thick gray bar. Just to the right of it is a loose piece that might fall out for you. It looks like two thin pieces of metal that sandwich some insulation. You will also notice two tiny tabs bent at an angle on each end only on one side. If that piece does fall out, that's where it goes. Just match the tab angles with this photo and location. I, unfortunately, don't have that piece anymore and am not willing to break through that display adhesive to put it back anyways.
FYI My model Pixel 5 SKU: GA01316-UK does not have this spacer at all.
-
-
Bu adımda kullanılan alet:Plastic Cards$2.99
-
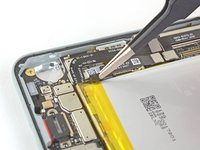
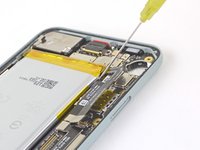
Insert an opening pick into the gap long the left side of the battery.
-
Use the opening pick to slice the remaining adhesive at the top and bottom of the battery.
-
If you cannot pry the battery up, add a few more drops of isopropyl alcohol to the adhesive. A plastic card can also be helpful during this process.
This was, by far, the hardest step for me. Pay very much attention to that link "strategically located". It tells you exactly where the toughest adhesive is. I had to use a lot of isopropyl alcohol, a lot of waiting for the adhesive to dissolve, and the thin spudger on only the top and bottom of the battery to pry it out. I did not use the pick.
I don't think it's worth applying adhesive when putting the battery back in.
Absolutely agree. More isopropyl alcohol, a lot of waiting is the key.
Watch how far you push in. The thin cable for the finger print sensor is at the back I snapped it pushing into the glue.
Try to not use alcohol. Or at least use just a tiny bit without tilting the phone too much. While it worked for me, it leaked into my primary camera lens. Wide camera is okay fortunately, so I can still take photos for important things, and I hope in the next few days alcohol will evaporate. I also tried to put the iOpener on the camera to increase the pressure and move the alcohol to the edges. It kinda worked but photos are still a no go, too blurred
Just to update who may read this, alcohol fully evaporated after 1 day. I've been very lucky 😅!
Be aware that if the battery has already been replaced, the aftermarket battery may be adhered over the fingerprint reader cable. I forgot that I already replaced the battery so I was expecting all the adhesive to be to be above the cable, so I pried on the battery too hard and the adhesive ripped the cable. Using more alcohol seems to have been the right move.
-
-
-
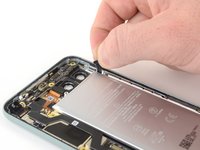
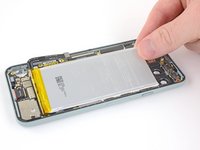
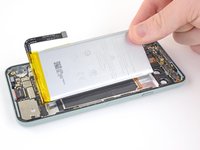
Remove your old battery.
Step 28 battery replacement guide. This is the battery replacement guide - for bad batteries. So why does it say "Do not reuse the battery if it has been deformed or damaged, as doing so is a potential safety hazard. Replace it with a new battery." This must have been copied from a different guide, that does not involve battery replacement.
Great! You did it and removed the battery... now what? Doing the steps in reverse is easier said than done.
To put it back together I recommend watching Google Pixel 5 Battery Replacement from 5:46 onwards. This video as an accompaniment in general to this guide I found super helpful as it's an actual video of this repair.
Seeing someone actually perform this exact repair in realtime is very helpful as well as some techniques not mentioned in this guide.
I performed a screen and battery replacement with the help of this video so I really recommend watching it.
Could be because these steps are used in other repairs where the battery is still fine?
The youtube link is helpful - thank you! Frustrating that the guide doesn't go through the reverse steps more explicitly, especially considering the adhesives need to be relaid.
With these adhesives that come as part of the kit, make sure to keep the blue coverings face-up, then press all over before attempting to pull the blue coverings. This is especially fiddly when laying the final adhesive for the screen. Whilst pulling off the blue covering here, I went especially slowly and followed with the spudger to keep the adhesive down if it was coming up with the blue covering. Note: it's worth placing the adhesive before cliping in the screen connector unless you want to test the screen first (as per the youtube vid)There are also two small adhesive plastic "spacer strips" at the top and bottom of the battery that should be peeled off and installed on the replacement battery, they help hold the battery in the center of the compartment. the bottom one has a "D" cross-section to it while the top is flat and more like a rub strip. They did not come on the replacement battery and aren't mentioned anywhere.
PSA: When reconnection the screen (the little lego bracket) be freaking careful. I've connected brackets like these multiple times on other devices but here these pins are so f fragile. I bend the left top pins (3 of them) without noticing and was freaking out if I bricked my phone.
Fortunately, I could bend them back but I was in a lot of pain till I reassembled it.
-


For optimal performance, calibrate your newly installed battery after completing this guide.
Compare your new replacement part to the original part—you may need to transfer remaining components or remove adhesive backings from the new part before installing.
To reassemble your device, follow the above steps in reverse order.
Take your e-waste to an R2 or e-Stewards certified recycler.
Repair didn’t go as planned? Try some basic troubleshooting, or ask our Answers community for help.
İptal et: Bu kılavuzu tamamlamadım.
82 farklı kişi bu kılavuzu tamamladı.

41Kılavuz Yorumları
While this is an excellent guide, like the others here, I find the ending statement of "To reassemble your device, follow the above steps in reverse order." very much a throw you in the deep end type of scenario. Figuring out how to place the adhesives that come with the kit was very much a trial and error thing. They are not quite intuitive and I was unable to find any answers anywhere. In my first attempt, the two strips for the battery, are a mess. You never get a visual of how or where they are since you remove them by pulling tabs in Step 21.
Here's the deal with them. Two protective layers, a clear oversized layer on one side, and blue cut to the exact shape on the other. Both sides are sticky. Once you figure out the placement, apply the adhesives by peeling the clear protective layer first. Line it up and firmly press. When ready to adhere to the other side, the blue layer is removed by 2 tabs that are part of the layer. Pull 1 tab and carefully peel it away and it should come away in 1 or 2 pieces.
Very frustrating that a year and a half later the tutorial has not been fixed to include the information you've given, or any more information at all.
It's clear that this tutorial is not complete when multiple replies have had issues with vibration, screens, and other functions, along with pieces that got left out upon reassembly. I had better hopes for ifixit since they offer a complete kit and boast they have tutorials. I thought the experience would be higher quality.
lupa -
To put it back together I recommend watching Google Pixel 5 Battery Replacement from 5:46 onwards. This video as an accompaniment in general to this guide I found super helpful as it's an actual video of this repair.
Seeing someone actually perform this exact repair in realtime is very helpful as well as some techniques not mentioned in this guide.
I performed a screen and battery replacement with the help of this video so I really recommend watching it.
Clear instructions and photos. I would agree the 'do in reverse order' instruction is too vague. Thanks to Jesse for the clarifying information on the adhesives and to Marcel for the video link - both of these additional instructions helped immensely. New phone battery installed and phone is in working order!
I followed this guide and successfully changed the battery. Unfortunately, vibration seems to be not working anymore. What could I have done wrong? Did I damage something?
To keep you posted: I opened it again and apparently bent the contacts for the vibration motor in one corner of the main PCB. So be also careful here when removing the battery.
Julian -
There is a spacer between the midframe and the top of the phone that will fall out when the midframe is removed. This spacer is pictured at Google Pixel 5 Motherboard Replacement. When reassembling, first replace the midframe. Then, before screwing the midframe back down, use the tweezers to pinch the space together, compressing the foam in the middle, and slide it into place.
After changing the battery and putting the phone back together the proximity sensor showed that something was in front of it it all the time. Removing the display shows the sensor is still working. Is there any special trick?
Found the issue, lost the proximity sensor grommet.
did you get a new grommet? or find the old one? or is it still not working?
dan -
I had a good repair and everything works but i forgot the screen connector cover. Is it okay if it isn't in the phone?
It will function just fine, but that screen connector cover is to keep the screen connected in case of any jostling. So if you drop your phone it's less likely to disconnect the screen.
%#*@ I must have made an error, the new battery charges I think (it heats up and green light on wireless charger) but the screen is not displaying anything
I hear you. I mostly got it working--the screen mostly works, but it displays a vertical white (and some thin red and geen lines) in the center. It seems stable even when I re-seat the connector, so I'm thinking maybe my screen is broke.
Costano -
Where can I buy a battery for pixel 5 and be sure that it is original?Where can I buy a battery for pixel 5 and be sure that it is original?
Make sure all of the isopropyl is dry before reassembling. I was in a hurry, reassembled, and found condensation behind my rear camera glass. I had to take the glass off to let it out since the phone is mostly sealed up. Then you need to get the phone warm to try to evaporate out any moisture that may still be inside, otherwise the camera glass will fog if the phone gets warm. I used 70% isopropyl which might have been the issue.
Did that resolve the issue for you? Ive just done a quick test before sealing the screen and have the same issue
Como hago para adquirir una batería ,pero para enviarme a Ecuador ????
After replacement of the battery followig this guide, I cannot hear the caller when picking up the phone.
When switching to the main speaker it seems to work.
Obviously there is a speaker in the top part of the display, which does not work any more.
Any hints, how to fix that ?
I successfully installed the new battery per the instructions in this guide. However, my phone won't turn on. I can get the phone to go to the fast boot menu by holding volume down/power but that's all I can do. None of the options in that menu even do anything when I select them. My phone just turns back off. I reconnected my old battery and my phone turns on just fine. Is it possible I was sent a faulty battery replacement? What other explanation is there that my phone wouldn't boot up with a new battery?
I'm sorry to hear your phone is not running correctly. I'd suggest watching a full tear down and reassembly video on YouTube or a reputable tutorial site and see if you can pinpoint any missed connections or pinched components.
The reddit group r/mobilerepair is also a great resource and may be able to help you diagnose your problem.
lupa -
I am thankful this is not my first battery replacement because this guide is not for beginners. I commented above with specific info, but overall I've never seen a tutorial that gives an ok teardown and then just says to do the reverse.
Nothing about how to prep surfaces prior to putting things back. No warning about pinch points. No instructions on how to apply the new graphite stickers or the adhesive. I had a rubber piece fall out while I was taking the battery out. There was no clear diagram so I had to hunt to find a pic with the piece in it. It did end belonging where I thought it did, but a lot of times people in competent tutorials will point out all of the loose things that may come out. Nothing about how you clean the glass on the camera in case you accidentally got fuzz or smudges on it before you seal your phone back up. Nothing about safe handling of the display (copper sticker has some marks on it, I was hoping it didn't affect my display but not addressed. It seems ok so far). Disappointing.
This less a battery replacement guide and more of a battery removal guide as there no steps on how to apply the new battery and screen adhesives to actually complete the replacement. Many things may be end up being overlooked during the reassembly I think warrants at least a couple of tips.
For example, I managed to replace my battery successfully. It charges and the battery life is significantly improved. However, it appears I must have missed something when placing the screen back as the proximity sensor is now permanently triggered. I can see the flashing white dot where it's supposed to be, so it appears to be unobstructed but short of opening the phone again I don't really have a way to troubleshoot this. Does anyone have any ideas?
I may have to get another display adhesive before opening the phone again...
I did not open my phone but had this issue too, I would guess its the adhesive with the display having a gap in the top?
For me it will eventually work when I press down on the phones top (slightly left) a bit and it will for a second pretend like nothing is infront of it. Its strange
On reassembly, I missed the graphite tape installation. Will this be an issue?
Putting it back together I recommend watching Google Pixel 5 Battery Replacement from 5:46 onwards. This video as an accompaniment to this guide I found superhelpful as it's an actual video of this repair.
I don't get the comments about lack of reassembly instructions. Maybe it is due to the article being improved recently but I had no problems putting things back together using linked content such as: Google Pixel 5 Screen Adhesive Installation - iFixit Repair Guide
I'm frankly amazed that this does not include HALF the guide. I have a bunch of adhesive that I don't know what to do with, even following the OTHER guide that others recommended. If you're not an expert, do NOT buy this product. My phone starts up, but I have no way of knowing if it's reliable or will break or anything, because there is ZERO instructions to put it back together. 0/5 stars, would not recommend.
I followed through this guide today and the most tricky part was the removal of the battery. My phones battery was already inflated, so it loosened some of the glue that held the display in place. I didn't want to use too much force on the battery, but I finally got it out using one of the plastic cards that were supplied with the battery kit.
I found the reassembly part straight forward, but it's worth mentioning that:
a) you should try to remove left over parts from the glue strips around the display and the case carefully with alcohol. I used a few more of those little alcohol swabs.
b) if you paid attention during the disassembly part, it's really easy to figure out where all the adhesives go. For the battery you simply replace the two strips that where so hard to remove. For the display it is a template that only fits in on direction. If you look at the template, it has two markers in the opposite corners that fit exactly with the same markers on the phones frame. It was an easy fit if you ask me.
everything went well, followed a youtube video for guidance.. just forgot about the display cable bracket but its rather nonfunctional so i will keep it in storage if i absolutely need it.
I was able to get my battery perfectly replaced but it would be very useful to have some steps on how to apply the new adhesives. Also pay attention to the metal spacer at the top of the phone. I didn't push it in all the way and it damaged my display, green lines of dead pixels.
Grundsätzlich hat der Austausch gemäß Anleitung gut funktioniert.
Leider funktionieren nun die mobilen Daten nicht mehr. Kein Plan, wie oder was ich beschädigt habe.
Thank you for this guidance and the very fast supply with the replacement parts.
As my battery had already started inflating and kept inflating even further, I removed it immediately from the device. As Hendrik pointed out, also for me the glue for the display was already damaged by the inflated battery. For the battery itself, I needed some Isopropanol, but this worked pretty well when done with patience. Please take a close look at the detail pirctures to understand where the adhesive strips are located.
Personally, I did not have much trouble re-assembling the phone, please consider also the comment from Hendrik above. The adhesive strips are shaped in a way that one can easily figure out where to locate them. I peeled of the large protective layer, placed the strips on the battery, removed the blue layer, and placed the battery in the phone. For the display adhesive, I removed the large protective layer and placed the strip on the housing frame (the pin hole in the top right corner might help). (1/2)
(2/2) Then I removed the first blue protective layer, attached the display cable and the latch, removed the last blue protective layer and placed the display on the housing frame, applied light pressure around.
Most tricky part was to really get rid of all glue residues on housing frame and display to allow for good bonding.
Fabian -
I followed this guide to replace my battery - proved to be useful. However, after the performing the replacement, the microphone no longer works. After further testing, the microphone works when on speaker mode, but not when calls are taken via earpiece. Can I get suggestions on what I can do to check for the cause of the issues? Thanks.
Just finished this replacement this morning, here is my feedback.
1) The kit is really complete and nice!
2) The instructions need work, luckily there are YouTube videos on this
3) Having a heating pad is super helpful.
4) It's not hard but you can't have ADHD and get this done. It is careful work that needs your full attention.
5) You will spend 45-60min cleaning the existing glue off of the screen and body. Isopropyl Alcohol will be your friend.
6) Go to Walmart and by some pistol cleaning patches, they will help get the glue off.
7) Took me roughly 2hrs, with a lot of that time cleaning off the old glue.
8) Even before battery calibration this is an improvement.
PSA: When reconnection the screen (the little lego bracket) be freaking careful. I've connected brackets like these multiple times on other devices but here these pins are so f fragile. I bend the left top pins (3 of them) without noticing and was freaking out if I bricked my phone.
Fortunately, I could bend them back but I was in a lot of pain till I reassembled it.
Will it still be waterproof?
If you put the new adhesive on properly, it should still be waterproof. There are apps that use your phone's barometer to check if the seals are working.
It would be helpful to know for how long ally the heated pad
Yuri Deglin - Yanıt
Agreed, my friend from the past.
Albert Einstein -
If you click on the "iOpener" link, it tells you to heat it up for 30 seconds, and if you're using a microwave with a carousel, make sure it moves freely.
Azurina Schalk-Smith - Yanıt
How long do you think it would take with a hair dryer?
Gen L. - Yanıt
Don't have a microwave, so I boiled the kettle, left the iOpener in for 5 minutes and it was a good temperature to go. Doesn't need to be that hot to be effective
Rick - Yanıt
i damaged my digitizer using a hair dryer ugh
marco - Yanıt